Ripping PS2 Models
Posted: Thu Dec 21, 2017 2:58 am
Ripping PS2 Models; an update, original tutorial by https://www.vg-resource.com/thread-20541.html
I wanted to make an update about solving more odd problems when ripping PS2 models. (With images)
Rayman 2 ISO (Optional)
PCSX2 0.9.8 + PS2 Bios
Ninja Ripper
3DS Max 2009 & 3DS Max 2014 (Or current version)
Gimp + DDS Pulgin
Photoshop (Optional) + Photoshop DDS Plugin
In PCSX2, go to the, Config tab > Video (GS) > Plugin Settings

For ripping the models select the Renderer: Direct3D9 (Software)

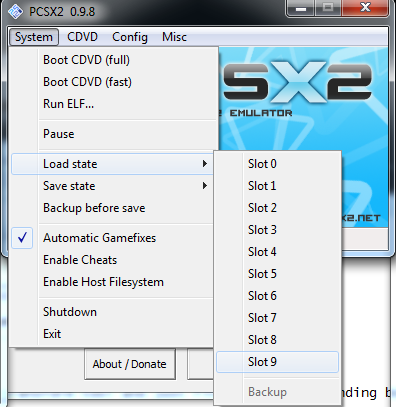
Now go to the part in the game where the model you want is, and press, Shift + F8
(Dont forget to save the state, we can go back and get the textures in a minute)

The *.OBJ is loacted at, C:\Users\%USERNAME%\Documents\PCSX2\snaps
In 3DS Max, import it and find the model you want.
The y-axis (somtimes the x-axis) is stretch, scale it along the y-axis down to about 22
After you have your model ready to export, go to the modifier panel and select, Normals, then, unify normals.


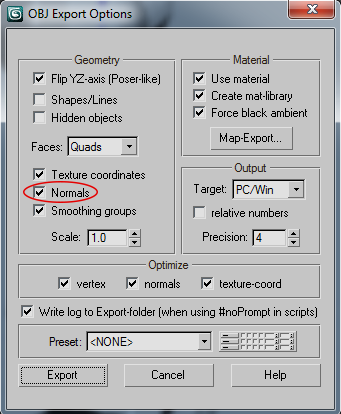
Export as .OBJ & under the Geometry section, select Normals.
You can now import to any version of Max or Maya.
Some faces might be backwards, we'll fix that later.
We need to go back and get the textures.
In PCSX2, go to the, Config tab > Video (GS) > Plugin Settings
For ripping the textures select the Renderer: Direct3D9 (Hardware)

Open Ninja Ripper, by default to capture textures the hotkey is, F11
You can change this in, settings. Set the output directory to where ever you want.
Now load your save state,
Once your at the area where you want the textures press, F11
We can view the ones we wants in Max's material editor.

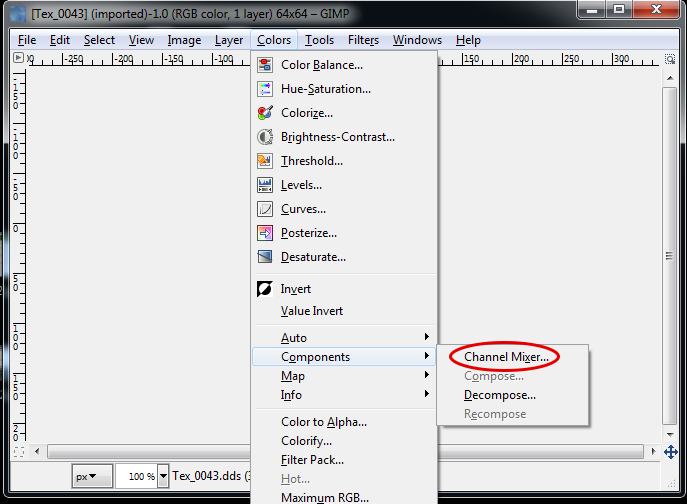
The textures are inverted, so we need to invert them.
In gimp go to the, colors tab and select channel mixer.
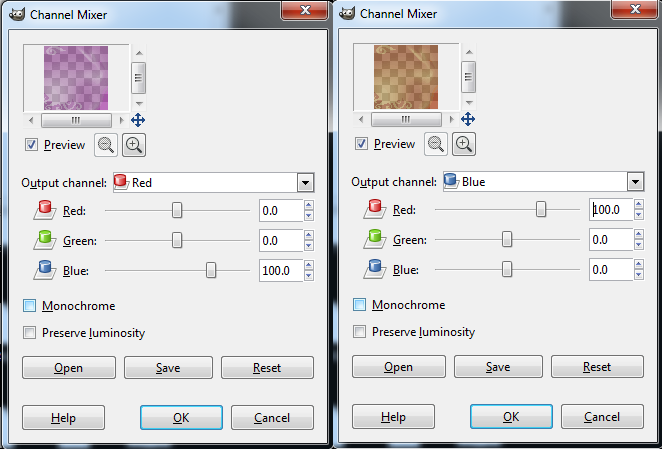
In the Red tab set, "Red" to 0.0 & "Blue" To 100.0
Now in the Blue tab set "Red to 100.0 & "Blue" to 0.0
Press, Ctrl + Shift + E
To export.
Now go to the modifier panel and select, Unwrap UVW.

Open UV Editor & zoom out. (Press Z to zoom completely out to the UV)
And now scale it down (a lot) so that the UV fits inside this square
Now, flip vertically.
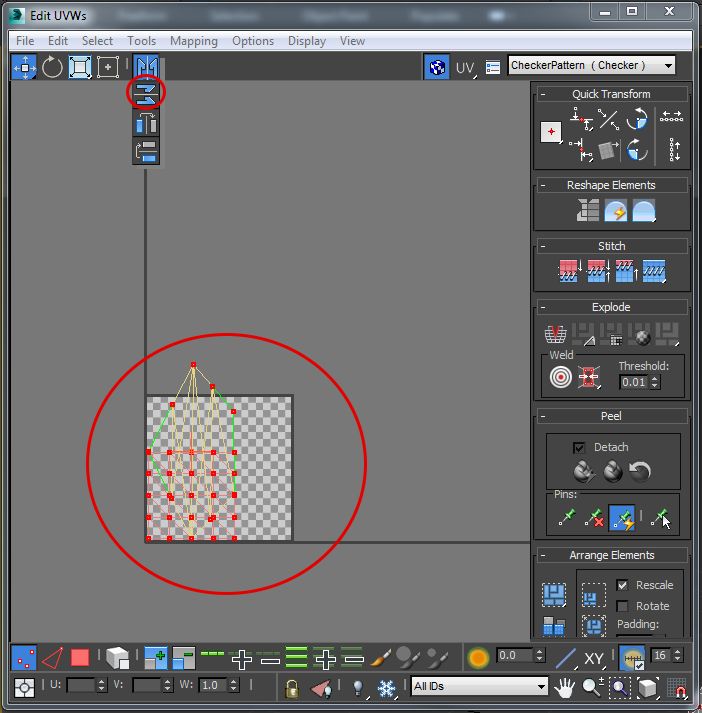
Most textures you can use the free form transform tool and just fit the orange bounding box around the square so the UV's are 1:1 with the games (This is for most models but not always.) (Hold shift and click and hold a corner to snap to the x or y axis)

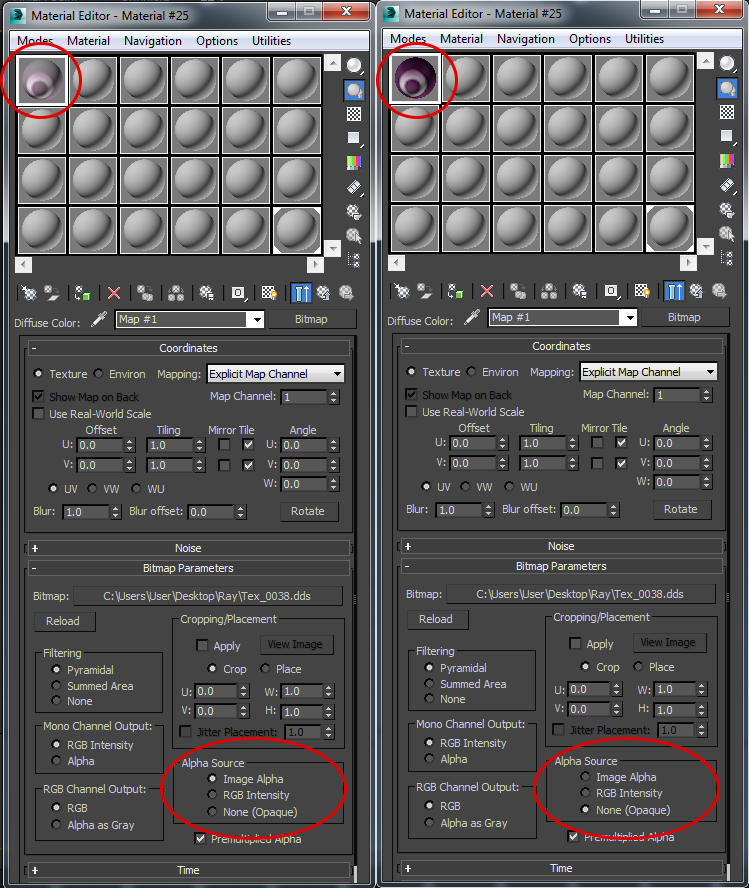
If your texture looks very saturated or bright this is because the alpha source needs to be change from, Image Alpha, to, None (Opaque)
Some textures, we need to make an opacity map. (I'm going to use Photoshop for this.)
In Photoshop use the, Quick Select Tool, and select all the pixels you want to keep.
Now select the brush tool, and paint all of it white.
Now inverse your selection, Ctrl + Shift + I
And paint the reset black. (Save it as a different material)
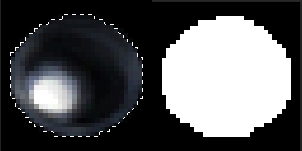
White = visble
Balck = invisible (wont be seen in viewport or while rendering)
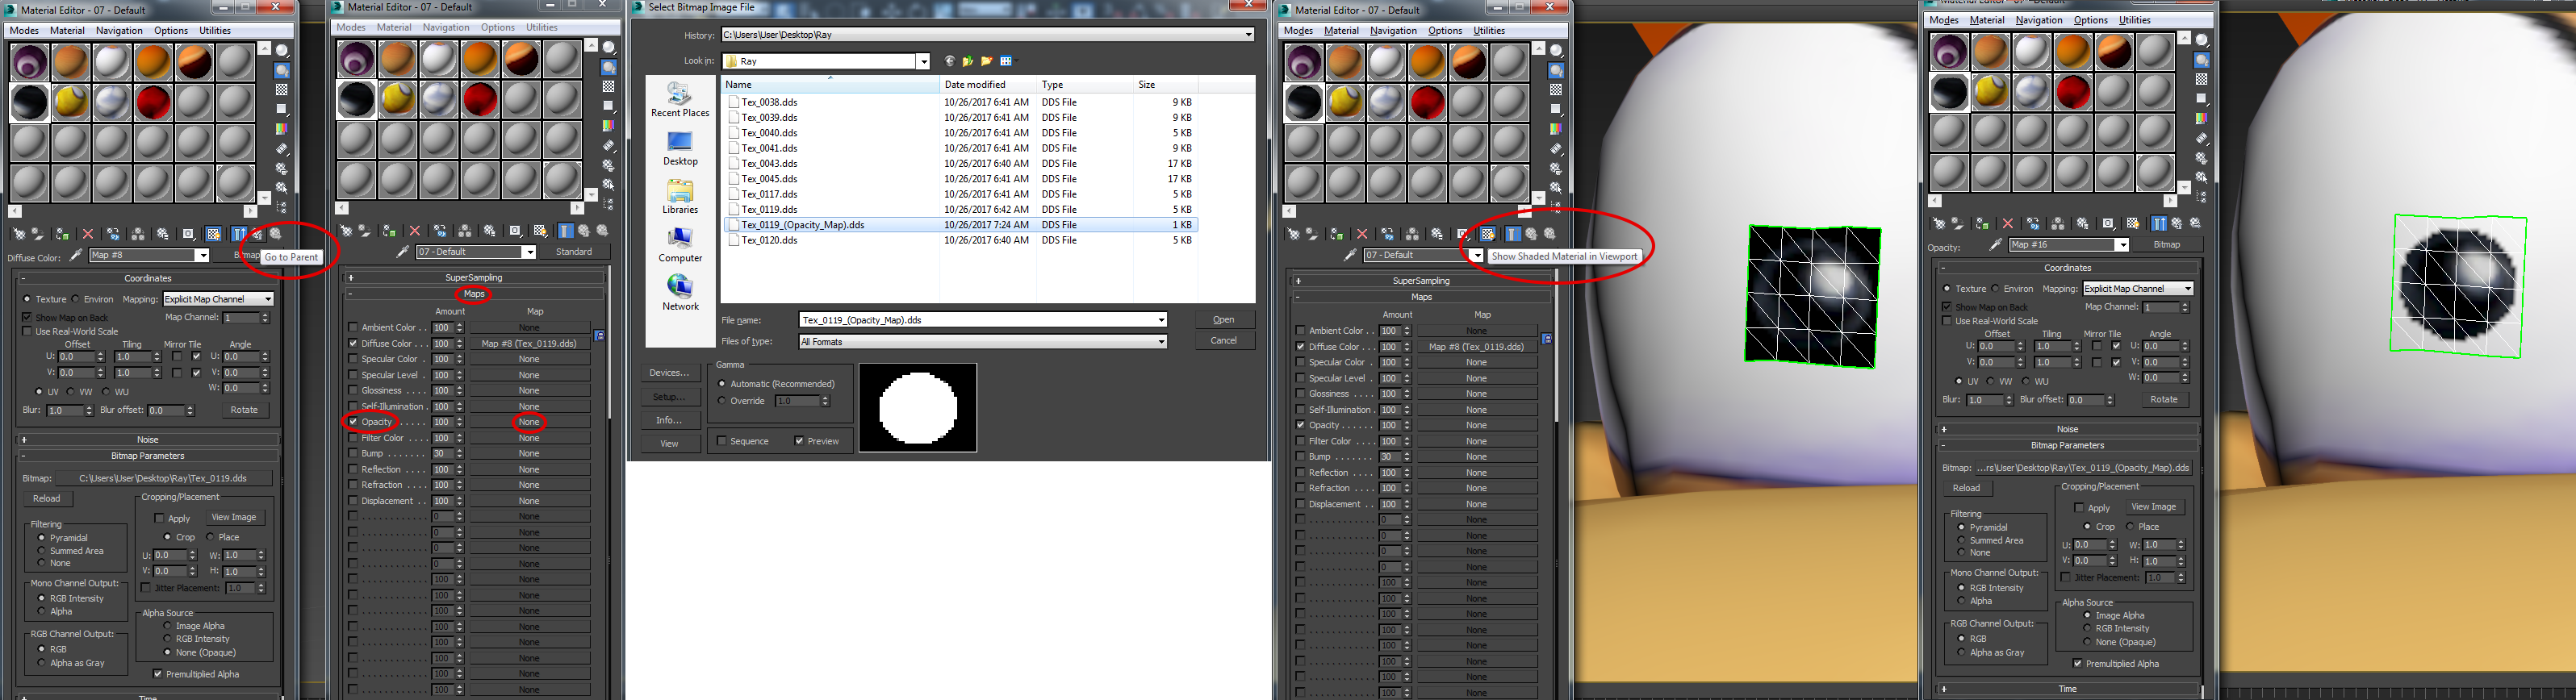
(If you want the opacity map to show in the viewport, check, Show Shaded material In Viewport. Do this before adding the opacity map)
In 3DS Max, go to the material editor and select the material that you want to be transparent. Then press, Go to Parent
Then go to, Maps
Select, Opacity, and then select, none
When you select non the material browser will pop up, choose, bitmap
And add the opacity map.
If you go to render and still see no polygons, press F10 (Render Setup) and check, Force 2-Sided

If any polygons look odd (wont smooth (not subdivide) or just wont weld, even if there's an open face to weld to.) Then the normals are backwards.
To see and flip them,
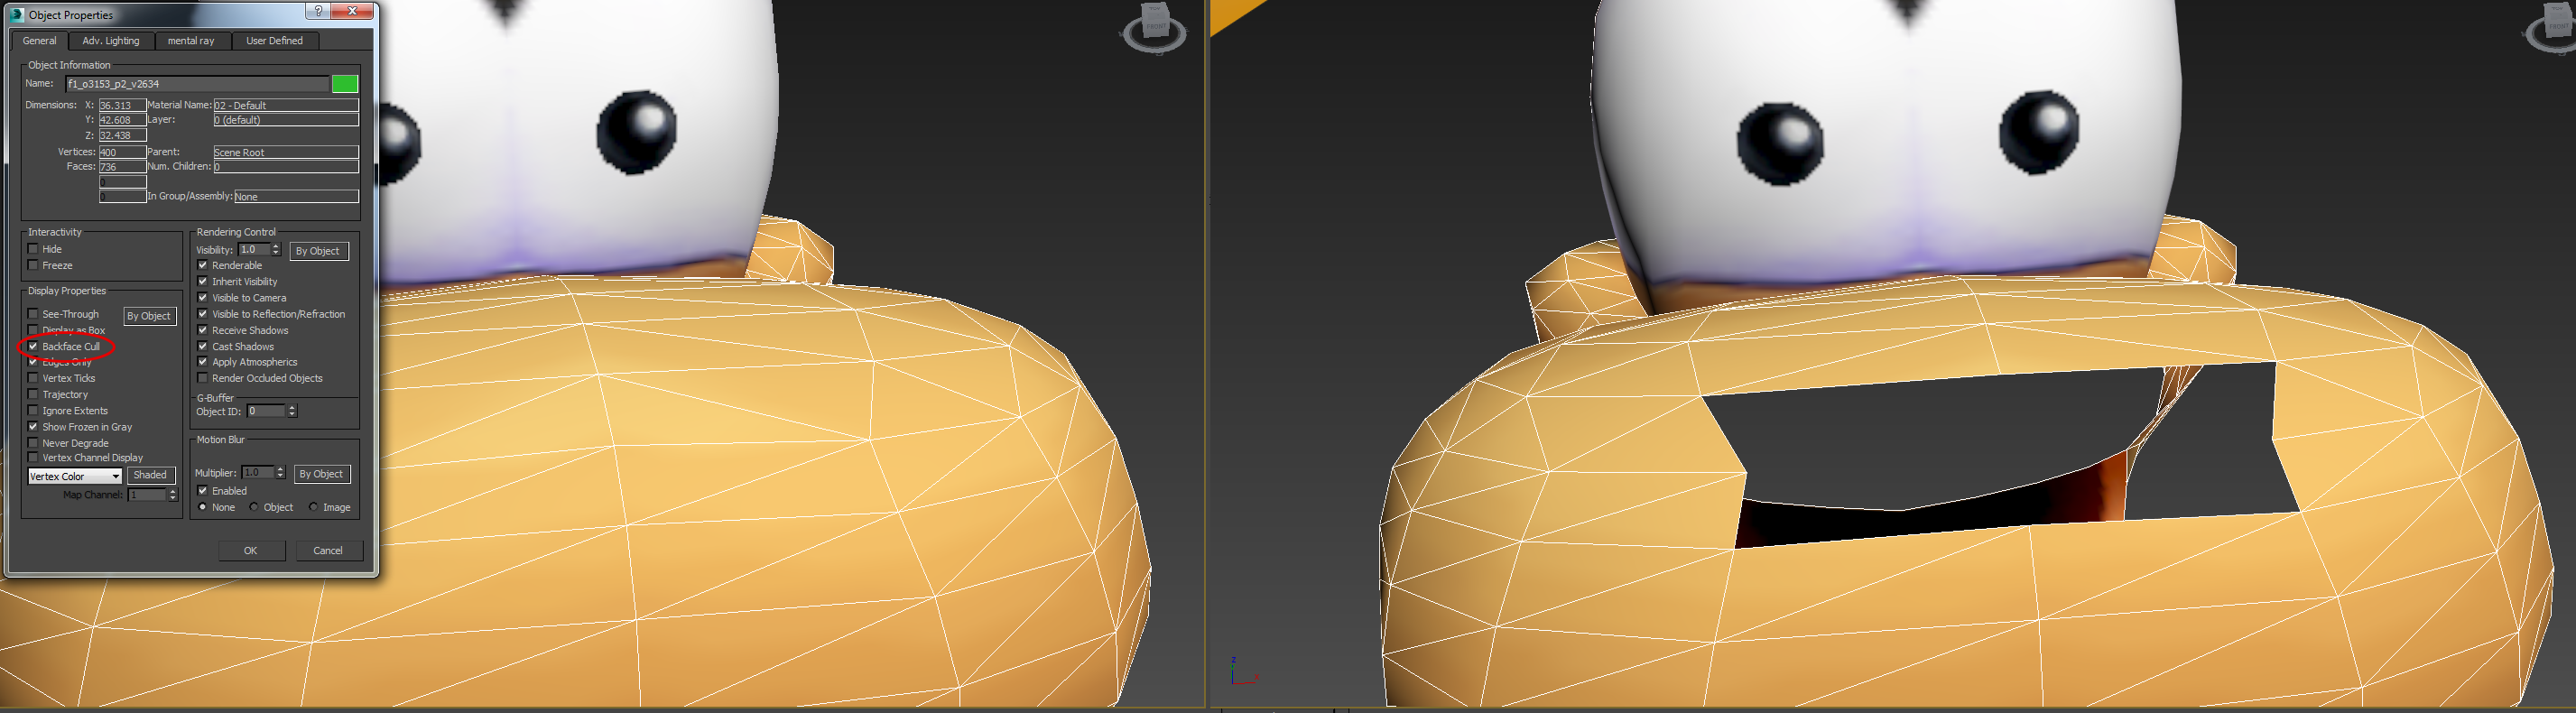
Right Click and select, Object Properties
Then select, Backface cull
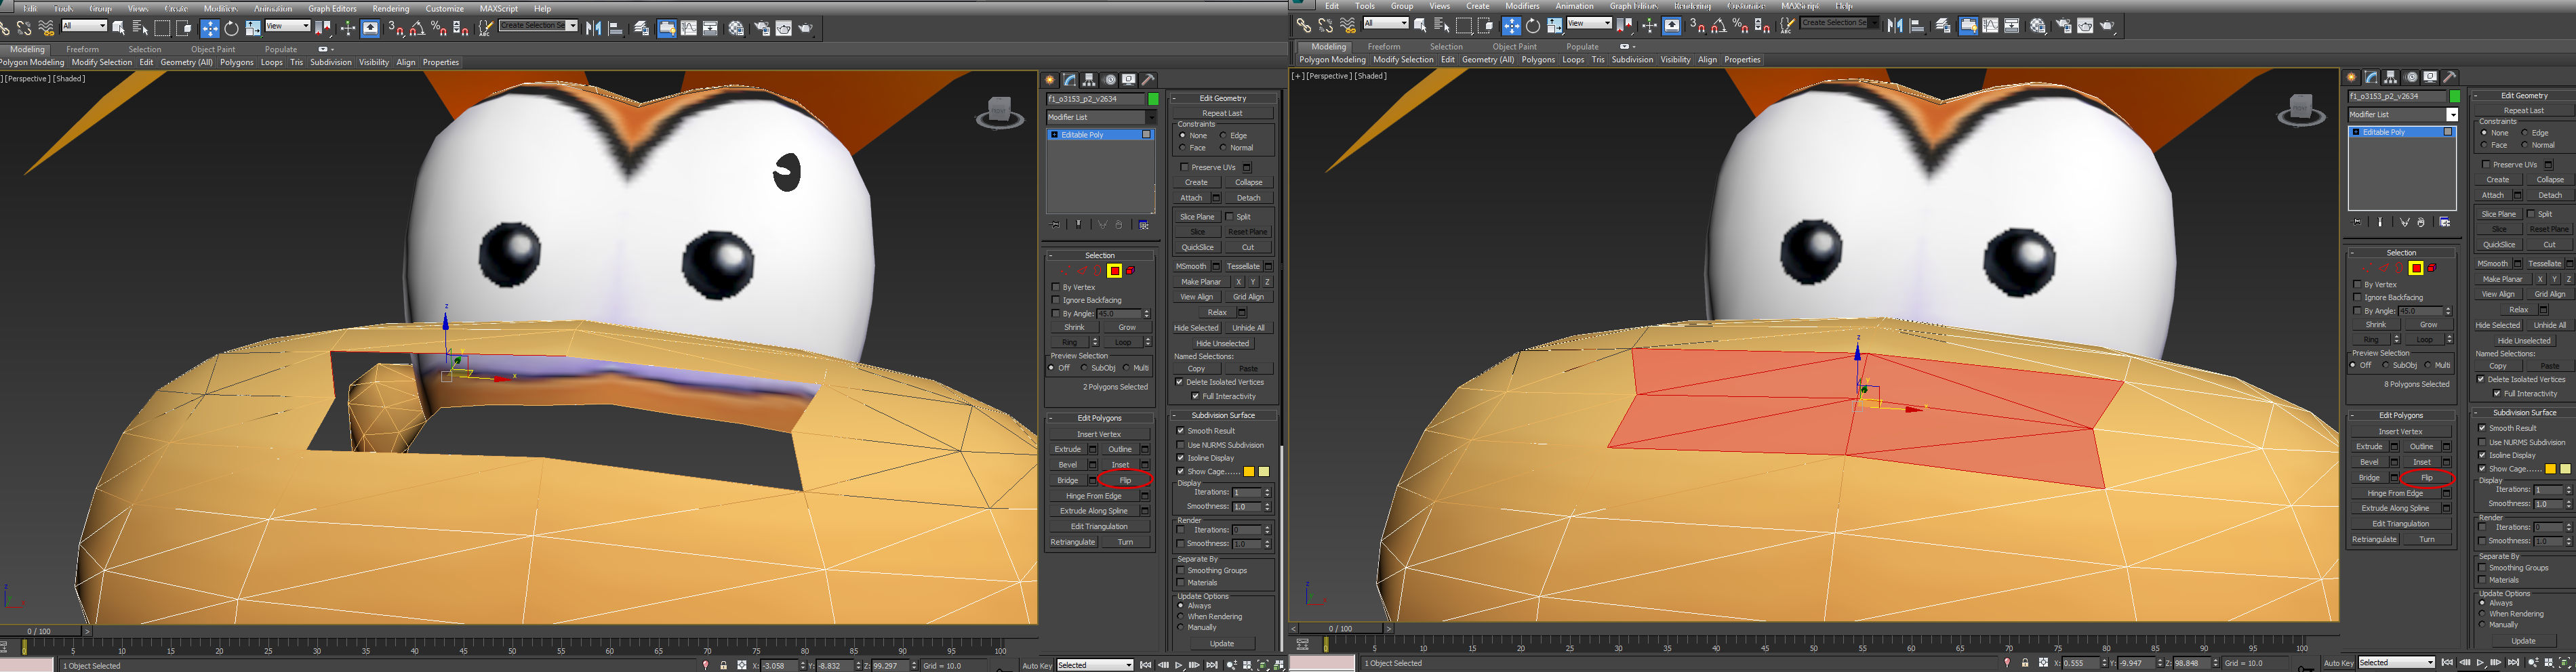
Right click and convert to Editable Poly.
Select polygon selection and select which faces are backwards.
In the, Edit Polygons panel, select, Flip.
You can now select all vertices and weld all overlapping vertices with a threshold of, 0.1
Or go to the, view tab > xView > select overlapping vertices and then weld.
To smooth, go to the modifier panel, and select Meshsmooth and set iterations to 0 (We don't need to subdivide just smooth)
If you have a mesh with a triangle (I'm not sure if these triangles are cause by, tessellation) that isn't there to hold volume, that's skewing the textures, just select the edge and press, Ctrl + Backspace
Special thanks to, Harpic fraîcheur!
I wanted to make an update about solving more odd problems when ripping PS2 models. (With images)
Rayman 2 ISO (Optional)
PCSX2 0.9.8 + PS2 Bios
Ninja Ripper
3DS Max 2009 & 3DS Max 2014 (Or current version)
Gimp + DDS Pulgin
Photoshop (Optional) + Photoshop DDS Plugin
In PCSX2, go to the, Config tab > Video (GS) > Plugin Settings
For ripping the models select the Renderer: Direct3D9 (Software)
Now go to the part in the game where the model you want is, and press, Shift + F8
(Dont forget to save the state, we can go back and get the textures in a minute)
The *.OBJ is loacted at, C:\Users\%USERNAME%\Documents\PCSX2\snaps
In 3DS Max, import it and find the model you want.
The y-axis (somtimes the x-axis) is stretch, scale it along the y-axis down to about 22
After you have your model ready to export, go to the modifier panel and select, Normals, then, unify normals.
Export as .OBJ & under the Geometry section, select Normals.
You can now import to any version of Max or Maya.
Some faces might be backwards, we'll fix that later.
We need to go back and get the textures.
In PCSX2, go to the, Config tab > Video (GS) > Plugin Settings
For ripping the textures select the Renderer: Direct3D9 (Hardware)
Open Ninja Ripper, by default to capture textures the hotkey is, F11
You can change this in, settings. Set the output directory to where ever you want.
Now load your save state,
Once your at the area where you want the textures press, F11
We can view the ones we wants in Max's material editor.
The textures are inverted, so we need to invert them.
In gimp go to the, colors tab and select channel mixer.
In the Red tab set, "Red" to 0.0 & "Blue" To 100.0
Now in the Blue tab set "Red to 100.0 & "Blue" to 0.0
Press, Ctrl + Shift + E
To export.
Now go to the modifier panel and select, Unwrap UVW.
Open UV Editor & zoom out. (Press Z to zoom completely out to the UV)
And now scale it down (a lot) so that the UV fits inside this square
Now, flip vertically.
Most textures you can use the free form transform tool and just fit the orange bounding box around the square so the UV's are 1:1 with the games (This is for most models but not always.) (Hold shift and click and hold a corner to snap to the x or y axis)
If your texture looks very saturated or bright this is because the alpha source needs to be change from, Image Alpha, to, None (Opaque)
Some textures, we need to make an opacity map. (I'm going to use Photoshop for this.)
In Photoshop use the, Quick Select Tool, and select all the pixels you want to keep.
Now select the brush tool, and paint all of it white.
Now inverse your selection, Ctrl + Shift + I
And paint the reset black. (Save it as a different material)
White = visble
Balck = invisible (wont be seen in viewport or while rendering)
(If you want the opacity map to show in the viewport, check, Show Shaded material In Viewport. Do this before adding the opacity map)
In 3DS Max, go to the material editor and select the material that you want to be transparent. Then press, Go to Parent
Then go to, Maps
Select, Opacity, and then select, none
When you select non the material browser will pop up, choose, bitmap
And add the opacity map.
If you go to render and still see no polygons, press F10 (Render Setup) and check, Force 2-Sided
If any polygons look odd (wont smooth (not subdivide) or just wont weld, even if there's an open face to weld to.) Then the normals are backwards.
To see and flip them,
Right Click and select, Object Properties
Then select, Backface cull
Right click and convert to Editable Poly.
Select polygon selection and select which faces are backwards.
In the, Edit Polygons panel, select, Flip.
You can now select all vertices and weld all overlapping vertices with a threshold of, 0.1
Or go to the, view tab > xView > select overlapping vertices and then weld.
To smooth, go to the modifier panel, and select Meshsmooth and set iterations to 0 (We don't need to subdivide just smooth)
If you have a mesh with a triangle (I'm not sure if these triangles are cause by, tessellation) that isn't there to hold volume, that's skewing the textures, just select the edge and press, Ctrl + Backspace
Special thanks to, Harpic fraîcheur!