The Control Room: Difference between revisions
RayGamer99 (talk | contribs) No edit summary |
Hunchman801 (talk | contribs) No edit summary |
||
| Line 3: | Line 3: | ||
{{RPSQuest | {{RPSQuest | ||
| name = The Control Room | | name = The Control Room | ||
| image = | | image = [[File:The Control Room.jpg|320px|The Control Room]] | ||
| quest type = Main quest | | quest type = Main quest | ||
| objectives = | | objectives = | ||
*Talk to the Phantom | *Talk to the Phantom | ||
* | *Defeat the Phantom! | ||
| rewards = | | rewards = None | ||
}} | }} | ||
| Line 14: | Line 14: | ||
==Meeting the Phantom== | ==Meeting the Phantom== | ||
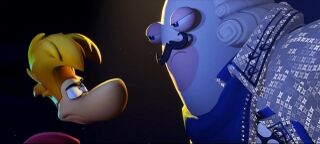
Once the heroes have cleared the three main quests [[The Western Set]], [[The Medieval Set]] and [[The Pirate Set]], and therefore restored the ratings of the [[Space Opera Network]], the [[Phantom]] congratulates them and asks the team to join him by the elevator in the [[Space Opera Network#Main TV Studio|Main TV Studio]]. [[Rayman]] shows wariness, but they nonetheless ascend to the [[Space Opera Network#Control Room|Control Room]], where the [[Phantom]] reveals his duplicity, explaining that he had been plotting his revenge the entire time and only manipulated the heroes into ridding the [[Space Opera Network]] of [[Darkmess]]. With the help of his newfound fame, as the studio is now number one in the galaxy, he intends to defeat the heroes as part of one last performance. | |||
==Spectral Swing== | ==Spectral Swing== | ||
''Main article: [[Spectral Swing]]'' | ''Main article: [[Spectral Swing]]'' | ||
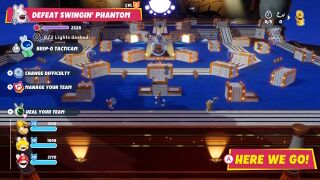
The [[Phantom]] begins by roasting [[Rayman]] through a diss track, called [[Phantom Returns]], in which he notably taunts him for having become irrelevant and fallen second to the [[Rabbid]]s. | |||
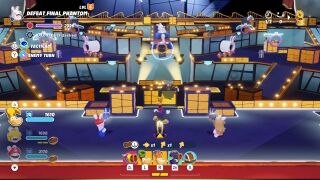
The battle then begins, pinning the heroes against the [[Phantom]] and many other enemies. In order to defeat him, they must destroy the spotlights that provide him with immunity, in a similar fashion to when he was first encountered. | |||
<gallery widths="320px" heights="180px"> | |||
Phantom Returns - Act 1 - Confronting Rayman.jpg|The [[Phantom]] confronting [[Rayman]] | |||
Phantom Returns - Act 1 - Rabbids cheering.jpg|[[Rabbid]]s cheering to the [[Phantom]], with [[Rabbid Peach]] getting carried away | |||
Spectral Swing.jpg|The beginning of the battle | |||
</gallery> | |||
==Burnin' Rock== | ==Burnin' Rock== | ||
''Main article: [[Burnin' Rock]]'' | ''Main article: [[Burnin' Rock]]'' | ||
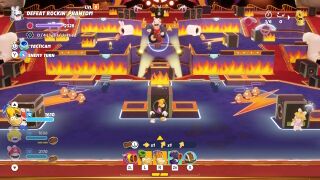
This battle is similar to the previous one, but with more spotlights to destroy and enemies with fire-based attacks. | |||
<gallery widths="320px" heights="180px"> | |||
Burnin' Rock.jpg|The beginning of the battle | |||
</gallery> | |||
==Operatic Showdown== | ==Operatic Showdown== | ||
''Main article: [[Operatic Showdown]]'' | ''Main article: [[Operatic Showdown]]'' | ||
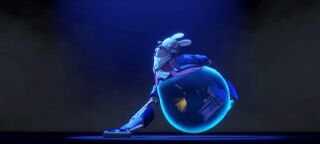
The final battle is preceded with the [[Phantom]] roasting all of the heroes through an operatic diss track, similarly to how he does in [[Spectral Swing#Prelude|the first phase]]. Once more, the heroes must first destroy the spotlights which provide the [[Phantom]] with immunity, after which they are able to finally defeat him, once and for all. | |||
<gallery widths="320px" heights="180px"> | |||
Phantom Returns - Act 3 - Confronting Beep-0.jpg|The [[Phantom]] confronting [[Beep-0]] | |||
Phantom Returns - Act 3 - Confronting Rabbids.jpg|The [[Phantom]] confronting [[Rabbid Mario]] and [[Rabbid Peach]] | |||
Operatic Showdown.jpg|The beginning of the battle | |||
</gallery> | |||
==Ending== | ==Ending== | ||
{{ | After the team has defeated the [[Phantom]], [[Beep-0]] claims that he was never fooled by their old enemy's promises, but this is quickly dismissed by [[Rabbid Mario]] who reminds him that he has already fallen for it once. [[Rayman]] then exclaims that it was nice to fight alongside [[Rabbid]]s for once. | ||
Having found a functioning warp portal, [[Rabbid Mario]] and [[Rabbid Peach]] decide to head back to Princess Peach's castle, having not found the actor career much to their liking, while [[Rayman]] chooses to stay for some time, explaining that the [[Rabbid]]s here at the [[Space Opera Network|studio]] are actually trying to do some good and simply need some supervision. | |||
[[Beep-0]] then goes on to thank [[Rayman]], promising him that he can count on them, should he need anything. Finally, the game ends with [[Rabbid Mario]] hugging [[Rayman]] and [[Rabbid Peach]] exchanging presents with him. In pictures shown after the credits, the presents are revealed to be a Mario cap with [[Rabbid]] ears, which [[Rayman]] is shown wearing, and a [[Rayman]] hoodie, which Mario is shown holding in his hands. | |||
<gallery widths="320px" heights="180px"> | |||
RPS Phantom playing dead.jpg|The [[Phantom]] playing dead | |||
RPS Ending.jpg|The DLC's ending | |||
RPS Post-credits scene.jpg|The presents revealed | |||
</gallery> | |||
{{Rayman in the Phantom Show}} | |||
[[Category:Quests from Rayman in the Phantom Show]] | [[Category:Quests from Rayman in the Phantom Show]] | ||
Revision as of 18:06, 23 September 2023
![]() This article is a stub, please share your knowledge by expanding it!
This article is a stub, please share your knowledge by expanding it!
| The Control Room | |
|---|---|

| |
| Quest type |
Main quest |
| Objectives |
|
| Rewards |
None |
The Control Room is the final main quest in Rayman in the Phantom Show, the third DLC of Mario + Rabbids Sparks of Hope.
Meeting the Phantom
Once the heroes have cleared the three main quests The Western Set, The Medieval Set and The Pirate Set, and therefore restored the ratings of the Space Opera Network, the Phantom congratulates them and asks the team to join him by the elevator in the Main TV Studio. Rayman shows wariness, but they nonetheless ascend to the Control Room, where the Phantom reveals his duplicity, explaining that he had been plotting his revenge the entire time and only manipulated the heroes into ridding the Space Opera Network of Darkmess. With the help of his newfound fame, as the studio is now number one in the galaxy, he intends to defeat the heroes as part of one last performance.
Spectral Swing
Main article: Spectral Swing
The Phantom begins by roasting Rayman through a diss track, called Phantom Returns, in which he notably taunts him for having become irrelevant and fallen second to the Rabbids.
The battle then begins, pinning the heroes against the Phantom and many other enemies. In order to defeat him, they must destroy the spotlights that provide him with immunity, in a similar fashion to when he was first encountered.
-
-

-
 The beginning of the battle


Burnin' Rock
Main article: Burnin' Rock
This battle is similar to the previous one, but with more spotlights to destroy and enemies with fire-based attacks.
-
 The beginning of the battle

Operatic Showdown
Main article: Operatic Showdown
The final battle is preceded with the Phantom roasting all of the heroes through an operatic diss track, similarly to how he does in the first phase. Once more, the heroes must first destroy the spotlights which provide the Phantom with immunity, after which they are able to finally defeat him, once and for all.
-
-

-
 The beginning of the battle


Ending
After the team has defeated the Phantom, Beep-0 claims that he was never fooled by their old enemy's promises, but this is quickly dismissed by Rabbid Mario who reminds him that he has already fallen for it once. Rayman then exclaims that it was nice to fight alongside Rabbids for once.
Having found a functioning warp portal, Rabbid Mario and Rabbid Peach decide to head back to Princess Peach's castle, having not found the actor career much to their liking, while Rayman chooses to stay for some time, explaining that the Rabbids here at the studio are actually trying to do some good and simply need some supervision.
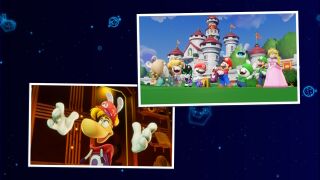
Beep-0 then goes on to thank Rayman, promising him that he can count on them, should he need anything. Finally, the game ends with Rabbid Mario hugging Rayman and Rabbid Peach exchanging presents with him. In pictures shown after the credits, the presents are revealed to be a Mario cap with Rabbid ears, which Rayman is shown wearing, and a Rayman hoodie, which Mario is shown holding in his hands.
-
 The Phantom playing dead
 -
 The DLC's ending
 -
 The presents revealed


