Shielded Hoodboom: Difference between revisions
Improvements |
Hunchman801 (talk | contribs) m clean up |
||
| Line 1: | Line 1: | ||
{{Enemy | {{Enemy | ||
| name = Shielded Hoodboom | | name = Shielded Hoodboom | ||
| image = [[File:R3GBA-HoodlumHideout-ShieldedHoodboom.PNG|center|class=sprite| | | image = [[File:R3GBA-HoodlumHideout-ShieldedHoodboom.PNG|center|class=sprite|Shielded Hoodboom]] | ||
| alignment = Bad | | alignment = Bad | ||
| species = [[Hoodlum]] | | species = [[Hoodlum]] | ||
| appears in = [[Rayman 3 (Game Boy Advance)|''Rayman 3'' (Game Boy Advance)]] | | appears in = [[Rayman 3 (Game Boy Advance)|''Rayman 3'' (Game Boy Advance)]] | ||
| location = [[Hoodlum Hideout]] | | location = [[Hoodlum Hideout]] | ||
| resistance = [[ | | resistance = [[File:Lifebar1.png|1 HP]] (wooden shield version) | ||
[[ | [[File:Lifebar2.png|2 HP]] (metal shield version) | ||
| attacks = [[Plum juice]] jug throw | | attacks = [[Plum juice]] jug throw | ||
}} | }} | ||
| Line 21: | Line 21: | ||
The most powerful variant of shielded [[Hoodboom]] can be found in the second part of [[Hoodlum Hideout]]. They carry reinforced metal shields that [[Rayman]] cannot destroy, and wear bright orange instead of red and green. As they block all of [[Rayman]]'s shots, a different approach is needed; [[Rayman]] must shoot the lower part of the [[Hoodlum]]'s torso to make it stop blocking its head or to hit the head first, attacking its torso when it is visible. [[Rayman]] must hit the [[Hoodlum]] twice anywhere in order for it to be defeated. There are only four of these in the whole game. | The most powerful variant of shielded [[Hoodboom]] can be found in the second part of [[Hoodlum Hideout]]. They carry reinforced metal shields that [[Rayman]] cannot destroy, and wear bright orange instead of red and green. As they block all of [[Rayman]]'s shots, a different approach is needed; [[Rayman]] must shoot the lower part of the [[Hoodlum]]'s torso to make it stop blocking its head or to hit the head first, attacking its torso when it is visible. [[Rayman]] must hit the [[Hoodlum]] twice anywhere in order for it to be defeated. There are only four of these in the whole game. | ||
<gallery | <gallery widths="240px" heights="160px" class="sprite"> | ||
R3GBA-HoodlumHideout-ShieldedHoodboom-MetalShield.PNG|Some Shielded Hoodbooms use metal shields. | R3GBA-HoodlumHideout-ShieldedHoodboom-MetalShield.PNG|Some Shielded Hoodbooms use metal shields. | ||
</gallery> | </gallery> | ||
Revision as of 19:43, 26 September 2023
| Shielded Hoodboom | ||
|---|---|---|
 | ||
| Alignment | Bad | |
| Appears in | Rayman 3 (Game Boy Advance) | |
| Location | Hoodlum Hideout | |
| Resistance |  (wooden shield version) (wooden shield version)
| |
| Attacks | Plum juice jug throw | |
| Species | Hoodlum | |

Shielded Hoodbooms are a variation of Hoodbooms found only in the Game Boy Advance version of Rayman 3, specifically in Hoodlum Hideout.
They wear an outfit very similar to that of the Grim Keepers, though with distinctive Hoodbooms' heads. They have a notable string of plum juice jugs around their bodies, as Hoodbooms do. They are much weaker than their regular counterparts, which is counterbalanced by the massive shields they carry around, made out of either wood or metal. When they are defeated, they seemingly melt into the ground.
Wooden shields
The weakest variety of shielded Hoodboom can only be found in the first part of Hoodlum Hideout. They carry flimsy, wooden shields that, unlike Grim Keepers', can be destroyed in two punches. Once the shield is destroyed, the hapless Hoodlum carries on throwing jugs of plum juice. With his shield gone, he needs only one hit to be defeated. There are only four of these in the game and are usually the first Hoodlums Rayman has to fight.
Metal shields
The most powerful variant of shielded Hoodboom can be found in the second part of Hoodlum Hideout. They carry reinforced metal shields that Rayman cannot destroy, and wear bright orange instead of red and green. As they block all of Rayman's shots, a different approach is needed; Rayman must shoot the lower part of the Hoodlum's torso to make it stop blocking its head or to hit the head first, attacking its torso when it is visible. Rayman must hit the Hoodlum twice anywhere in order for it to be defeated. There are only four of these in the whole game.
-
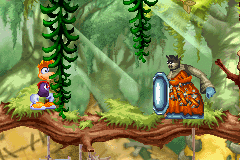 Some Shielded Hoodbooms use metal shields.

See also
| Hoodlums | ||||
|---|---|---|---|---|
| Hoodlums from Rayman 3 | ||||
| André • Black Lum • Hoodmonger • Slapdash • Hoodmonger Soldier • Hoodboom • Master Kaag • Stumbleboom • Spinneroo • Hoodstormer • Hoodlum airship • Grim Keeper • Grim • Hoodoo • Hoodmonger Officer • Heckler • Céloche • Lavomatrix • Hoodlum watercraft • Hoodloon • Hostess • Armaguiddon | ||||
| Hoodlums from Rayman 3 (Game Boy Advance) and Rayman: Hoodlums' Revenge | ||||
| Armoured Slapdash • Shielded Hoodboom • Scaleman • Armed Spinneroo • Helicopter bomb | ||||
| Scrapped Hoodlums | ||||
| Lav-O-Matic • Kagalpha • Conjoined Hoodlum • Kagoubinôme • Gunslinger Hoodlum | ||||