Master Kaag: Difference between revisions
Hunchman801 (talk | contribs) m Code clean-up, formatting and standardization |
|||
| (15 intermediate revisions by 8 users not shown) | |||
| Line 1: | Line 1: | ||
{{Enemy | {{Enemy | ||
| Name = Master Kaag | | Name = Master Kaag | ||
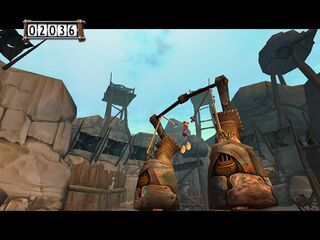
| image = [[File: | | image = [[File:Rayman 3 Master Kaag.png|250px|center|Master Kaag]] | ||
| alignment = Bad | | alignment = Bad | ||
| species = [[Hoodlum]] | | species = [[Hoodlum]] | ||
| appears in = ''[[Rayman 3 | | appears in = ''[[Rayman 3]]'' | ||
| location = [[Clearleaf Forest]] | | location = [[Clearleaf Forest]] | ||
| resistance = [[ | | resistance = [[File:Lifebar18.png|18 HP]]<ref>Master Kaag takes exactly three [[Shock Rocket]]s to defeat.</ref> | ||
| attacks = Jump | | attacks = Jump | ||
}} | }} | ||
{{ | {{Quote|text=An exceptionally gifted baby [[Hoodlum]] who transforms his toys into combat weapons. Here, we can admire what he's done to the frame of his swing. And while we're on the subject, please keep well away from areas near sandpits. The bomb disposal unit is still looking for five explosive pacifiers and three Molotov baby bottles.|sign=In-game description|source=''[[Rayman 3]]''}} | ||
{{ | {{Quote|text=The Hoodstomper is masterful indeed; a simple yet smashing war machine controlled by a small [[Hoodlum]] atop two destuctive [sic] stomping legs. The [[Hoodlum]]s are so thrilled with their precious powerhouse that they obsessively scrub it down in nearby ponds.|sign=Official description}} | ||
'''Master Kaag''' is a [[Hoodlum]] who serves as the first boss fought in ''[[Rayman 3 | '''Master Kaag''' is a [[Hoodlum]] who serves as the first boss fought in ''[[Rayman 3]]''. He is fought in the [[Clearleaf Forest]], the second of the game's nine levels. Master Kaag's name comes from the beta names of the [[Hoodlum]]s, Kagoulards (hence Master Kaag). | ||
==Description== | ==Description== | ||
Master Kaag is a | Master Kaag is a legless baby [[Hoodlum]], with the unique ability to transform his toys into combat weapons. He turned the frame of his swing into a huge bipedal stomping machine, known as the Hoodstomper,<ref>The name comes from [[Rayman 3: Hoodlum Havoc: Official Strategy Guide|the official strategy guide of ''Rayman 3'']].</ref> which he controls with his strong arms. His battle strategy consists of stomping around [[Clearleaf Stadium]] after [[Rayman]] in an attempt to squash him. He can also stomp and deactivate the [[switch]]es which [[Rayman]] must to hit three times for a [[Shock Rocket]], and the [[Shock Rocket]] canister itself. If three of the five [[switch]]es are activated, [[Rayman]] receives a [[Shock Rocket]] with which he may damage Master Kaag. The player is required to do this three times in order to defeat him (the third time, one [[Slapdash]] appears on each [[switch]]). Once the controlling [[Hoodlum]] has been taken out with [[Shock Rocket]]s, he is defeated and turned into a [[Black Lum]], and [[Rayman]] must now mount the stomping machine and use it to fight a small army of [[Hoodmonger Soldier]]s. | ||
As of ''[[ | |||
As of ''[[Rayman 3]]'', the [[Hoodlum]] bomb disposal unit is still searching for five explosive pacifiers and three Molotov baby bottles which have been lost in Master Kaag's sandpits. | |||
<gallery widths="320px" heights="240px"> | |||
RaymanFightsMasterKaag.jpg|Master Kaag. | |||
RaymanUsingMasterKaag.jpg|[[Rayman]] climbs into Master Kaag's Hoodstomper machine. | |||
</gallery> | |||
==Notes== | ==Notes== | ||
<references /> | <references/> | ||
{{R3characters}} | {{R3characters|collapsed=Y}} | ||
{{Hoodlums}} | {{Hoodlums|collapsed=Y}} | ||
[[fr:Master Kaag]] | [[fr:Master Kaag]] | ||
[[pl:Hood Stomper]] | |||
[[es:Master Kaag]] | |||
[[ru:Мастер Кааг]] | |||
[[Category: Bosses from Rayman 3]] | [[Category:Bosses from Rayman 3]] | ||
[[Category: Hoodlums]] | [[Category:Hoodlums]] | ||
[[Category: Vehicles]] | [[Category:Vehicles]] | ||
Latest revision as of 11:11, 11 July 2026
| Master Kaag | ||
|---|---|---|
 | ||
| Alignment | Bad | |
| Appears in | Rayman 3 | |
| Location | Clearleaf Forest | |
| Resistance | ||
| Attacks | Jump | |
| Species | Hoodlum | |
An exceptionally gifted baby Hoodlum who transforms his toys into combat weapons. Here, we can admire what he's done to the frame of his swing. And while we're on the subject, please keep well away from areas near sandpits. The bomb disposal unit is still looking for five explosive pacifiers and three Molotov baby bottles.—In-game description, Rayman 3
The Hoodstomper is masterful indeed; a simple yet smashing war machine controlled by a small Hoodlum atop two destuctive [sic] stomping legs. The Hoodlums are so thrilled with their precious powerhouse that they obsessively scrub it down in nearby ponds.—Official description
Master Kaag is a Hoodlum who serves as the first boss fought in Rayman 3. He is fought in the Clearleaf Forest, the second of the game's nine levels. Master Kaag's name comes from the beta names of the Hoodlums, Kagoulards (hence Master Kaag).
Description
Master Kaag is a legless baby Hoodlum, with the unique ability to transform his toys into combat weapons. He turned the frame of his swing into a huge bipedal stomping machine, known as the Hoodstomper,[2] which he controls with his strong arms. His battle strategy consists of stomping around Clearleaf Stadium after Rayman in an attempt to squash him. He can also stomp and deactivate the switches which Rayman must to hit three times for a Shock Rocket, and the Shock Rocket canister itself. If three of the five switches are activated, Rayman receives a Shock Rocket with which he may damage Master Kaag. The player is required to do this three times in order to defeat him (the third time, one Slapdash appears on each switch). Once the controlling Hoodlum has been taken out with Shock Rockets, he is defeated and turned into a Black Lum, and Rayman must now mount the stomping machine and use it to fight a small army of Hoodmonger Soldiers.
As of Rayman 3, the Hoodlum bomb disposal unit is still searching for five explosive pacifiers and three Molotov baby bottles which have been lost in Master Kaag's sandpits.
-
 Master Kaag.
 -
 Rayman climbs into Master Kaag's Hoodstomper machine.


Notes
- ↑ Master Kaag takes exactly three Shock Rockets to defeat.
- ↑ The name comes from the official strategy guide of Rayman 3.
| Characters from Rayman 3 | ||||
|---|---|---|---|---|
| Friends from Rayman 3 | ||||
| Rayman • Globox • Murfy • Grand Minimus • Otto Psi • Roméo Patti • Gumsi • Art Rytus | ||||
| Bosses from Rayman 3 | ||||
| Master Kaag • Bégoniax • Count Razoff • Céloche • Reflux • Horrible Machine • André | ||||
| Hoodlums | ||||
|---|---|---|---|---|
| Hoodlums from Rayman 3 | ||||
| André • Black Lum • Hoodmonger • Slapdash • Hoodmonger Soldier • Hoodboom • Master Kaag • Stumbleboom • Spinneroo • Hoodstormer • Hoodlum airship • Grim Keeper • Grim • Hoodoo • Hoodmonger Officer • Heckler • Céloche • Lavomatrix • Hoodlum watercraft • Hoodloon • Hostess • Armaguiddon | ||||
| Hoodlums from Rayman 3 (Game Boy Advance) and Rayman: Hoodlums' Revenge | ||||
| Armoured Slapdash • Shielded Hoodboom • Scaleman • Armed Spinneroo • Helicopter bomb | ||||
| Scrapped Hoodlums | ||||
| Lav-O-Matic • Kagalpha • Conjoined Hoodlum • Kagoubinôme • Gunslinger Hoodlum | ||||