Hoodmonger Officer: Difference between revisions
Jump to navigation
Jump to search
No edit summary |
No edit summary |
||
| Line 4: | Line 4: | ||
| alignment = Bad | | alignment = Bad | ||
| species = [[Hoodlum]] | | species = [[Hoodlum]] | ||
| appears in = ''[[Rayman 3 | | appears in = ''[[Rayman 3]]'' | ||
| location = [[The Land of the Livid Dead (Rayman 3)|The Land of the Livid Dead]], [[the Desert of the Knaaren]], [[the Summit Beyond the Clouds]], [[Hoodlum Headquarters]], [[the Tower of the Leptys]] | | location = [[The Land of the Livid Dead (Rayman 3)|The Land of the Livid Dead]], [[the Desert of the Knaaren]], [[the Summit Beyond the Clouds]], [[Hoodlum Headquarters]], [[the Tower of the Leptys]] | ||
| resistance = [[Image:Lifebar6.png|''6 HP'']] | | resistance = [[Image:Lifebar6.png|''6 HP'']] | ||
| Line 10: | Line 10: | ||
}} | }} | ||
{{quote|text=A high-ranking officer who well deserves his status: very few [[Hoodlum]]s have received so many decorations.|sign=In-game description|source=''[[Rayman 3 | {{quote|text=A high-ranking officer who well deserves his status: very few [[Hoodlum]]s have received so many decorations.|sign=In-game description|source=''[[Rayman 3]]''}} | ||
'''Hoodmonger Officers''', also known as '''Elite Mongers'''<ref>The name comes from [[Rayman 3: Hoodlum Havoc: Official Strategy Guide|the official strategy guide of ''Rayman 3'']].</ref>, are a variety of [[Hoodlum]] enemies encountered in ''[[Rayman 3 | '''Hoodmonger Officers''', also known as '''Elite Mongers'''<ref>The name comes from [[Rayman 3: Hoodlum Havoc: Official Strategy Guide|the official strategy guide of ''Rayman 3'']].</ref>, are a variety of [[Hoodlum]] enemies encountered in ''[[Rayman 3]]''. | ||
Hoodmonger Officers look almost exactly the same as standard [[Hoodmonger]]s, except that rather than being brown, their uniforms are red and blue, with a yellow crest on the front. They can take twice as much damage before dying as regular Hoodmongers, and can shoot three shots at once from their guns, whereas regular Hoodmongers can only shoot one. The only Hoodmonger Officer in the game that shoots one bullet at a time can be found in the second part of [[the Tower of the Leptys]], on a [[balloon]] above a pit of lava. | Hoodmonger Officers look almost exactly the same as standard [[Hoodmonger]]s, except that rather than being brown, their uniforms are red and blue, with a yellow crest on the front. They can take twice as much damage before dying as regular Hoodmongers, and can shoot three shots at once from their guns, whereas regular Hoodmongers can only shoot one. The only Hoodmonger Officer in the game that shoots one bullet at a time can be found in the second part of [[the Tower of the Leptys]], on a [[balloon]] above a pit of lava. | ||
Revision as of 19:28, 23 September 2017
| Hoodmonger Officer | ||
|---|---|---|
 | ||
| Alignment | Bad | |
| Appears in | Rayman 3 | |
| Location | The Land of the Livid Dead, the Desert of the Knaaren, the Summit Beyond the Clouds, Hoodlum Headquarters, the Tower of the Leptys | |
| Resistance | 
| |
| Attacks | Triple gunshot | |
| Species | Hoodlum | |
A high-ranking officer who well deserves his status: very few Hoodlums have received so many decorations.—In-game description, Rayman 3
Hoodmonger Officers, also known as Elite Mongers[1], are a variety of Hoodlum enemies encountered in Rayman 3.
Hoodmonger Officers look almost exactly the same as standard Hoodmongers, except that rather than being brown, their uniforms are red and blue, with a yellow crest on the front. They can take twice as much damage before dying as regular Hoodmongers, and can shoot three shots at once from their guns, whereas regular Hoodmongers can only shoot one. The only Hoodmonger Officer in the game that shoots one bullet at a time can be found in the second part of the Tower of the Leptys, on a balloon above a pit of lava.
-
 A Hoodmonger Officer firing his gun.
 -
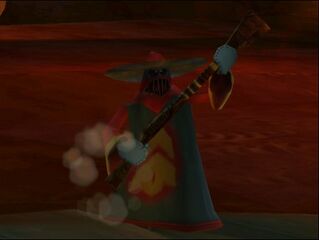 The Hoodmonger Officer from the Desert of the Knaaren.


References
- ↑ The name comes from the official strategy guide of Rayman 3.
| Hoodlums | ||||
|---|---|---|---|---|
| Hoodlums from Rayman 3 | ||||
| André • Black Lum • Hoodmonger • Slapdash • Hoodmonger Soldier • Hoodboom • Master Kaag • Stumbleboom • Spinneroo • Hoodstormer • Hoodlum airship • Grim Keeper • Grim • Hoodoo • Hoodmonger Officer • Heckler • Céloche • Lavomatrix • Hoodlum watercraft • Hoodloon • Hostess • Armaguiddon | ||||
| Hoodlums from Rayman 3 (Game Boy Advance) and Rayman: Hoodlums' Revenge | ||||
| Armoured Slapdash • Shielded Hoodboom • Scaleman • Armed Spinneroo • Helicopter bomb | ||||
| Scrapped Hoodlums | ||||
| Lav-O-Matic • Kagalpha • Conjoined Hoodlum • Kagoubinôme • Gunslinger Hoodlum | ||||
| Enemies from Rayman 3 | ||||
|---|---|---|---|---|
| Hoodlums • Knaaren • Muddibog • Nettle • Ninja Crab • Piranha • Podocrock • Zombie Chicken | ||||