Boss Biditank: Difference between revisions
Boomboleros7 (talk | contribs) No edit summary |
Improvements and added links |
||
| Line 6: | Line 6: | ||
| appears in = ''[[Rayman Revolution]]'' | | appears in = ''[[Rayman Revolution]]'' | ||
| location = [[Pirate Factory]] | | location = [[Pirate Factory]] | ||
| resistance = Three shots from the laser cannon | | resistance = Three shots from the [[laser]] cannon | ||
| attacks = Electrical discharge, [[helicopter bomb]]s, energy balls | | attacks = Electrical discharge, [[helicopter bomb]]s, energy balls | ||
}} | }} | ||
| Line 15: | Line 15: | ||
==Description== | ==Description== | ||
The Boss Biditank is an experimental tank resembling a giant barrel or [[Barrel Pirate]]. The machine has three wheels and an eye-hole for the [[Spyglass Pirate]] to peer out from. Its primary attack is a cannon at the front of the machine, which fires a round of small shots (similar to those used by [[green Henchman 800]]s). Its sides also open up and release two [[helicopter bomb]]s, but only when there are none chasing [[Rayman]]. At times, it shakes violently and releases electrical discharges; it is firing up a powerful laser beam that always hits unless Rayman is hiding behind something. Mounted on top of it is a mechanical eye, which is its only vulnerable spot, which can only be hit by the high-firepower laser gun at the back of the room. | The Boss Biditank is an experimental tank resembling a giant barrel or [[Barrel Pirate]]. The machine has three wheels and an eye-hole for the [[Spyglass Pirate]] to peer out from. Its primary attack is a cannon at the front of the machine, which fires a round of small shots (similar to those used by [[green Henchman 800]]s). Its sides also open up and release two [[helicopter bomb]]s, but only when there are none chasing [[Rayman]]. At times, it shakes violently and releases electrical discharges; it is firing up a powerful [[laser]] beam that always hits unless [[Rayman]] is hiding behind something. Mounted on top of it is a mechanical eye, which is its only vulnerable spot, which can only be hit by the high-firepower [[laser]] gun at the back of the room. | ||
== | ==In ''[[Rayman Revolution]]''== | ||
The Boss Biditank was to be tested out [[Bimbette]], one of [[Globox]]'s [[Baby Globox|daughters]], before [[Rayman]] arrives in the [[Pirate Factory]] and frees her from her [[cage]]. The Boss Biditank is quick to arrive, however, and is piloted by the [[Spyglass Pirate]]. To defeat the Biditank, [[Rayman]] must step on the four [[switch]]es controlling the four [[generator]]s at the four corners of the large room while avoiding the Biditank's attacks. Once the four [[generator]]s have been activated, the [[laser]] turret at the back of the room becomes operational. While [[Rayman]] is using the turret, a door on the back of the Boss Biditank opens, and the [[Spyglass Pirate]] emerges. [[Rayman]] cannot harm him, either with the [[laser]] or his [[magic fist]]. If [[Rayman]] approaches the [[Spyglass Pirate]] or his Biditank, the [[Spyglass Pirate]] produces [[helicopter bomb]]s and begins to throw them at him. If [[Rayman]] successfully hits the Boss Biditank's weak spot with the [[laser]], the Biditank will be damaged, losing one third of its health. [[Rayman]] must return to the [[generator]]s to power up the [[laser]] and use it again. It takes three hits to destroy the Boss Biditank, after which its wheels and weak point fall off. The [[Spyglass Pirate]] then runs out, declaring "[[Technical Check-Up|I'll be back]]" as a ladder descends, allowing [[Rayman]] entry to [[The Sanctuary of Rock and Lava#PlayStation 2 version|the Lava Sanctuary]] and [[Beneath the Sanctuary of Rock and Lava#PlayStation 2 version|beneath it]]. | |||
<gallery widths="320px" heights="240px"> | |||
Biditank.png|The Boss Biditank during its battle with [[Rayman]]. | |||
Biditank(electric attack).jpg|The Boss Biditank's electric attack. | |||
FlyingBombBiditank.jpg|The Boss Biditank dispatching [[flying bomb]]s. | |||
</gallery> | |||
==See also== | ==See also== | ||
| Line 36: | Line 33: | ||
*[http://www.youtube.com/watch?v=a5aOQE9Mvqc The Boss Biditank battle (''Rayman Revolution'')] | *[http://www.youtube.com/watch?v=a5aOQE9Mvqc The Boss Biditank battle (''Rayman Revolution'')] | ||
{{Robo-Pirates}} | {{Robo-Pirates|collapsed=Y}} | ||
{{R2characters}} | {{R2characters|collapsed=Y}} | ||
[[fr:Boss Biditank]] | [[fr:Boss Biditank]] | ||
[[pl:Biditank]] | [[pl:Biditank]] | ||
[[Category: Bosses from Rayman 2]] | [[Category:Bosses from Rayman 2]] | ||
[[Category: Robo-Pirates]] | [[Category:Robo-Pirates]] | ||
[[Category: Vehicles]] | [[Category:Vehicles]] | ||
Revision as of 18:45, 19 May 2018
| Boss Biditank | ||
|---|---|---|
 | ||
| Alignment | Bad | |
| Appears in | Rayman Revolution | |
| Location | Pirate Factory | |
| Resistance | Three shots from the laser cannon | |
| Attacks | Electrical discharge, helicopter bombs, energy balls | |
| Species | Robo-Pirate | |
I'm going to take care of this pile of junk...—Rayman, before the fight with Boss Biditank, Rayman Revolution
Boss Biditank (Poubelus Agrovis), referred to as just Biditank by Bimbette, is a mechanical boss piloted by the Spyglass Pirate. It appears only in Rayman Revolution, where it is fought in the Pirate Factory.
Description
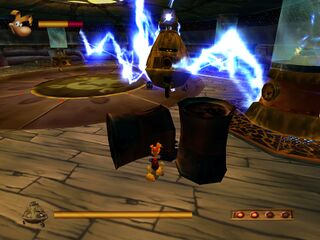
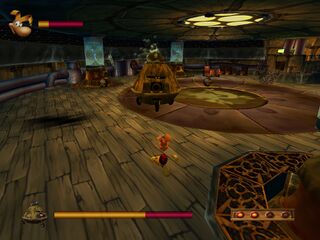
The Boss Biditank is an experimental tank resembling a giant barrel or Barrel Pirate. The machine has three wheels and an eye-hole for the Spyglass Pirate to peer out from. Its primary attack is a cannon at the front of the machine, which fires a round of small shots (similar to those used by green Henchman 800s). Its sides also open up and release two helicopter bombs, but only when there are none chasing Rayman. At times, it shakes violently and releases electrical discharges; it is firing up a powerful laser beam that always hits unless Rayman is hiding behind something. Mounted on top of it is a mechanical eye, which is its only vulnerable spot, which can only be hit by the high-firepower laser gun at the back of the room.
In Rayman Revolution
The Boss Biditank was to be tested out Bimbette, one of Globox's daughters, before Rayman arrives in the Pirate Factory and frees her from her cage. The Boss Biditank is quick to arrive, however, and is piloted by the Spyglass Pirate. To defeat the Biditank, Rayman must step on the four switches controlling the four generators at the four corners of the large room while avoiding the Biditank's attacks. Once the four generators have been activated, the laser turret at the back of the room becomes operational. While Rayman is using the turret, a door on the back of the Boss Biditank opens, and the Spyglass Pirate emerges. Rayman cannot harm him, either with the laser or his magic fist. If Rayman approaches the Spyglass Pirate or his Biditank, the Spyglass Pirate produces helicopter bombs and begins to throw them at him. If Rayman successfully hits the Boss Biditank's weak spot with the laser, the Biditank will be damaged, losing one third of its health. Rayman must return to the generators to power up the laser and use it again. It takes three hits to destroy the Boss Biditank, after which its wheels and weak point fall off. The Spyglass Pirate then runs out, declaring "I'll be back" as a ladder descends, allowing Rayman entry to the Lava Sanctuary and beneath it.
-
 The Boss Biditank during its battle with Rayman.
 -
 The Boss Biditank's electric attack.
 -
 The Boss Biditank dispatching flying bombs.

.jpg)

See also
External links
| Robo-Pirate army | ||||
|---|---|---|---|---|
| Unique Robo-Pirates | ||||
| Admiral Razorbeard • Spyglass Pirate • Ninjaws • Boss Biditank • Robot Dinosaur • Grolgoth • Razorwife • Henchman 1000 | ||||
| Generic Robo-Pirates | ||||
| Henchmen 800 • Gorilla Pirates • Warships • Barrel Pirates • Ninja Henchmen • List of Robo-Pirates in Rayman 2 | ||||
| Henchman 800 models | ||||
| Red Henchman 800 • Green Henchman 800 • Purple Henchman 800 • Yellow Henchman 800 • Zombie Henchman 800 • Grey-brown Henchman 800 • Grey Henchman 800 • Blue Henchman 800 | ||||
| Miscellaneous | ||||
| The General • Helicopter bomb • Shell • Walking shell • Red walking shell • Flying shell | ||||
| Characters from Rayman 2 | ||||
|---|---|---|---|---|
| Friends from Rayman 2 | ||||
| Rayman • Globox • Murfy • Baby Globoxes • Grand Minimus • Teensies • Ly • Ssssam • Bzzit • Polokus • Clark • Carmen • Umber • Uglette | ||||
| Bosses from Rayman 2 | ||||
| Axel • Jano • Ninjaws • Boss Biditank • Spyglass Pirate • Boss Chenille • Foutch • Clark • Grolem 13 • Grolgoth • Admiral Razorbeard | ||||