Tomb of the Ancients: Difference between revisions
The Jonster (talk | contribs) PlayStation link replacement |
Hunchman801 (talk | contribs) Added language links |
||
| (7 intermediate revisions by 3 users not shown) | |||
| Line 1: | Line 1: | ||
The '''Tomb of the Ancients''' is a location in [[ | The '''Tomb of the Ancients''' is a location in the [[Glade of Dreams]] and a level in ''[[Rayman 2]]''. This is where [[Clark]] the Giant was taken to for [[Technical Check-up|a check-up]]. The [[Robo-Pirate]]s use this place as one of their strongholds, and many signs of their occupation, such as their haphazard wooden constructions, are visible. | ||
It is notable for being the final level in [[Rayman 2 Forever|the Game Boy Color version]], as the final three levels of the game have all been removed. | It is notable for being the final level in [[Rayman 2 Forever|the Game Boy Color version]], as the final three levels of the game have all been removed. | ||
In the PC, Nintendo 64, Sega Dreamcast and [[Rayman 3D|Nintendo 3DS]] version of the game, a secret area can be found in the last phase of the Tomb of the Ancients | In the PC, Nintendo 64, Sega Dreamcast and [[Rayman 3D|Nintendo 3DS]] version of the game, [[Tomb of the Ancients secret|a secret area]] can be found in the last phase of the Tomb of the Ancients. | ||
==Original version== | ==Original version== | ||
| Line 16: | Line 16: | ||
===Phase 1=== | ===Phase 1=== | ||
As the player enters the level for the first time, a short cutscene is played. The [[Spyglass Pirate]] informs [[Admiral Razorbeard]] that [[Rayman]] has retrieved [[Four Masks of Polokus|the third mask]]. A furious [[ | As the player enters the level for the first time, a short cutscene is played. The [[Spyglass Pirate]] informs [[Razorbeard|Admiral Razorbeard]] that [[Rayman]] has retrieved [[Four Masks of Polokus|the third mask]]. A furious [[Razorbeard]] warns him to make sure [[Rayman]] doesn't get [[Four Masks of Polokus|the last mask]]. The level then begins with [[Rayman]] emerging from a [[Spiral Door]] onto some stairs. Once he climbs down he encounters a [[Robo-Pirate]] sign saying that ’[[Clark]] was captured here before being brought to the [[Technical Check-up]].’ After hitting a [[switch]] that opens a door, [[Rayman]] is attacked by a [[Spider (Rayman 2)|spider]] through a tomb until he reaches a few platforms sticking out of the water. Here, he must descend into the pit to activated a [[switch]], while being pursued by a [[Spider (Rayman 2)|spider]], and then escalate out using the spider web. Then, climbing on to previous platforms, he reaches a passage with three possible routes. The left one leads to another platforming section where he has to avoid a [[Red Henchman 800]], a [[Spider (Rayman 2)|spider]] and a disembodied [[arm]] similar to the one encountered in [[the Cave of Bad Dreams]]. There is a crashed [[warship]] in this section. The right one is a graveyard with more disembodied [[arm]]s and another [[Red Henchman 800]]. Both of these contain [[switch]]es that must be activated in order to progress further. Once the [[switch]]es have been activated, [[Rayman]] must return to the passage and go forward, jumping across platforms and avoiding [[piranha]]s. Once he reaches the uppermost platform he has to jump down a hole to get to the next stage. | ||
The last platforming part features a secret passage which the player can access by jumping to the left once near the end of the phase. In the wall is a gap where a secret room can be found down some stairs. In this room, the player will have to fight several waves of [[Henchman 800|Henchmen 800]] before finding the [[1000th Yellow Lum]] necessary to obtain 100% completion of the game. If [[1000th Yellow Lum|this Lum]] remains uncollected, the game will be 99.9% complete, and even after it is collected the game screen will only display a total of 999 [[Yellow Lum]]s. | The last platforming part features a secret passage which the player can access by jumping to the left once near the end of the phase. In the wall is a gap where a secret room can be found down some stairs. In this room, the player will have to fight several waves of [[Henchman 800|Henchmen 800]] before finding the [[1000th Yellow Lum]] necessary to obtain 100% completion of the game. If [[1000th Yellow Lum|this Lum]] remains uncollected, the game will be 99.9% complete, and even after it is collected the game screen will only display a total of 999 [[Yellow Lum]]s. | ||
| Line 24: | Line 24: | ||
<gallery widths="320px" heights="240px"> | <gallery widths="320px" heights="240px"> | ||
R2TGE-PC-TombOfTheAncients-HallOfDoors.jpg|A [[Zombie Chicken]] hologram represents the Tomb of the Ancients in [[the Hall of Doors]]. | R2TGE-PC-TombOfTheAncients-HallOfDoors.jpg|A [[Zombie Chicken]] hologram represents the Tomb of the Ancients in [[the Hall of Doors]]. | ||
Fossilised Razorbeards Tomb of the Ancients.jpg|The crypts contain what look like statues or fossils of [[ | Fossilised Razorbeards Tomb of the Ancients.jpg|The crypts contain what look like statues or fossils of [[Razorbeard]]. Nearby, [[Henchman 800|Henchmen 800]] and a [[Gorilla Pirate]] are found in a similar state. | ||
</gallery> | </gallery> | ||
===Phase 2=== | ===Phase 2=== | ||
[[Rayman]] finds himself in front of a gate. After [[Magic fist|shooting]] the nearby cogs enough times to fully open it, [[Rayman]] jumps down onto a floating [[keg]]. He then rides the floating [[keg]]s and maneuvers up spiderwebs to reach the next barrel, avoiding electrical fences, [[ | [[Rayman]] finds himself in front of a gate. After [[Magic fist|shooting]] the nearby cogs enough times to fully open it, [[Rayman]] jumps down onto a floating [[keg]]. He then rides the floating [[keg]]s and maneuvers up spiderwebs to reach the next barrel, avoiding electrical fences, [[Zombie Chicken]]s and [[Henchman 800|Henchmen 800s]]. A shortcut exists here where the player can skip a portion of the level by not entering a pipe. This phase also appears as two phases in the Nintendo 64 and [[Rayman DS|Nintendo DS]] versions. After executing another platform jump, [[Rayman]] once again rides a floating [[keg]] where he must avoid a [[Robo-Pirate|pirate]] throwing [[keg]]s at him from higher ground and then climb up into the [[Robo-Pirate|pirate]] stronghold and defeat him. Once the [[Robo-Pirate|pirate]] is defeated, a [[Purple Lum]] will appear. [[Rayman]] must use this [[Purple Lum]] to reach a net and climb up towards the next phase. | ||
===Phase 3=== | ===Phase 3=== | ||
The final phase begins with [[Rayman]] running across a narrow stretch of ground with polluted water towards the left, before reaching a door with a small [[Robo-Pirate|pirate]] sign saying ‘[[Technical Check-up]]’ adjacent to it. (It is at this point that the entrance to the [[Tomb of the Ancients secret]] is hidden.) After opening the [[Technical Check- | The final phase begins with [[Rayman]] running across a narrow stretch of ground with polluted water towards the left, before reaching a door with a small [[Robo-Pirate|pirate]] sign saying ‘[[Technical Check-up]]’ adjacent to it. (It is at this point that the entrance to the [[Tomb of the Ancients secret]] is hidden.) After opening the [[Technical Check-up]] door, a small cutscene plays where [[Rayman]] and [[Clark]] are initially overjoyed to find each other before it is revealed that [[Clark]] has had a controlling device implanted on his back and is being controlled by the [[Spyglass Pirate]] from another room. | ||
A boss fight ensues in which [[Rayman]] must activate a [[laser]] by hitting three [[switch]]es, then tricking [[Clark]] into tripping over it in order to attack the controlling device. Once the controlling device is destroyed, [[Clark]] is restored to his normal self. [[Rayman]] climbs onto [[Clark]]'s back to destroy the final [[cage]], freeing a [[Teensie]] who then opens a [[Spiral Door]]. [[Rayman]] is then transported back to [[the Hall of Doors]]. | A boss fight ensues in which [[Rayman]] must activate a [[laser]] by hitting three [[switch]]es, then tricking [[Clark]] into tripping over it in order to attack the controlling device. Once the controlling device is destroyed, [[Clark]] is restored to his normal self. [[Rayman]] climbs onto [[Clark]]'s back to destroy the final [[cage]], freeing a [[Teensie]] who then opens a [[Spiral Door]]. [[Rayman]] is then transported back to [[the Hall of Doors]]. | ||
| Line 143: | Line 143: | ||
*[https://www.youtube.com/watch?v=TGRPI1hm-N4 Tomb of the Ancients playthrough at YouTube (PC version) (Part 1/2)] | *[https://www.youtube.com/watch?v=TGRPI1hm-N4 Tomb of the Ancients playthrough at YouTube (PC version) (Part 1/2)] | ||
*[https://www.youtube.com/watch?v=HiQD2HI7SvM Tomb of the Ancients playthrough at YouTube (PC version) (Part 2/2)] | *[https://www.youtube.com/watch?v=HiQD2HI7SvM Tomb of the Ancients playthrough at YouTube (PC version) (Part 2/2)] | ||
*[ | *[https://www.youtube.com/watch?v=r7Hmv7AX0XI Tomb of the Ancients playthrough at YouTube (Sega Dreamcast version) (Part 1/3)] | ||
*[ | *[https://www.youtube.com/watch?v=NZ8dkv-aJmk Tomb of the Ancients playthrough at YouTube (Sega Dreamcast version) (Part 2/3)] | ||
*[ | *[https://www.youtube.com/watch?v=VNe-n1o3HP8 Tomb of the Ancients playthrough at YouTube (Sega Dreamcast version) (Part 3/3)] | ||
*[http://www.youtube.com/watch?v=xEMMSo_fsrU The 1000th Yellow Lum glitch playthrough at YouTube (Nintendo 3DS version)] | *[http://www.youtube.com/watch?v=xEMMSo_fsrU The 1000th Yellow Lum glitch playthrough at YouTube (Nintendo 3DS version)] | ||
*[https://www.youtube.com/watch?v=6042ZqwV9rw Tomb of the Ancients playthrough at YouTube (Sony PlayStation version)] | *[https://www.youtube.com/watch?v=6042ZqwV9rw Tomb of the Ancients playthrough at YouTube (Sony PlayStation version)] | ||
*[ | *[https://www.youtube.com/watch?v=PnmOrS29ays The Tomb of the Ancients playthrough at YouTube (Sony PlayStation 2 version) (Part 1/4)] | ||
*[ | *[https://www.youtube.com/watch?v=Ip5DuGpHCe0 The Tomb of the Ancients playthrough at YouTube (Sony PlayStation 2 version) (Part 2/4)] | ||
*[ | *[https://www.youtube.com/watch?v=iedbKzLUCHE The Tomb of the Ancients playthrough at YouTube (Sony PlayStation 2 version) (Part 3/4)] | ||
*[ | *[https://www.youtube.com/watch?v=NryOHKwpM2I The Tomb of the Ancients playthrough at YouTube (Sony PlayStation 2 version) (Part 4/4)] | ||
*[ | *[https://www.youtube.com/watch?v=R8V7Pn1vXV4 Tomb of the Ancients playthrough at YouTube (Game Boy Color version) (Part 1/2)] | ||
*[ | *[https://www.youtube.com/watch?v=uQDaWtRKWC8 Tomb of the Ancients playthrough at YouTube (Game Boy Color version) (Part 2/2)] | ||
{{Rayman2worlds}} | {{Rayman2worlds}} | ||
| Line 160: | Line 160: | ||
[[de:Das Grab der Alten]] | [[de:Das Grab der Alten]] | ||
[[pl:Grobowiec starożytnych]] | [[pl:Grobowiec starożytnych]] | ||
[[es:Las Viejas Tumbas]] | |||
[[ru:Могила Древних]] | [[ru:Могила Древних]] | ||
[[zh:幽秘古墓]] | |||
[[Category:Places from Rayman 2|Tomb of the Ancients, The]] | [[Category:Places from Rayman 2|Tomb of the Ancients, The]] | ||
[[Category:Places from Rayman 2 Forever|Tomb of the Ancients, The]] | [[Category:Places from Rayman 2 Forever|Tomb of the Ancients, The]] | ||
Latest revision as of 15:48, 27 March 2026
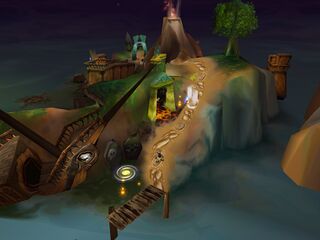
The Tomb of the Ancients is a location in the Glade of Dreams and a level in Rayman 2. This is where Clark the Giant was taken to for a check-up. The Robo-Pirates use this place as one of their strongholds, and many signs of their occupation, such as their haphazard wooden constructions, are visible.
It is notable for being the final level in the Game Boy Color version, as the final three levels of the game have all been removed.
In the PC, Nintendo 64, Sega Dreamcast and Nintendo 3DS version of the game, a secret area can be found in the last phase of the Tomb of the Ancients.
Original version
| Tomb of the Ancients | ||
|---|---|---|

| ||
| ← Beneath the Sanctuary of Rock and Lava | The Iron Mountains → | |
Phase 1
As the player enters the level for the first time, a short cutscene is played. The Spyglass Pirate informs Admiral Razorbeard that Rayman has retrieved the third mask. A furious Razorbeard warns him to make sure Rayman doesn't get the last mask. The level then begins with Rayman emerging from a Spiral Door onto some stairs. Once he climbs down he encounters a Robo-Pirate sign saying that ’Clark was captured here before being brought to the Technical Check-up.’ After hitting a switch that opens a door, Rayman is attacked by a spider through a tomb until he reaches a few platforms sticking out of the water. Here, he must descend into the pit to activated a switch, while being pursued by a spider, and then escalate out using the spider web. Then, climbing on to previous platforms, he reaches a passage with three possible routes. The left one leads to another platforming section where he has to avoid a Red Henchman 800, a spider and a disembodied arm similar to the one encountered in the Cave of Bad Dreams. There is a crashed warship in this section. The right one is a graveyard with more disembodied arms and another Red Henchman 800. Both of these contain switches that must be activated in order to progress further. Once the switches have been activated, Rayman must return to the passage and go forward, jumping across platforms and avoiding piranhas. Once he reaches the uppermost platform he has to jump down a hole to get to the next stage.
The last platforming part features a secret passage which the player can access by jumping to the left once near the end of the phase. In the wall is a gap where a secret room can be found down some stairs. In this room, the player will have to fight several waves of Henchmen 800 before finding the 1000th Yellow Lum necessary to obtain 100% completion of the game. If this Lum remains uncollected, the game will be 99.9% complete, and even after it is collected the game screen will only display a total of 999 Yellow Lums.
How to get secret 1000th Lum (at 4:00).
-
 A Zombie Chicken hologram represents the Tomb of the Ancients in the Hall of Doors.
 -
 The crypts contain what look like statues or fossils of Razorbeard. Nearby, Henchmen 800 and a Gorilla Pirate are found in a similar state.


Phase 2
Rayman finds himself in front of a gate. After shooting the nearby cogs enough times to fully open it, Rayman jumps down onto a floating keg. He then rides the floating kegs and maneuvers up spiderwebs to reach the next barrel, avoiding electrical fences, Zombie Chickens and Henchmen 800s. A shortcut exists here where the player can skip a portion of the level by not entering a pipe. This phase also appears as two phases in the Nintendo 64 and Nintendo DS versions. After executing another platform jump, Rayman once again rides a floating keg where he must avoid a pirate throwing kegs at him from higher ground and then climb up into the pirate stronghold and defeat him. Once the pirate is defeated, a Purple Lum will appear. Rayman must use this Purple Lum to reach a net and climb up towards the next phase.
Phase 3
The final phase begins with Rayman running across a narrow stretch of ground with polluted water towards the left, before reaching a door with a small pirate sign saying ‘Technical Check-up’ adjacent to it. (It is at this point that the entrance to the Tomb of the Ancients secret is hidden.) After opening the Technical Check-up door, a small cutscene plays where Rayman and Clark are initially overjoyed to find each other before it is revealed that Clark has had a controlling device implanted on his back and is being controlled by the Spyglass Pirate from another room.
A boss fight ensues in which Rayman must activate a laser by hitting three switches, then tricking Clark into tripping over it in order to attack the controlling device. Once the controlling device is destroyed, Clark is restored to his normal self. Rayman climbs onto Clark's back to destroy the final cage, freeing a Teensie who then opens a Spiral Door. Rayman is then transported back to the Hall of Doors.
-
 The Spyglass Pirate remotely manipulates Clark.
 -
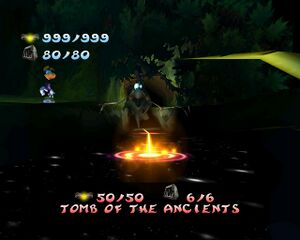
 The Tomb of the Ancients secret area.


Dreamcast version
| Tomb of the Ancients | ||
|---|---|---|

| ||
| ← Beneath the Sanctuary of Rock and Lava | The Iron Mountains → | |
The level is identical to the original version, barring a few graphical enhancements such as the presence of bats. Notably, the secret area at the end of the level has been finished and is now accessible via a button code.
-
 The Spiral Door in the Isle of Doors which leads to the Tomb of the Ancients.
 -

.jpg)

PlayStation version
| Tomb of the Ancients | |||
|---|---|---|---|

| |||
| ← Beneath the Sanctuary of Rock and Lava | Gloomy Island → | ||
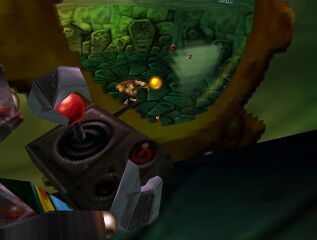
The first phase of the original is completely removed. The rest of the level is also edited in the form of where the start and end of each phase occurs. Alternate passages and forks have been omitted, making the level much more linear and straightforward. Overall, however, the general layout is similar, and the level still concludes with the battle against the hypnotised Clark.
Although the area depicted in the loading screen is part of the first stage of the original version, it does not actually appear in the PlayStation version.
PlayStation 2 version
| The Tomb of the Ancients | |
|---|---|

| |
| ← The Lava Sanctuary | The Iron Mountains → |
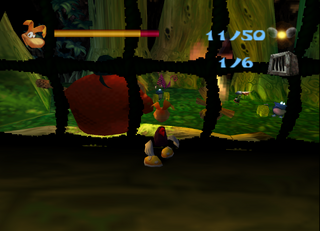
In this version, Rayman discovers a treasure chest in the Technical Check-up after rescuing Clark, and upon opening it finds the Lums Radar, a magnet-like device that points the way to nearby Yellow Lums. He finds the 1000th Yellow Lum in the same chest. The secret location in phase 1, which contained the 1000th Yellow Lum in the original versions, is still present, and contains a few ordinary Yellow Lums. Therefore, Rayman must visit it to achieve 100% completion.
Whilst no real reason was ever given as to why Rayman went to the Tomb in the other versions of the game, he is specifically instructed to go here to rescue Clark in this version. In the other versions, Rayman appears to stumble across Clark solely by chance, and was simply passing through. This may be because the other games used the Hall of Doors as a level selector, where Clark does not need to do anything: whereas in Revolution, the game can not progress without Clark to open the way to the Iron Mountains, due to Revolution's use of a free roaming world map.
If Rayman destroys any Robo-Pirates and then revisits the level, they are replaced by Zombie Pirates.
-
 The room next to the Technical Check-up.

Game Boy Color version
| Tomb of the Ancients | ||
|---|---|---|

| ||
| ← Sanctuary of Rock & Lava | Ending scene → | |
In Rayman 2 Forever, the Tomb of the Ancients directly follows the Sanctuary of Rock and Lava, and this is where Rayman fights the final boss, which is just a drilling Henchman 800.
Part 1

Part 2

Bonus level

Part 3

Part 4

Screenshots

External links
- Tomb of the Ancients playthrough at YouTube (PC version) (Part 1/2)
- Tomb of the Ancients playthrough at YouTube (PC version) (Part 2/2)
- Tomb of the Ancients playthrough at YouTube (Sega Dreamcast version) (Part 1/3)
- Tomb of the Ancients playthrough at YouTube (Sega Dreamcast version) (Part 2/3)
- Tomb of the Ancients playthrough at YouTube (Sega Dreamcast version) (Part 3/3)
- The 1000th Yellow Lum glitch playthrough at YouTube (Nintendo 3DS version)
- Tomb of the Ancients playthrough at YouTube (Sony PlayStation version)
- The Tomb of the Ancients playthrough at YouTube (Sony PlayStation 2 version) (Part 1/4)
- The Tomb of the Ancients playthrough at YouTube (Sony PlayStation 2 version) (Part 2/4)
- The Tomb of the Ancients playthrough at YouTube (Sony PlayStation 2 version) (Part 3/4)
- The Tomb of the Ancients playthrough at YouTube (Sony PlayStation 2 version) (Part 4/4)
- Tomb of the Ancients playthrough at YouTube (Game Boy Color version) (Part 1/2)
- Tomb of the Ancients playthrough at YouTube (Game Boy Color version) (Part 2/2)
