The Reveal: Difference between revisions
No edit summary |
Improvements and added links |
||
| Line 11: | Line 11: | ||
==Description== | ==Description== | ||
===The Reveal=== | ===The Reveal=== | ||
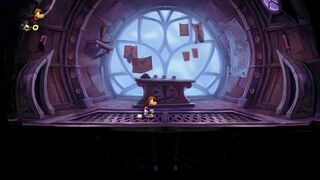
In this level, [[Rayman]] and the team of heroes start by jumping over a gap that is currently blocked off. In the next room, they find [[the Magician]] working on some kind of computer. | In this level, [[Rayman]] and the team of heroes start by jumping over a gap that is currently blocked off. In the next room, they find [[the Magician]] working on some kind of computer. [[The Magician]] sees the team and pulls the star off his hat. He jumps onto the table in the middle of the room, and posters can be seen on the back wall that show that [[the Magician]] is a fan of [[Mr Dark]]. Then he pulls a lever, and a trapdoor opens under the team, and they fall. | ||
<gallery widths="320px" heights="180px"> | |||
The Reveal 2.jpg|[[Rayman]] outside of [[the Magician|the Magician's]] office. | |||
The Reveal 3.jpg|[[The Magician]] pushing buttons on a computer. | |||
The Reveal 4.jpg|[[The Magician]] opens a trapdoor. | |||
</gallery> | |||
===Mecha Carnivora area=== | ===[[Mecha Carnivora]] area=== | ||
Down here, a mechanical version of [[Carnivora]] shows up, [[Mecha Carnivora]]. Some [[Robot ( | Down here, a mechanical version of [[Carnivora]] shows up, [[Mecha Carnivora]]. Some [[Robot (Moody Clouds)|robots]] are trying to stop it, but they are unable to and are destroyed. The heroes must then stay ahead of the [[Mecha Carnivora]], avoiding pistons and electricity. After a short time, they must fight [[Mecha Carnivora]] in a similar fashion as the real [[Carnivora]]. | ||
<gallery widths="320px" heights="180px"> | |||
The Reveal 5.jpg|Two [[Robot (Moody Clouds)|robots]] attempting to stop the [[Mecha Carnivora]]. | |||
The Reveal 6.jpg|[[Mecha Carnivora]] chases the player for a bit before the fight starts. | |||
The Reveal 7.jpg|The fight takes place in a similar looking area to that in [[Poor Little Daisy]]. | |||
</gallery> | |||
===Mecha Carnivora battle=== | ===[[Mecha Carnivora]] battle=== | ||
[[Mecha Carnivora]] will jump, and the team must run under it. | [[Mecha Carnivora]] will jump, and the team must [[Running|run]] under it. Then, the team must [[Wall run|run up the wall]] as it charges and bangs its head. A [[bubo]] will form on its forehead, and the players must hit it. Then, it will start to walk on the ceiling and start hitting its head on the floor. The team must avoid this until [[Mecha Carnivora]] hits its head hard enough for a [[bubo]] to form on its underside. It will let go of the ceiling and lay on its head, and once the team hits this [[bubo]], it will be defeated. | ||
<gallery widths="320px" heights="180px"> | |||
The Reveal 8.jpg|[[Mecha Carnivora]] revealing the first [[bubo]]. | |||
The Reveal 9.jpg|[[Mecha Carnivora]] walking on the ceiling. | |||
The Reveal 10.jpg|[[Mecha Carnivora]] revealing the second and last [[bubo]]. | |||
</gallery> | |||
===Mecha Mockingbird battle=== | ===[[Mecha Mockingbird]] battle=== | ||
[[ | The heroes fall to an area below, where they must fight a mechanical [[Mockingbird]], [[Mecha Mockingbird]]. The [[Mecha Mockingbird]] flies overhead with a [[bubo]] on its underside, dropping eggs. It will then return, snapping its beak at him. The heroes must hit the [[bubo]], or this process will repeat. After hitting the [[bubo]], an updraft appears, which the team can use to fly. The [[Mecha Mockingbird]] makes the platform the players were previously on fall, and then it will fly across the screen twice with a group of [[mecha fish]] behind it. Afterward, it will hit its head on the ceiling, and a [[bubo]] forms. Once the [[bubo]] is hit, the [[Mecha Mockingbird]] is defeated. | ||
<gallery widths="320px" heights="180px"> | |||
The Reveal 11.jpg|[[Mecha Mockingbird]] flying in. | |||
The Reveal 12.jpg|[[Mecha Mockingbird]] revealing the first [[bubo]]. | |||
The Reveal 13.jpg|[[Mecha Mockingbird]] with her mechanical [[mecha fish]]. | |||
The Reveal 14.jpg|[[Mecha Mockingbird]] revealing the second and last [[bubo]]. | |||
</gallery> | |||
===The dance=== | ===The dance=== | ||
The team can then ride a platform to the left and get back to the first room of the level. They will | The team can then ride a platform to the left and get back to the first room of the level. They will walljump up to a [[switch]], and after hitting this [[switch]], what was blocking the gap originally stops. The gang then can return to the room where [[the Magician]] was. Here, [[the Magician]] falls off the table he was on, and his hat as well. Then, music starts to play. Shortly after, [[the Magician]] and the team begin dancing back and forth across the screen. After this ends, [[the Magician]] [[Running|runs]] away. The heroes must [[Running|run]] after him to the next area. Here, the level goes directly into [[Get Away!]]. | ||
<gallery widths="320px" heights="180px"> | |||
The Reveal 15.jpg|The player returns to the start of the level. | |||
The Reveal 16.jpg|[[The Magician]] then distracts the player by performing a dance. | |||
The Reveal 17.jpg|Once [[the Magician]] has escaped, the player will have to chase him down. | |||
</gallery> | |||
==Trivia== | ==Trivia== | ||
*It is possible to collect [[Lum (UbiArt games)|Lums]] in this level. Once the players fall down to where the [[Mecha Carnivora]] is, the two [[Robot ( | *It is possible to collect [[Lum (UbiArt games)|Lums]] in this level. Once the players fall down to where the [[Mecha Carnivora]] is, the two [[Robot (Moody Clouds)|robots]] can be hit if done quickly. | ||
==External links== | ==External links== | ||
Revision as of 15:55, 5 April 2018
| The Reveal | |||||||||||
|---|---|---|---|---|---|---|---|---|---|---|---|
 | |||||||||||
| ← Mecha No Mistake! | Get Away! → | ||||||||||
The Reveal is the fifth level of the Moody Clouds, a world in Rayman Origins. This level is where the Magician reveals himself as the mastermind of the diabolical machinery.
Description
The Reveal
In this level, Rayman and the team of heroes start by jumping over a gap that is currently blocked off. In the next room, they find the Magician working on some kind of computer. The Magician sees the team and pulls the star off his hat. He jumps onto the table in the middle of the room, and posters can be seen on the back wall that show that the Magician is a fan of Mr Dark. Then he pulls a lever, and a trapdoor opens under the team, and they fall.
-
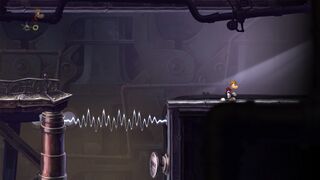 Rayman outside of the Magician's office.
 -
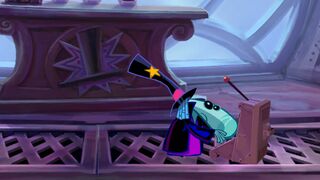 The Magician pushing buttons on a computer.
 -
 The Magician opens a trapdoor.


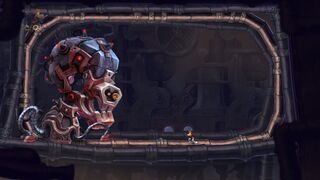
Mecha Carnivora area
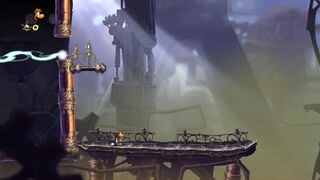
Down here, a mechanical version of Carnivora shows up, Mecha Carnivora. Some robots are trying to stop it, but they are unable to and are destroyed. The heroes must then stay ahead of the Mecha Carnivora, avoiding pistons and electricity. After a short time, they must fight Mecha Carnivora in a similar fashion as the real Carnivora.
-
 Two robots attempting to stop the Mecha Carnivora.
 -
 Mecha Carnivora chases the player for a bit before the fight starts.
 -
 The fight takes place in a similar looking area to that in Poor Little Daisy.


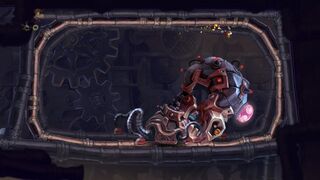
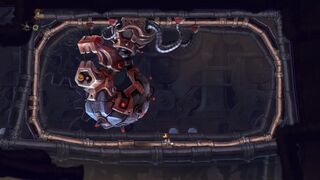
Mecha Carnivora battle
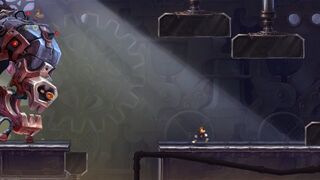
Mecha Carnivora will jump, and the team must run under it. Then, the team must run up the wall as it charges and bangs its head. A bubo will form on its forehead, and the players must hit it. Then, it will start to walk on the ceiling and start hitting its head on the floor. The team must avoid this until Mecha Carnivora hits its head hard enough for a bubo to form on its underside. It will let go of the ceiling and lay on its head, and once the team hits this bubo, it will be defeated.
-
 Mecha Carnivora revealing the first bubo.
 -
 Mecha Carnivora walking on the ceiling.
 -
 Mecha Carnivora revealing the second and last bubo.


Mecha Mockingbird battle
The heroes fall to an area below, where they must fight a mechanical Mockingbird, Mecha Mockingbird. The Mecha Mockingbird flies overhead with a bubo on its underside, dropping eggs. It will then return, snapping its beak at him. The heroes must hit the bubo, or this process will repeat. After hitting the bubo, an updraft appears, which the team can use to fly. The Mecha Mockingbird makes the platform the players were previously on fall, and then it will fly across the screen twice with a group of mecha fish behind it. Afterward, it will hit its head on the ceiling, and a bubo forms. Once the bubo is hit, the Mecha Mockingbird is defeated.
-
 Mecha Mockingbird flying in.
 -
 Mecha Mockingbird revealing the first bubo.
 -
 Mecha Mockingbird with her mechanical mecha fish.
 -
 Mecha Mockingbird revealing the second and last bubo.


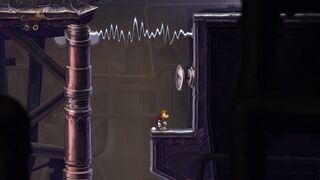
The dance
The team can then ride a platform to the left and get back to the first room of the level. They will walljump up to a switch, and after hitting this switch, what was blocking the gap originally stops. The gang then can return to the room where the Magician was. Here, the Magician falls off the table he was on, and his hat as well. Then, music starts to play. Shortly after, the Magician and the team begin dancing back and forth across the screen. After this ends, the Magician runs away. The heroes must run after him to the next area. Here, the level goes directly into Get Away!.
-
 The player returns to the start of the level.
 -
 The Magician then distracts the player by performing a dance.
 -
 Once the Magician has escaped, the player will have to chase him down.


Trivia
- It is possible to collect Lums in this level. Once the players fall down to where the Mecha Carnivora is, the two robots can be hit if done quickly.