Savage Swarms: Difference between revisions
Added information |
That was the old name for Skyward Sonata, not this level |
||
| (26 intermediate revisions by 6 users not shown) | |||
| Line 1: | Line 1: | ||
{{ | {{ROLevel | ||
| name = Savage Swarms | | name = Savage Swarms | ||
| image = [[ | | image = [[File:Savage Swarms 1.jpg|center|320px|Savage Swarms]] | ||
| preceded by = [[Poor Little Daisy]] | | preceded by = [[Poor Little Daisy]] | ||
| followed by = [[Tricky Winds]] | | followed by = [[Tricky Winds]] | ||
| world = [[Grumbling Grottos | | world = [[Desert of Dijiridoos|Grumbling Grottos]] | ||
| medallion slot 1 = Cage | |||
| medallion slot 1 = | | medallion slot 2 = Cage | ||
| medallion slot 2 = | | medallion slot 3 = Cage | ||
| medallion slot 3 = | | medallion slot 4 = Lums | ||
| medallion slot 4 = | | medallion slot 4 number = 150 | ||
| medallion slot 5 = | | medallion slot 5 = Lums | ||
| medallion slot 6 = | | medallion slot 5 number = 300 | ||
| medal = | | medallion slot 6 = Time | ||
| | | medallion slot 6 number = 2:10 | ||
| | | medal = 350 | ||
| cup = 1:47 | |||
| skull coins = 6 | |||
| relics = 3 | |||
| format numbers = true | |||
}} | }} | ||
'''Savage Swarms''' is the first level of the [[Grumbling Grottos]], a world | '''Savage Swarms''' is the first level of the [[Desert of Dijiridoos|Grumbling Grottos]], a world from ''[[Rayman Origins]]''. In this level, [[flying creature]]s appear in swarms; the heroes can briefly drive them away by punching [[Gong (UbiArt games)|gongs]] to create sound waves. This level is not included in the [[Back to Origins]] painting from ''[[Rayman Legends]]''. | ||
==Area 1== | ==Area 1== | ||
In this area, the heroes encounter a large group of [[flying creature]]s. To proceed, the heroes need to hit a [[Gong (UbiArt games)|gong]], creating a sound wave that causes the [[flying creature]]s to flee from the area briefly. Some sound waves are continuously provided by certain [[Gong (UbiArt games)|gongs]] in the area. The heroes eventually encounter a cyclops [[Gong (UbiArt games)|gong]]. If this type of [[Gong (UbiArt games)|gong]] is hit, it creates a sound wave around the heroes; the effect of this sound wave is temporary. The first [[Skull Coin]] can be retrieved by hitting the cyclops [[Gong (UbiArt games)|gong]] and then quickly reaching the former, which will be surrounded by [[flying creature]]s. The second [[Skull Coin]] can be found by performing a wall jump just above the exit. | |||
<gallery widths="320px" heights="180px"> | |||
Savage Swarms 2.jpg|The first [[Gong (UbiArt games)|gong]] seen in the level. | |||
Savage Swarms 3.jpg|The same [[Gong (UbiArt games)|gong]] after it has been hit. | |||
Savage Swarms 4.jpg|Another type of [[Gong (UbiArt games)|gong]]. | |||
Savage Swarms 5.jpg|Cyclops [[Gong (UbiArt games)|gongs]] create a sound wave which follows the heroes. | |||
</gallery> | |||
===Relic 1=== | |||
[[File:Savage Swarms first relic.png|thumb|320px|The first [[relic]] is located in the sound wave of a [[Gong (UbiArt games)|gong]], directly in [[Rayman]]'s eyeline.]] | |||
The first [[relic]] can be found in this area, camouflaged in the sound wave of a [[Gong (UbiArt games)|gong]]. | |||
{{clear}} | |||
==Area 2== | ==Area 2== | ||
[[File:Savage Swarms 8.jpg|320px|thumb|A [[heart]] [[phial]].]] | |||
The beginning of this area seems quiet, with no enemies in sight. As the heroes proceed, they can [[crush attack]] an angled [[Drum (UbiArt games)|drum]] and then perform wall jumps against a didgeridoo to reach the [[#Secret area 1|first secret area]]. The heroes eventually encounter two paths, each containing a [[Skull Coin]], the third and fourth ones. The [[Skull Coin]] in the lower path can be found if the heroes drop down where they see a [[red bird]], while the one in the upper area can be retrieved by [[crush attack]]ing a [[Drum (UbiArt games)|drum]], using the cyclops [[Gong (UbiArt games)|gong]], and then wall jumping to safety. The lower path will need to be taken to proceed. More [[Gong (UbiArt games)|gongs]] aid the heroes on their journey to the exit. The fifth [[Skull Coin]] can be retrieved by punching a [[Gong (UbiArt games)|gong]] located to the right of the [[Skull Coin]] and then quickly retrieving it. The exit can be found nearby. | |||
{{clear}} | |||
===Relic 2=== | |||
[[File:Savage Swarms second relic.png|thumb|320px|The second [[relic]] as seen in the background of the area.]] | |||
The second [[relic]] can be found in this area, located in the background near the beginning of the area. | |||
{{clear}} | |||
===Secret area 1=== | |||
The heroes need to be careful as they use sound waves from the vertically moving [[Gong (UbiArt games)|gongs]], as there are [[flying creature]]s everywhere. Once they reach the huge sound wave, they encounter three [[red bird]]s, which they need to defeat. Once all of them have been defeated, the heroes can break the [[cage]]. | |||
<gallery widths="320px" heights="180px"> | |||
Savage Swarms 6.jpg|The first secret area, where the heroes need to stay within the sound waves to avoid the [[flying creature]]s. | |||
Savage Swarms 7.jpg|Three [[red bird]]s guard the [[cage]]. | |||
</gallery> | |||
=== | ===Relic 3=== | ||
The | [[File:Savage Swarms third relic.png|thumb|320px|The third [[relic]] as seen on the didgeridoo.]] | ||
The third [[relic]] can be found in this area, located near the exit on a didgeridoo. | |||
{{clear}} | |||
==Area 3== | ==Area 3== | ||
As the heroes proceed, they eventually need to activate a [[switch]], which makes one of the [[Gong (UbiArt games)|gongs]] begin to move. The heroes must stay within its sound wave to avoid more [[flying creature]]s. The sixth [[Skull Coin]] can be acquired by punching a cyclops [[Gong (UbiArt games)|gong]] and then using the sound wave to pass through the [[flying creature]]s quickly and obtain it. The heroes need to proceed using the sound waves of more [[Gong (UbiArt games)|gongs]]; some move while others remain stationary. The heroes eventually escape from the [[flying creature]]s. The second secret area can then be found by using a [[Swingman]] and performing a wall jump, reaching the platform above. The exit can be found nearby. | |||
<gallery widths="320px" heights="180px"> | |||
Savage Swarms 9.jpg|A [[Skull Coin]]. | |||
Savage Swarms 10.jpg|The heroes will need to [[Helicopter|glide]] down slowly to avoid the [[flying creature]]s. | |||
</gallery> | |||
===Secret area 2=== | |||
The heroes must use [[giant mosquito]]es in this area to reach the [[Electoon]] [[cage]]. During the ride, projectiles will need to be fired at certain [[Gong (UbiArt games)|gongs]] to clear their path of [[flying creature]]s. When the heroes reach the end of the area, they will need to keep firing at a [[Gong (UbiArt games)|gong]], providing a sound wave to protect them, as they defeat three [[red bird]]s. Once all three have been defeated, the heroes can disband the [[giant mosquito]]es, and the [[cage]] can be broken. | |||
== | <gallery widths="320px" heights="180px"> | ||
[[ | Savage Swarms 11.jpg|The [[giant mosquito]]es can shoot the [[Gong (UbiArt games)|gongs]] from a distance. | ||
Savage Swarms 12.jpg|The heroes will have to stay within the sound waves as they move. | |||
Savage Swarms 13.jpg|The [[cage]] is once again guarded by three [[red bird]]s. | |||
</gallery> | |||
==Area 4== | ==Area 4== | ||
In this area, | In this area, cyclops [[Gong (UbiArt games)|gongs]] will need to be used to pass more [[flying creature]]s. The heroes need to move quickly, as they will need to reach multiple cyclops [[Gong (UbiArt games)|gongs]] in time, keeping the sound wave going as they approach the exit. | ||
<gallery widths="320px" heights="180px"> | |||
Savage Swarms 14.jpg|A [[red bird]]. | |||
Savage Swarms 15.jpg|The heroes will need to make small precise jumps before the sound wave runs out. | |||
</gallery> | |||
==Area 5== | ==Area 5== | ||
[[File:Savage Swarms 16.jpg|320px|thumb|The final area.]] | |||
The heroes need to defeat four [[red bird]]s guarding the [[Electoon]] [[cage]]. Once all have been defeated, the [[cage]] can be broken, ending the level. The heroes then pose on the [[The Photographer|photoboard]] as [[The Magician (Rayman Origins)|the Magician]] counts the total amount of [[Lum (UbiArt games)|Lums]] collected throughout the level. | |||
{{Clear}} | |||
==Names in other languages== | |||
{{Names | |||
|en=Savage Swarms | |||
|cs=Barbarské roje | |||
|nl=Zwakzinnige zwermen | |||
|fr=King Gong | |||
|de=Schwirrende Schwärme | |||
|hu=Vad raj | |||
|it=Sciami selvaggi | |||
|ja=きょうぼうな むれ | |||
|pl=Dzikie roje | |||
|pt=Enxame do vexame | |||
|ru=Свирепые полчища | |||
|es=Enjambres salvajes | |||
}} | |||
==External links== | ==External links== | ||
* [ | * [https://www.youtube.com/watch?v=-oqeaiwshSg Savage Swarms playthrough at YouTube (PC version) (Normal walkthrough + Lums Medal)] | ||
* [ | * [https://www.youtube.com/watch?v=wVY6ZQDEAw8 Savage Swarms playthrough at YouTube (PC version) (Speed Trophy)] | ||
{{RaymanOriginslocations}} | {{RaymanOriginslocations}} | ||
[[fr:King Gong]] | [[fr:King Gong]] | ||
[[hu:Vad raj]] | |||
[[it:Sciami selvaggi]] | |||
[[pl:Dzikie roje]] | [[pl:Dzikie roje]] | ||
[[Category:Places from Rayman Origins]] | [[Category:Places from Rayman Origins]] | ||
Latest revision as of 15:44, 23 June 2026
| Savage Swarms | |||||
|---|---|---|---|---|---|
 | |||||
| ← Poor Little Daisy | Tricky Winds → | ||||
Savage Swarms is the first level of the Grumbling Grottos, a world from Rayman Origins. In this level, flying creatures appear in swarms; the heroes can briefly drive them away by punching gongs to create sound waves. This level is not included in the Back to Origins painting from Rayman Legends.
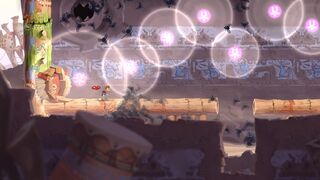
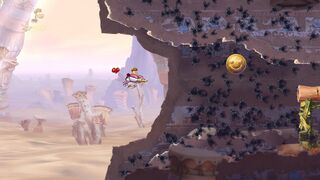
Area 1
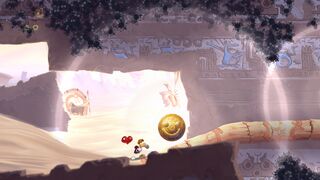
In this area, the heroes encounter a large group of flying creatures. To proceed, the heroes need to hit a gong, creating a sound wave that causes the flying creatures to flee from the area briefly. Some sound waves are continuously provided by certain gongs in the area. The heroes eventually encounter a cyclops gong. If this type of gong is hit, it creates a sound wave around the heroes; the effect of this sound wave is temporary. The first Skull Coin can be retrieved by hitting the cyclops gong and then quickly reaching the former, which will be surrounded by flying creatures. The second Skull Coin can be found by performing a wall jump just above the exit.
-
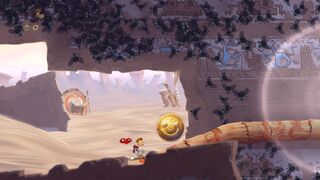 The first gong seen in the level.
 -
 The same gong after it has been hit.
 -
 Another type of gong.
 -
 Cyclops gongs create a sound wave which follows the heroes.


Relic 1

The first relic can be found in this area, camouflaged in the sound wave of a gong.
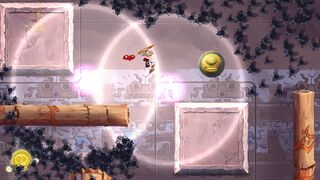
Area 2

The beginning of this area seems quiet, with no enemies in sight. As the heroes proceed, they can crush attack an angled drum and then perform wall jumps against a didgeridoo to reach the first secret area. The heroes eventually encounter two paths, each containing a Skull Coin, the third and fourth ones. The Skull Coin in the lower path can be found if the heroes drop down where they see a red bird, while the one in the upper area can be retrieved by crush attacking a drum, using the cyclops gong, and then wall jumping to safety. The lower path will need to be taken to proceed. More gongs aid the heroes on their journey to the exit. The fifth Skull Coin can be retrieved by punching a gong located to the right of the Skull Coin and then quickly retrieving it. The exit can be found nearby.
Relic 2

The second relic can be found in this area, located in the background near the beginning of the area.
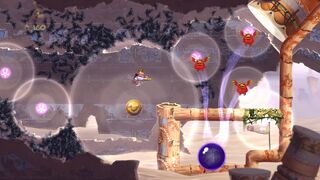
Secret area 1
The heroes need to be careful as they use sound waves from the vertically moving gongs, as there are flying creatures everywhere. Once they reach the huge sound wave, they encounter three red birds, which they need to defeat. Once all of them have been defeated, the heroes can break the cage.
-
 The first secret area, where the heroes need to stay within the sound waves to avoid the flying creatures.
 -


Relic 3

The third relic can be found in this area, located near the exit on a didgeridoo.
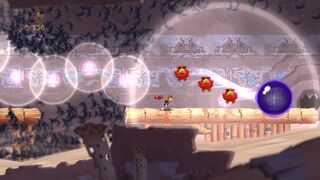
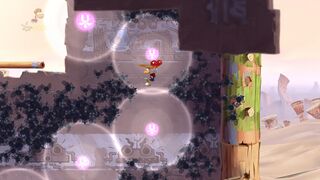
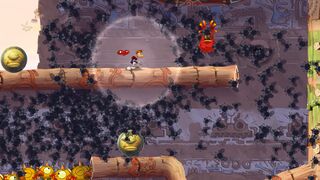
Area 3
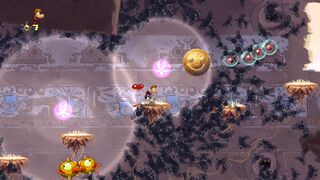
As the heroes proceed, they eventually need to activate a switch, which makes one of the gongs begin to move. The heroes must stay within its sound wave to avoid more flying creatures. The sixth Skull Coin can be acquired by punching a cyclops gong and then using the sound wave to pass through the flying creatures quickly and obtain it. The heroes need to proceed using the sound waves of more gongs; some move while others remain stationary. The heroes eventually escape from the flying creatures. The second secret area can then be found by using a Swingman and performing a wall jump, reaching the platform above. The exit can be found nearby.
-
 A Skull Coin.
 -
 The heroes will need to glide down slowly to avoid the flying creatures.


Secret area 2
The heroes must use giant mosquitoes in this area to reach the Electoon cage. During the ride, projectiles will need to be fired at certain gongs to clear their path of flying creatures. When the heroes reach the end of the area, they will need to keep firing at a gong, providing a sound wave to protect them, as they defeat three red birds. Once all three have been defeated, the heroes can disband the giant mosquitoes, and the cage can be broken.
-
 The giant mosquitoes can shoot the gongs from a distance.
 -
 The heroes will have to stay within the sound waves as they move.
 -


Area 4
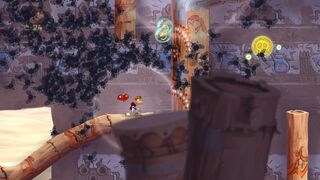
In this area, cyclops gongs will need to be used to pass more flying creatures. The heroes need to move quickly, as they will need to reach multiple cyclops gongs in time, keeping the sound wave going as they approach the exit.
-
 A red bird.
 -
 The heroes will need to make small precise jumps before the sound wave runs out.


Area 5

The heroes need to defeat four red birds guarding the Electoon cage. Once all have been defeated, the cage can be broken, ending the level. The heroes then pose on the photoboard as the Magician counts the total amount of Lums collected throughout the level.
Names in other languages
| Language | Name |
|---|---|
| English | Savage Swarms |
| Czech | Barbarské roje |
| Dutch | Zwakzinnige zwermen |
| French | King Gong |
| German | Schwirrende Schwärme |
| Hungarian | Vad raj |
| Italian | Sciami selvaggi |
| Japanese | きょうぼうな むれ |
| Polish | Dzikie roje |
| Portuguese | Enxame do vexame |
| Russian | Свирепые полчища |
| Spanish | Enjambres salvajes |
External links
- Savage Swarms playthrough at YouTube (PC version) (Normal walkthrough + Lums Medal)
- Savage Swarms playthrough at YouTube (PC version) (Speed Trophy)