Crazy Bouncing: Difference between revisions
Added relic count |
Improvements and added links |
||
| Line 18: | Line 18: | ||
}} | }} | ||
'''Crazy Bouncing''' is the first level of the [[Desert of Dijiridoos]], the second world in ''[[Rayman Origins]]''. In this level, [[Rayman]] and his friends meet the second | '''Crazy Bouncing''' is the first level of the [[Desert of Dijiridoos]], the second world in ''[[Rayman Origins]]''. In this level, [[Rayman]] and his friends meet the second [[nymph]], [[Holly Luya]], saving her from a [[Antitoon|Darktoon]]. The heroes then receive the power to [[Helicopter|glide]]. This is the first level from this world and sixth overall level that is not featured in the [[Back to Origins]] mode in ''[[Rayman Legends]]. | ||
==Area 1== | ==Area 1== | ||
At the beginning of the level, [[the Magician]] appears. He gives information about the role of [[heart]]s in the game if he is bounced on or attacked. The heroes move on and get sucked in from an air blowing vent. They continue on to see a [[Red Bird]] bouncing on a bongo. If the players do a crush attack on a bongo, they will gain extra height. This is useful for getting the first [[Skull Coin]] of the level, hiding on a platform right above the aforementioned [[Red Bird]]. Shortly after, there is a barb wire with a horizontal moving electrical shock. The players need to dodge it to avoid getting hurt from it. The second [[Skull Coin]] can be found by using a nearby [[Swingman]] in the air. The exit is close by. | |||
At the beginning of the level, | |||
<gallery widths="320px" heights="180px"> | |||
Crazy Bouncing 2.jpg|The first area of the level. | |||
</gallery> | |||
==Area 2== | ==Area 2== | ||
Upon entering, [[Rayman]] and his team meet another [[Red Bird]] bouncing on a bongo. The third [[Skull Coin]] can be found by body slamming on the same bongo, and then performing a walljump on a barb wire with a vertical moving electrical shock. As the heroes advance, they will hear an [[Electoon]] cry for help. The secret area can be found by defeating three [[Red Bird]]s bouncing together, then using the [[Swingman]] to jump left where the first secret area is located. Once they are saved, the heroes can continue on to the exit, by avoiding more electrical shocks and destroying the [[Red Bird]]s that block the path. | |||
Upon entering, [[Rayman]] and his team meet another [[Red Bird]] bouncing on a bongo. The third [[Skull Coin]] can be found by body slamming on the same bongo | <gallery widths="320px" heights="180px"> | ||
Crazy Bouncing 3.jpg|The third [[Skull Coin]] of the level. | |||
Crazy Bouncing 5.jpg|[[Red Bird]]s jumping up and down on [[switch]]es. | |||
</gallery> | |||
===Secret | ===Secret area 1=== | ||
[[File:Crazy Bouncing 4.jpg|thumb| | [[File:Crazy Bouncing 4.jpg|320px|thumb|right|The first secret area of the level.]] | ||
In order to break open the [[Electoon]] [[cage]], the team needs to destroy the many small [[Red Bird]]s hovering around it. Once all are defeated, the cage | In order to break open the [[Electoon]] [[cage]], the team needs to destroy the many small [[Red Bird]]s hovering around it. Once all are defeated, the [[cage]] can be broken open. | ||
{{Clear}} | {{Clear}} | ||
==Area 3== | ==Area 3== | ||
[[File:Crazy Bouncing 6.jpg| | [[File:Crazy Bouncing 6.jpg|320px|thumb|left|The fourth [[Skull Coin]] of the level.]] | ||
From the start, the heroes need to avoid several electrical shocks on a couple of barbed wires. That pattern continues on throughout the area. The fourth [[Skull Coin]] of the level can be found by | From the start, the heroes need to avoid several electrical shocks on a couple of barbed wires. That pattern continues on throughout the area. The fourth [[Skull Coin]] of the level can be found by timing a body slam on little bongos to avoid contact with several electrical shocks. The fifth [[Skull Coin]] can be found by dropping down to a long barb wire close to a [[Lum King]]. Endless shocks appear, so the players need to keep jumping to collect the [[Skull Coin|coin]]. The team can now move upwards, and defeat the [[Red Bird]]s to get to the exit. | ||
{{Clear}} | |||
==Area 4== | ==Area 4== | ||
This is where [[Rayman]] and his team meets the second | This is where [[Rayman]] and his team of heroes meets the second [[nymph]], [[Holly Luya]]. But like [[Betilla]] was, she is captured by a [[Antitoon|Darktoon]]. The [[Antitoon|Darktoon]] spots the team, and tries to escape. The heroes will have to keep up, avoiding obstacles that were present in earlier areas. The sixth [[Skull Coin]] of the level can be collected by a player performing a walljump between two pillars at the top. Eventually, the [[Antitoon|Darktoon]] is able to be destroyed, and then [[Holly Luya]] in return gives the heroes the ability to [[Helicopter|glide]]. The players can practice their new power before going to the nearby exit. | ||
<gallery widths="320px" heights="180px"> | |||
Crazy Bouncing 7.jpg|[[Rayman]] chasing the [[Antitoon|Darktoon]] that holds [[Holly Luya]]. | |||
Crazy Bouncing 9.jpg|[[Holly Luya]] giving the player the power to [[Helicopter|glide]]. | |||
Crazy Bouncing 10.jpg|[[Rayman]] showing his [[helicopter]] power. | |||
</gallery> | |||
==Area 5== | ==Area 5== | ||
Right when the team enters, an [[Electoon]] cries out. The second secret area can be found by [[Helicopter|gliding]] to the next platform, then body slamming on one of the larger bongos to get to the [[Swingman]]. The secret is to the left of the [[Swingman]]. Once completed, the team can move on, using a waterfall and geyser which leads to the final [[cage]]. When the three sleeping [[Red Bird]]s are defeated, the [[cage]] can be broken, which will end the level. The players after that pose on a [[The Photographer|photoboard]], while [[the Magician]] waits to see the amount of [[Lum (UbiArt games)|Lums]] that were collected in the level. | |||
Right when the team enters, an [[Electoon]] cries out. The second secret area can be found [[Helicopter|gliding]] to the next platform, then body slamming on one of the larger bongos to get to the [[ | |||
<gallery widths="320px" heights="180px"> | |||
Crazy Bouncing 11.jpg|The fifth and final area. | |||
Crazy Bouncing 13.jpg|The last [[cage]] of the level. | |||
</gallery> | |||
===Secret | ===Secret area 2=== | ||
[[File:Crazy Bouncing 12.jpg|thumb| | [[File:Crazy Bouncing 12.jpg|320px|thumb|right|The second secret area.]] | ||
All the team has to do is defeat the | All the team has to do is defeat the twelve slow moving [[Red Bird]]s. Once done, the [[cage]] can be broken. | ||
{{Clear}} | {{Clear}} | ||
Revision as of 21:06, 24 March 2018
| Crazy Bouncing | |||||||||||
|---|---|---|---|---|---|---|---|---|---|---|---|
 | |||||||||||
| ← Hi-Ho Moskito! | Best Original Score → | ||||||||||
Crazy Bouncing is the first level of the Desert of Dijiridoos, the second world in Rayman Origins. In this level, Rayman and his friends meet the second nymph, Holly Luya, saving her from a Darktoon. The heroes then receive the power to glide. This is the first level from this world and sixth overall level that is not featured in the Back to Origins mode in Rayman Legends.
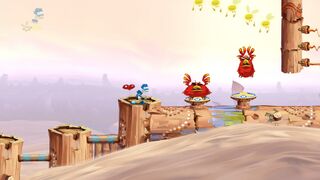
Area 1
At the beginning of the level, the Magician appears. He gives information about the role of hearts in the game if he is bounced on or attacked. The heroes move on and get sucked in from an air blowing vent. They continue on to see a Red Bird bouncing on a bongo. If the players do a crush attack on a bongo, they will gain extra height. This is useful for getting the first Skull Coin of the level, hiding on a platform right above the aforementioned Red Bird. Shortly after, there is a barb wire with a horizontal moving electrical shock. The players need to dodge it to avoid getting hurt from it. The second Skull Coin can be found by using a nearby Swingman in the air. The exit is close by.
-
 The first area of the level.

Area 2
Upon entering, Rayman and his team meet another Red Bird bouncing on a bongo. The third Skull Coin can be found by body slamming on the same bongo, and then performing a walljump on a barb wire with a vertical moving electrical shock. As the heroes advance, they will hear an Electoon cry for help. The secret area can be found by defeating three Red Birds bouncing together, then using the Swingman to jump left where the first secret area is located. Once they are saved, the heroes can continue on to the exit, by avoiding more electrical shocks and destroying the Red Birds that block the path.
-
 The third Skull Coin of the level.
 -


Secret area 1

In order to break open the Electoon cage, the team needs to destroy the many small Red Birds hovering around it. Once all are defeated, the cage can be broken open.
Area 3

From the start, the heroes need to avoid several electrical shocks on a couple of barbed wires. That pattern continues on throughout the area. The fourth Skull Coin of the level can be found by timing a body slam on little bongos to avoid contact with several electrical shocks. The fifth Skull Coin can be found by dropping down to a long barb wire close to a Lum King. Endless shocks appear, so the players need to keep jumping to collect the coin. The team can now move upwards, and defeat the Red Birds to get to the exit.
Area 4
This is where Rayman and his team of heroes meets the second nymph, Holly Luya. But like Betilla was, she is captured by a Darktoon. The Darktoon spots the team, and tries to escape. The heroes will have to keep up, avoiding obstacles that were present in earlier areas. The sixth Skull Coin of the level can be collected by a player performing a walljump between two pillars at the top. Eventually, the Darktoon is able to be destroyed, and then Holly Luya in return gives the heroes the ability to glide. The players can practice their new power before going to the nearby exit.
-

-
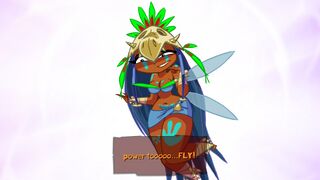 Holly Luya giving the player the power to glide.
 -
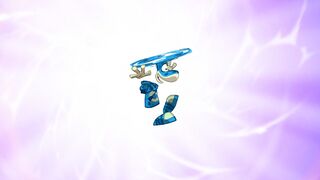 Rayman showing his helicopter power.


Area 5
Right when the team enters, an Electoon cries out. The second secret area can be found by gliding to the next platform, then body slamming on one of the larger bongos to get to the Swingman. The secret is to the left of the Swingman. Once completed, the team can move on, using a waterfall and geyser which leads to the final cage. When the three sleeping Red Birds are defeated, the cage can be broken, which will end the level. The players after that pose on a photoboard, while the Magician waits to see the amount of Lums that were collected in the level.
-
 The fifth and final area.
 -
 The last cage of the level.


Secret area 2

All the team has to do is defeat the twelve slow moving Red Birds. Once done, the cage can be broken.
External links
- Crazy Bouncing playthrough at YouTube (PC version) (Normal walkthrough + Lums Medal)
- Crazy Bouncing playthrough at YouTube (PC version) (Speed Trophy)