Crazy Bouncing: Difference between revisions
Hunchman801 (talk | contribs) No |
Hunchman801 (talk | contribs) Added language links |
||
| (7 intermediate revisions by 2 users not shown) | |||
| Line 5: | Line 5: | ||
| followed by = [[Best Original Score]] | | followed by = [[Best Original Score]] | ||
| world = [[Desert of Dijiridoos]] | | world = [[Desert of Dijiridoos]] | ||
| medallion slot 1 = | | medallion slot 1 = Cage | ||
| medallion slot 2 = | | medallion slot 2 = Cage | ||
| medallion slot 3 = | | medallion slot 3 = Cage | ||
| medallion slot 4 = | | medallion slot 4 = Lums | ||
| medallion slot 5 = | | medallion slot 4 number = 150 | ||
| medallion slot 6 = | | medallion slot 5 = Lums | ||
| medal = | | medallion slot 5 number = 300 | ||
| | | medallion slot 6 = Time | ||
| | | medallion slot 6 number = 1:30 | ||
| | | medal = 350 | ||
| cup = 1:08 | |||
| skull coins = 6 | |||
| relics = 2 | |||
| format numbers = true | |||
}} | }} | ||
| Line 20: | Line 24: | ||
==Area 1== | ==Area 1== | ||
[[The Magician]] can be seen at the beginning of the level; if he is bounced on or attacked, he will inform the heroes about the role of [[heart]]s in the game. As the heroes proceed, an air current will suck them into a didgeridoo, where they will descend and be exhausted out from the bottom of it. As the heroes proceed, they will encounter a [[red bird]] bouncing on a [[Drum (UbiArt games)|drum]]; the first [[Skull Coin]] can be found on a platform above if the heroes perform a [[crush attack]] on the [[Drum (UbiArt games)|drum]] in order to gain extra height. Eventually, they will | [[The Magician (Rayman Origins)|The Magician]] can be seen at the beginning of the level; if he is bounced on or attacked, he will inform the heroes about the role of [[heart]]s in the game. As the heroes proceed, an air current will suck them into a didgeridoo, where they will descend and be exhausted out from the bottom of it. As the heroes proceed, they will encounter a [[red bird]] bouncing on a [[Drum (UbiArt games)|drum]]; the first [[Skull Coin]] can be found on a platform above if the heroes perform a [[crush attack]] on the [[Drum (UbiArt games)|drum]] in order to gain extra height. Eventually, they will come across a string traversed by a vibration that moves horizontally; the heroes will need to evade it to avoid being [[Bubble|bubblized]]. The second [[Skull Coin]] can be found by using a nearby [[Swingman]]; the exit can be found nearby. | ||
<gallery widths="320px" heights="180px"> | <gallery widths="320px" heights="180px"> | ||
| Line 27: | Line 31: | ||
==Area 2== | ==Area 2== | ||
Upon entering, the heroes meet another [[red bird]] bouncing on a [[Drum (UbiArt games)|drum]]; the third [[Skull Coin]] can be found by performing a [[crush attack]] on the same [[Drum (UbiArt games)|drum]], then performing a wall jump on a vertical | Upon entering, the heroes meet another [[red bird]] bouncing on a [[Drum (UbiArt games)|drum]]; the third [[Skull Coin]] can be found by performing a [[crush attack]] on the same [[Drum (UbiArt games)|drum]], then performing a wall jump on a vertical string, which is traversed by a vibration. As the heroes advance, they will hear an [[Electoon]] cry for help; the first secret area can be found by defeating three [[red bird]]s which are bouncing together, then using the [[Swingman]] and jumping to the left. Once the [[Electoon]]s are saved, the heroes can continue to the exit, though they will need to avoid more vibrating strings and defeat the [[red bird]]s blocking their path. | ||
<gallery widths="320px" heights="180px"> | <gallery widths="320px" heights="180px"> | ||
Crazy Bouncing 3.jpg|The third [[Skull Coin]] of the level. | Crazy Bouncing 3.jpg|The third [[Skull Coin]] of the level. | ||
Crazy Bouncing 5.jpg|[[ | Crazy Bouncing 5.jpg|[[Red bird]]s jumping up and down on [[switch]]es. | ||
</gallery> | </gallery> | ||
=== | ===Relic 1=== | ||
[[File:Crazy Bouncing first relic.png|thumb|320px|The first [[relic]] can be found directly below [[Rayman]].]] | [[File:Crazy Bouncing first relic.png|thumb|320px|The first [[relic]] can be found directly below [[Rayman]].]] | ||
| Line 51: | Line 55: | ||
[[File:Crazy Bouncing 6.jpg|320px|thumb|The fourth [[Skull Coin]] of the level.]] | [[File:Crazy Bouncing 6.jpg|320px|thumb|The fourth [[Skull Coin]] of the level.]] | ||
The heroes will need to avoid several | The heroes will need to avoid several harmful vibrations on some strings throughout the area. The fourth [[Skull Coin]] of the level can be found by performing a [[crush attack]] on some small [[Drum (UbiArt games)|drums]] with perfect timing to avoid contact with several vibrations. The fifth [[Skull Coin]] can be found by dropping down to a long string close to a [[Lum King]]; endless vibrations traverse it, so the heroes will need to keep jumping to avoid them and collect the [[Skull Coin]]. The heroes can now climb to defeat some [[red bird]]s and reach the exit. | ||
{{Clear}} | {{Clear}} | ||
==Area 4== | ==Area 4== | ||
This is where the heroes will meet the second [[nymph]], [[Holly Luya]], but just like [[Betilla]], she is held captive by a [[Antitoon|Darktoon]]. Once the latter spots the heroes, it tries to flee. The heroes will need to keep up while avoiding obstacles that were present in earlier areas. The sixth [[Skull Coin]] of the level can be collected if the heroes perform a wall jump between two didgeridoos along the way. Eventually, the [[Antitoon|Darktoon]] | This is where the heroes will meet the second [[nymph]], [[Holly Luya]], but just like [[Betilla]], she is held captive by a [[Antitoon|Darktoon]]. Once the latter spots the heroes, it tries to flee. The heroes will need to keep up while avoiding obstacles that were present in earlier areas. The sixth [[Skull Coin]] of the level can be collected if the heroes perform a wall jump between two didgeridoos along the way. Eventually, the heroes catch up with the [[Antitoon|Darktoon]] and defeat it. [[Holly Luya]], in return, grants the heroes the power to [[Helicopter|glide]]. The heroes can practice using their new power before reaching the nearby exit. | ||
<gallery widths="320px" heights="180px"> | <gallery widths="320px" heights="180px"> | ||
Crazy Bouncing 7.jpg|[[ | Crazy Bouncing 7.jpg|[[Raybox]] chasing the [[Antitoon|Darktoon]] that holds [[Holly Luya]]. | ||
Crazy Bouncing 8.jpg|[[Holly Luya]] is freed by the player. | Crazy Bouncing 8.jpg|[[Holly Luya]] is freed by the player. | ||
Crazy Bouncing 9.jpg|[[Holly Luya]] giving the player the power to [[Helicopter|glide]]. | Crazy Bouncing 9.jpg|[[Holly Luya]] giving the player the power to [[Helicopter|glide]]. | ||
Crazy Bouncing 10.jpg|[[ | Crazy Bouncing 10.jpg|[[Raybox]] showing his [[helicopter]] power. | ||
</gallery> | </gallery> | ||
==Area 5== | ==Area 5== | ||
As the heroes enter this area, an [[Electoon]] cries out; the second secret area can be found by [[Helicopter|gliding]] to the next platform, then performing a [[crush attack]] on one of the larger [[Drum (UbiArt games)|drums]] to reach the [[Swingman]], which the secret area can be found to the left of. Once completed, the heroes can move on, using a water current and a geyser which leads to the final [[cage]]. When the three sleeping [[red bird]]s are defeated, the [[cage]] can be broken, which will end the level. The heroes will pose on a [[The Photographer|photoboard]] while [[the Magician]] waits to see how many [[Lum (UbiArt games)|Lums]] have been collected throughout the level. | As the heroes enter this area, an [[Electoon]] cries out; the second secret area can be found by [[Helicopter|gliding]] to the next platform, then performing a [[crush attack]] on one of the larger [[Drum (UbiArt games)|drums]] to reach the [[Swingman]], which the secret area can be found to the left of. Once completed, the heroes can move on, using a water current and a geyser which leads to the final [[cage]]. When the three sleeping [[red bird]]s are defeated, the [[cage]] can be broken, which will end the level. The heroes will pose on a [[The Photographer|photoboard]] while [[The Magician (Rayman Origins)|the Magician]] waits to see how many [[Lum (UbiArt games)|Lums]] have been collected throughout the level. | ||
<gallery widths="320px" heights="180px"> | <gallery widths="320px" heights="180px"> | ||
| Line 73: | Line 77: | ||
</gallery> | </gallery> | ||
=== | ===Relic 2=== | ||
[[File:Crazy Bouncing second relic.png|thumb|320px|The second [[relic]] can be found just below the [[Drum (UbiArt games)|drums]] to the right of [[Rayman]].]] | [[File:Crazy Bouncing second relic.png|thumb|320px|The second [[relic]] can be found just below the [[Drum (UbiArt games)|drums]] to the right of [[Rayman]].]] | ||
| Line 110: | Line 114: | ||
[[fr:Bonnes vibrations !]] | [[fr:Bonnes vibrations !]] | ||
[[hu:Őrült ugrálás]] | |||
[[it:Rimbalzi pazzi]] | |||
[[pl:Szalone odbijanie]] | [[pl:Szalone odbijanie]] | ||
[[Category:Places from Rayman Origins]] | [[Category:Places from Rayman Origins]] | ||
Latest revision as of 15:42, 27 March 2026
| Crazy Bouncing | |||||
|---|---|---|---|---|---|
 | |||||
| ← Hi-Ho Moskito! | Best Original Score → | ||||
Crazy Bouncing is the first level of the Desert of Dijiridoos, the second world in Rayman Origins. In this level, Rayman and his friends meet the second nymph, Holly Luya, saving her from a Darktoon. The heroes then receive the power to glide. The PlayStation Vita version of Rayman Origins features a Ghost Mode of this level. It is not included in the Back to Origins mode in Rayman Legends.
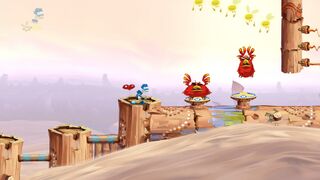
Area 1
The Magician can be seen at the beginning of the level; if he is bounced on or attacked, he will inform the heroes about the role of hearts in the game. As the heroes proceed, an air current will suck them into a didgeridoo, where they will descend and be exhausted out from the bottom of it. As the heroes proceed, they will encounter a red bird bouncing on a drum; the first Skull Coin can be found on a platform above if the heroes perform a crush attack on the drum in order to gain extra height. Eventually, they will come across a string traversed by a vibration that moves horizontally; the heroes will need to evade it to avoid being bubblized. The second Skull Coin can be found by using a nearby Swingman; the exit can be found nearby.
-
 The first area of the level.

Area 2
Upon entering, the heroes meet another red bird bouncing on a drum; the third Skull Coin can be found by performing a crush attack on the same drum, then performing a wall jump on a vertical string, which is traversed by a vibration. As the heroes advance, they will hear an Electoon cry for help; the first secret area can be found by defeating three red birds which are bouncing together, then using the Swingman and jumping to the left. Once the Electoons are saved, the heroes can continue to the exit, though they will need to avoid more vibrating strings and defeat the red birds blocking their path.
-
 The third Skull Coin of the level.
 -


Relic 1

The first relic can be found in this area below the heroes, just in front of a didgeridoo, partially obscured by feathers.
Secret area 1

To break the Electoon cage, the heroes will need to destroy many small red birds, which are hovering around it. Once all are defeated, the cage can be broken.
Area 3

The heroes will need to avoid several harmful vibrations on some strings throughout the area. The fourth Skull Coin of the level can be found by performing a crush attack on some small drums with perfect timing to avoid contact with several vibrations. The fifth Skull Coin can be found by dropping down to a long string close to a Lum King; endless vibrations traverse it, so the heroes will need to keep jumping to avoid them and collect the Skull Coin. The heroes can now climb to defeat some red birds and reach the exit.
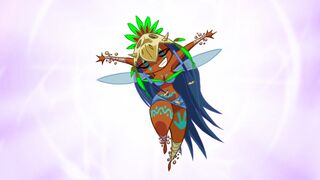
Area 4
This is where the heroes will meet the second nymph, Holly Luya, but just like Betilla, she is held captive by a Darktoon. Once the latter spots the heroes, it tries to flee. The heroes will need to keep up while avoiding obstacles that were present in earlier areas. The sixth Skull Coin of the level can be collected if the heroes perform a wall jump between two didgeridoos along the way. Eventually, the heroes catch up with the Darktoon and defeat it. Holly Luya, in return, grants the heroes the power to glide. The heroes can practice using their new power before reaching the nearby exit.
-

-
 Holly Luya is freed by the player.
 -
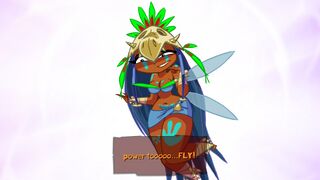 Holly Luya giving the player the power to glide.
 -
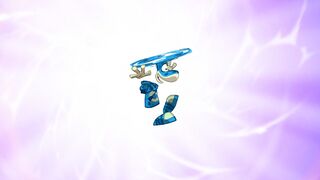 Raybox showing his helicopter power.


Area 5
As the heroes enter this area, an Electoon cries out; the second secret area can be found by gliding to the next platform, then performing a crush attack on one of the larger drums to reach the Swingman, which the secret area can be found to the left of. Once completed, the heroes can move on, using a water current and a geyser which leads to the final cage. When the three sleeping red birds are defeated, the cage can be broken, which will end the level. The heroes will pose on a photoboard while the Magician waits to see how many Lums have been collected throughout the level.
-
 The fifth and final area.
 -
 The final cage of the level.


Relic 2

The second relic can be found just below a didgeridoo where a set of drums are.
Secret area 2

All the heroes have to do is defeat the twelve slow-moving red birds. Once they are defeated, the cage can be broken.
Names in other languages
| Language | Name |
|---|---|
| English | Crazy Bouncing |
| Czech | Šílené skákání |
| Dutch | Stom gestuiter |
| French | Bonnes vibrations ! |
| German | Heimat der Hupfdohlen |
| Hungarian | Őrült ugrálás |
| Italian | Rimbalzi pazzi |
| Japanese | ピョンピョンピョ~ン! |
| Polish | Szalone odbijanie |
| Portuguese | Ricochete sem capacete |
| Russian | Бешеные прыжки |
| Spanish | Rebotando a lo loco |
External links
- Crazy Bouncing playthrough at YouTube (PC version) (Normal walkthrough + Lums Medal)
- Crazy Bouncing playthrough at YouTube (PC version) (Speed Trophy)