Go With The Flow: Difference between revisions
Spiraldoor (talk | contribs) mNo edit summary |
Hunchman801 (talk | contribs) Added language links |
||
| (41 intermediate revisions by 12 users not shown) | |||
| Line 1: | Line 1: | ||
{{ | {{ROLevel | ||
| name = Go With The Flow | |||
| image = [[File:05 go with the flow.jpg|center|320px|Go With The Flow]] | |||
| preceded by = [[Punching Plateaus]] | |||
| followed by = [[Swinging Caves]] | |||
| world = [[Jibberish Jungle]] | |||
| medallion slot 1 = Cage | |||
| medallion slot 2 = Cage | |||
| medallion slot 3 = Cage | |||
| medallion slot 4 = Lums | |||
| medallion slot 4 number = 150 | |||
| medallion slot 5 = Lums | |||
| medallion slot 5 number = 300 | |||
| medallion slot 6 = Time | |||
| medallion slot 6 number = 2:10 | |||
| medal = 350 | |||
| cup = 1:45 | |||
| skull coins = 6 | |||
| relics = 2 | |||
| format numbers = true | |||
}} | |||
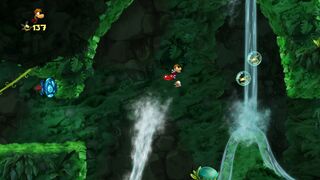
'''Go With The Flow''' is the fifth level of the [[Jibberish Jungle]], the first world in ''[[Rayman Origins]]''. | '''Go With The Flow''' is the fifth level of the [[Jibberish Jungle]], the first world in ''[[Rayman Origins]]''. The landscape is situated on a river with multiple waterfalls, which requires [[Rayman]] and his friends to use the speed of the waterfalls to advance through the level. The name of the level presumably comes from the song of the same name by Queens of the Stone Age. The PlayStation Vita version of ''[[Rayman Origins]]'' features a [[Ghost Mode]] of this level. This level is not featured in the [[Back to Origins]] mode in ''[[Rayman Legends]]''. | ||
{{ | ==Area 1== | ||
The heroes find [[The Magician (Rayman Origins)|the Magician]] on the left side, who instructs them on how to use the [[crush attack]]. The adventure continues as the heroes run along some water currents, using the [[crush attack]] to break the wooden barriers that block their way. The first [[Skull Coin]] can be found near the bottom of the area; the heroes must use the [[bouncy flower]] to reach the area where it is floating, then quickly perform a wall jump to avoid the [[spiky flower]]s. Afterwards, the heroes can [[crush attack]] the last wooden platform and the [[Livingstone|Lividstone]] below it, then the grassy platform to the right will descend, revealing the exit. | |||
<gallery widths="320px" heights="180px"> | |||
Go With The Flow - Origins 1.jpg|The first area of the level. | |||
</gallery> | |||
==Area 2== | |||
The next area has two [[Livingstone|Lividstones]] waiting for the heroes. The heroes must defeat them and continue their journey through more water currents. They will need to avoid [[spiky flower]]s with the help of a [[Swingman]], then break some wooden barriers and platforms along their way. The heroes eventually fall into the water, but a [[spiky flower]] blocks their way. Because the heroes do not have the ability to [[Swimming|swim]] yet, they must hit the blue [[bulb]] to make the [[spiky flower]] disappear and advance to the exit. | |||
<gallery widths="320px" heights="180px"> | |||
Go with the Flow 2.jpg|The second area. | |||
Go With The Flow - Origins 2.jpg|Wooden barricades and a [[Lum King]]. | |||
</gallery> | |||
===Relic 1=== | |||
[[File:Go With The Flow first relic.png|thumb|320px|The first [[relic]] can be found at the bottom of the water, underneath the [[spiky flower]].]] | |||
The first [[relic]] can be found in this area; it is underwater, directly below a [[spiky flower]]. | |||
{{clear}} | |||
==Area 3== | |||
Similar to the second area, two enemies appear, but this time they are [[Antitoon|Darktoons]] instead of [[Livingstone|Lividstones]]. Next to them is another water current, which leads the heroes to a wooden barrier. The second [[Skull Coin]] is visible after that; to collect it, the heroes must perform a wall jump correctly, avoiding the [[spiky flower]]s on the walls. A horizontal vine can be seen in the lowest area; dropping down from the vine will reveal the first secret area with a hidden [[Electoon]] [[cage]]. As the heroes proceed, they approach a wooden barrier with a [[Livingstone|Lividstone]] behind it. They will then approach a geyser, followed by some [[bouncy flower]]s and another [[Livingstone|Lividstone]], where the heroes can then find the exit. | |||
<gallery widths="320px" heights="180px"> | |||
Go With The Flow - Origins 3.jpg|The third area of the level. | |||
Go with the Flow 3.jpg|The second [[Skull Coin]], which requires a precise wall jump. | |||
Go With The Flow - Origins 6.jpg|A geyser will give the heroes a boost. | |||
</gallery> | |||
===Secret area 1=== | |||
A group of [[Livingstone|Lividstones]] can be seen standing on [[Water lily|water lilies]] above the water current, and in the right area, a group of dangerous [[spiky flower]]s covers the path, with the exception of a small space below. To defeat the [[Livingstone|Lividstones]], the heroes can either use a green [[bulb]] to make the [[Livingstone|Lividstones]] fall into the water and get [[Bubble|bubblized]] by the [[spiky flower]]s, or they can kick the first [[Livingstone|Lividstone]], causing a chain reaction as he hits the others. The heroes can then advance, crouching to pass the wall of [[spiky flower]]s without being harmed, and finally reach the [[Electoon]] [[cage]]. If done incorrectly, one of the heroes can go back by hitting the blue [[bulb]] located on the other side of the [[spiky flower]]s. | |||
<gallery widths="320px" heights="180px"> | |||
Go With The Flow - Origins 4.jpg|The first secret area. | |||
Go With The Flow - Origins 5.jpg|The [[cage]] in the first secret area. | |||
</gallery> | |||
==Area 4== | |||
At the start of the area, there is an upper gauntlet where the third [[Skull Coin]] can be found; below it is a wooden barrier with a [[Livingstone|Lividstone]] behind it. To collect the [[Skull Coin]], the heroes will need to wall jump to the above platform, then hit some blue [[bulb]]s in midair to avoid [[spiky flower]]s and land on the [[bouncy flower]]s. Then the heroes need to cross a water current to reach a [[bouncy flower]], where they will bounce up to find a wooden barrier. Once broken, the water current will take the heroes to another [[bouncy flower]], which will lead them to bounce over a stationary [[Antitoon|spiky Darktoon]] and find the exit. | |||
<gallery widths="320px" heights="180px"> | |||
Go With The Flow - Origins 7.jpg|The fourth area. | |||
Go With The Flow - Origins 8.jpg|The third [[Skull Coin]] of the level. | |||
</gallery> | |||
==Area 5== | |||
[[File:Go With The Flow - Origins 10.jpg|320px|thumb|The fifth area of the level.]] | |||
There are two [[bouncy flower]]s on the ground. Bouncing on the one on the right will help in reaching a [[Swingman]]; the second secret area can be found to the right. After rescuing the [[Electoon]]s, the heroes can use a [[Swingman]] and [[bouncy flower]]s to climb. The fourth [[Skull Coin]] is on the right of the second [[Swingman]]; the heroes can reach it by jumping on the [[bouncy flower]]. They will then have to bounce on the far right [[bouncy flower]] to go back, avoiding the [[spiky flower]]s. When the heroes reach the top, the fifth [[Skull Coin]] can be found in a [[Bulb-o-Lum]] to the left of a [[Swingman]]; the exit can be found to the right. | |||
{{Clear}} | |||
===Secret area 2=== | |||
[[File:Go With The Flow - Origins 9.jpg|320px|thumb|The second secret area.]] | |||
There are two geysers that the heroes must use to reach the [[Livingstone|Lividstones]], which are standing on [[Water lily|water lilies]] above. When all six of them are defeated, the [[cage]] located on the far right of the area can be broken. | |||
{{Clear}} | |||
==Area 6== | |||
After breaking a bottle containing a [[heart]], the heroes will cross a water current and bounce on some [[bouncy flower]]s, eventually reaching a [[champibumper]] that will launch them into the background. | |||
<gallery widths="320px" heights="180px"> | |||
Go With The Flow - Origins 11.jpg|The sixth area of the level. | |||
Go With The Flow - Origins 12.jpg|The [[champibumper]] will take the heroes to the background. | |||
RO JJ10.jpg|The ending part of the sixth area. | |||
</gallery> | |||
===Relic 2=== | |||
[[File:Go With The Flow second relic.png|thumb|320px|The second [[relic]] can be found behind these bushes, just above [[Rayman]]'s hands.]] | |||
The second [[relic]] can be found behind some small green bushes, just as the heroes enter this area. | |||
{{clear}} | |||
==Area 7== | |||
[[File:Go with the Flow 6.jpg|320px|thumb|The seventh and final area.]] | |||
There are only two [[Livingstone|Lividstones]] to defeat. The one on the ground can be destroyed in two ways: the heroes can either jump on top of a [[spiky platform]], making it descend and instantly defeating the [[Livingstone|Lividstone]], or they can defeat him manually. The other [[Livingstone|Lividstone]] is standing on a [[water lily]] above. Defeating both will allow the [[cage]] to be broken, ending the level; the heroes pose on a [[The Photographer|photoboard]], as [[The Magician (Rayman Origins)|the Magician]] waits to see how many [[Lum (UbiArt games)|Lums]] the heroes have collected throughout the level. | |||
{{Clear}} | |||
==Names in other languages== | |||
{{Names | |||
|en=Go With The Flow | |||
|cs=S davem | |||
|nl=Laat je meevoeren | |||
|fr=Sur la vague | |||
|de=Der mit dem Strom schwimmt | |||
|hu=Sodrásban | |||
|it=Vai con il flusso | |||
|ja=ながれに のっていこう | |||
|pl=Daj się ponieść | |||
|pt=Ir com a correnteza | |||
|ru=Плыви по течению | |||
|es=Déjate llevar | |||
}} | |||
==External links== | |||
* [https://www.youtube.com/watch?v=D9K09IjlliY Go With The Flow playthrough at YouTube (PC version) (Normal walkthrough + Lums Medal)] | |||
* [https://www.youtube.com/watch?v=rb5i7DNtFA0 Go With The Flow playthrough at YouTube (PC version) (Speed Trophy)] | |||
{{RaymanOriginslocations}} | |||
[[fr:Sur la vague]] | [[fr:Sur la vague]] | ||
[[hu:Sodrásban]] | |||
[[it:Vai con il flusso]] | |||
[[pl:Daj się ponieść]] | |||
[[es:Déjate llevar]] | |||
[[ru:Плыви по течению]] | |||
[[Category:Places from Rayman Origins]] | [[Category:Places from Rayman Origins]] | ||
Latest revision as of 15:43, 27 March 2026
| Go With The Flow | |||||
|---|---|---|---|---|---|
 | |||||
| ← Punching Plateaus | Swinging Caves → | ||||
Go With The Flow is the fifth level of the Jibberish Jungle, the first world in Rayman Origins. The landscape is situated on a river with multiple waterfalls, which requires Rayman and his friends to use the speed of the waterfalls to advance through the level. The name of the level presumably comes from the song of the same name by Queens of the Stone Age. The PlayStation Vita version of Rayman Origins features a Ghost Mode of this level. This level is not featured in the Back to Origins mode in Rayman Legends.
Area 1
The heroes find the Magician on the left side, who instructs them on how to use the crush attack. The adventure continues as the heroes run along some water currents, using the crush attack to break the wooden barriers that block their way. The first Skull Coin can be found near the bottom of the area; the heroes must use the bouncy flower to reach the area where it is floating, then quickly perform a wall jump to avoid the spiky flowers. Afterwards, the heroes can crush attack the last wooden platform and the Lividstone below it, then the grassy platform to the right will descend, revealing the exit.
-
 The first area of the level.

Area 2
The next area has two Lividstones waiting for the heroes. The heroes must defeat them and continue their journey through more water currents. They will need to avoid spiky flowers with the help of a Swingman, then break some wooden barriers and platforms along their way. The heroes eventually fall into the water, but a spiky flower blocks their way. Because the heroes do not have the ability to swim yet, they must hit the blue bulb to make the spiky flower disappear and advance to the exit.
-
 The second area.
 -
 Wooden barricades and a Lum King.


Relic 1

The first relic can be found in this area; it is underwater, directly below a spiky flower.
Area 3
Similar to the second area, two enemies appear, but this time they are Darktoons instead of Lividstones. Next to them is another water current, which leads the heroes to a wooden barrier. The second Skull Coin is visible after that; to collect it, the heroes must perform a wall jump correctly, avoiding the spiky flowers on the walls. A horizontal vine can be seen in the lowest area; dropping down from the vine will reveal the first secret area with a hidden Electoon cage. As the heroes proceed, they approach a wooden barrier with a Lividstone behind it. They will then approach a geyser, followed by some bouncy flowers and another Lividstone, where the heroes can then find the exit.
-
 The third area of the level.
 -
 The second Skull Coin, which requires a precise wall jump.
 -
 A geyser will give the heroes a boost.


Secret area 1
A group of Lividstones can be seen standing on water lilies above the water current, and in the right area, a group of dangerous spiky flowers covers the path, with the exception of a small space below. To defeat the Lividstones, the heroes can either use a green bulb to make the Lividstones fall into the water and get bubblized by the spiky flowers, or they can kick the first Lividstone, causing a chain reaction as he hits the others. The heroes can then advance, crouching to pass the wall of spiky flowers without being harmed, and finally reach the Electoon cage. If done incorrectly, one of the heroes can go back by hitting the blue bulb located on the other side of the spiky flowers.
-
 The first secret area.
 -
 The cage in the first secret area.


Area 4
At the start of the area, there is an upper gauntlet where the third Skull Coin can be found; below it is a wooden barrier with a Lividstone behind it. To collect the Skull Coin, the heroes will need to wall jump to the above platform, then hit some blue bulbs in midair to avoid spiky flowers and land on the bouncy flowers. Then the heroes need to cross a water current to reach a bouncy flower, where they will bounce up to find a wooden barrier. Once broken, the water current will take the heroes to another bouncy flower, which will lead them to bounce over a stationary spiky Darktoon and find the exit.
-
 The fourth area.
 -
 The third Skull Coin of the level.


Area 5

There are two bouncy flowers on the ground. Bouncing on the one on the right will help in reaching a Swingman; the second secret area can be found to the right. After rescuing the Electoons, the heroes can use a Swingman and bouncy flowers to climb. The fourth Skull Coin is on the right of the second Swingman; the heroes can reach it by jumping on the bouncy flower. They will then have to bounce on the far right bouncy flower to go back, avoiding the spiky flowers. When the heroes reach the top, the fifth Skull Coin can be found in a Bulb-o-Lum to the left of a Swingman; the exit can be found to the right.
Secret area 2

There are two geysers that the heroes must use to reach the Lividstones, which are standing on water lilies above. When all six of them are defeated, the cage located on the far right of the area can be broken.
Area 6
After breaking a bottle containing a heart, the heroes will cross a water current and bounce on some bouncy flowers, eventually reaching a champibumper that will launch them into the background.
-
 The sixth area of the level.
 -
 The champibumper will take the heroes to the background.
 -
 The ending part of the sixth area.


Relic 2

The second relic can be found behind some small green bushes, just as the heroes enter this area.
Area 7

There are only two Lividstones to defeat. The one on the ground can be destroyed in two ways: the heroes can either jump on top of a spiky platform, making it descend and instantly defeating the Lividstone, or they can defeat him manually. The other Lividstone is standing on a water lily above. Defeating both will allow the cage to be broken, ending the level; the heroes pose on a photoboard, as the Magician waits to see how many Lums the heroes have collected throughout the level.
Names in other languages
| Language | Name |
|---|---|
| English | Go With The Flow |
| Czech | S davem |
| Dutch | Laat je meevoeren |
| French | Sur la vague |
| German | Der mit dem Strom schwimmt |
| Hungarian | Sodrásban |
| Italian | Vai con il flusso |
| Japanese | ながれに のっていこう |
| Polish | Daj się ponieść |
| Portuguese | Ir com a correnteza |
| Russian | Плыви по течению |
| Spanish | Déjate llevar |
External links
- Go With The Flow playthrough at YouTube (PC version) (Normal walkthrough + Lums Medal)
- Go With The Flow playthrough at YouTube (PC version) (Speed Trophy)