Outta My Way: Difference between revisions
Improvements and added links |
No edit summary |
||
| Line 20: | Line 20: | ||
==Area 1== | ==Area 1== | ||
From the start of the level, the | From the start of the level, the heroes will need to safely perform jumps on the short platforms, while destroying [[Livingstone|Lividstones]]. The [[#Secret area 1|first secret area]] can be found by crush attacking a [[flower bulb]] and bouncing to a vine where the door is close by. Continuing on, if the heroes drop down to a platform where there are foreground vines, the first [[Skull Coin]] can be collected. The second [[Skull Coin]] can be acquired if the heroes perform the [[wall run]] ability on a tall platform. As the heroes advance to the exit, they will encounter enemies from the [[Sea of Serendipity]]; the [[Blowfish]] and two [[spiky fish]]. | ||
<gallery widths="320px" heights="180px"> | <gallery widths="320px" heights="180px"> | ||
| Line 29: | Line 29: | ||
===Secret area 1=== | ===Secret area 1=== | ||
[[File:Outta My Way 2.jpg|320px|thumb|right|The first secret area.]] | [[File:Outta My Way 2.jpg|320px|thumb|right|The first secret area.]] | ||
The | The heroes can destroy the three [[Livingstone|Lividstones]] on the bottom in two ways; one is to manually defeat them, and the other is to hit the red [[flower bomb]]s to make geysers appear to send two of the three [[Livingstone|Lividstones]] to where the [[bullet]]s' path is. Either way, the geyser on the right will need to be used to get to a platform where two more [[Livingstone|Lividstones]] are at as well as the [[Electoon]] [[cage]]. | ||
{{Clear}} | {{Clear}} | ||
==Area 2== | ==Area 2== | ||
A nearby [[hunter]] begins to shoot red [[bullet]]s that follow the heroes until they come into contact with either water or something solid. A temporary power can be collected if the | A nearby [[hunter]] begins to shoot red [[bullet]]s that follow the heroes until they come into contact with either water or something solid. A temporary power can be collected; if the heroes drop down to the left of the water, the [[Blue Punch]] can be found, which will shoot at long distances. The third [[Skull Coin]] can be collected through [[Helicopter|hovering]] to it while getting a [[running]] start. In order to reach the exit, the heroes need to safely jump on top of the incoming [[bullet]]s. | ||
<gallery widths="320px" heights="180px"> | <gallery widths="320px" heights="180px"> | ||
Outta My Way 4.jpg|A [[hunter]] shooting a red missile. | Outta My Way 4.jpg|A [[hunter]] shooting a red missile. | ||
Outta My Way 5.jpg|The | Outta My Way 5.jpg|The heroes can reach the [[Skull Coin]] by jumping on the [[Livingstone|Lividstones]] or by [[Helicopter|hovering]]. | ||
</gallery> | </gallery> | ||
==Area 3== | ==Area 3== | ||
Another [[hunter]] starts shooting | Another [[hunter]] starts shooting homing red [[bullet]]s at the heroes from above. The first one is next to the fourth [[Skull Coin]] of the level. Next to another [[hunter]] is a wooden barricade; smashing it will lead the heroes to the [[#Secret area 2|second secret area]]. After that, the heroes can gather the fifth [[Skull Coin]] if one crush attacks a [[flower bulb]], bouncing past the [[spiky flower]]s. The exit can be found not too far from here. | ||
<gallery widths="320px" heights="180px"> | <gallery widths="320px" heights="180px"> | ||
| Line 52: | Line 52: | ||
===Secret area 2=== | ===Secret area 2=== | ||
[[File:Outta My Way 8.jpg|320px|thumb|left|The second secret area.]] | [[File:Outta My Way 8.jpg|320px|thumb|left|The second secret area.]] | ||
[[Rayman]] and his friends need to get to the large quantity of [[Livingstone|Lividstones]] without getting hit from the [[spiky flower]]s. Once the [[Livingstone|Lividstones]] are defeated, the | [[Rayman]] and his friends need to get to the large quantity of [[Livingstone|Lividstones]] without getting hit from the [[spiky flower]]s. Once the [[Livingstone|Lividstones]] are defeated, the heroes will need to hit the [[bulb]] on the left to make the [[spiky flower]]s that are around the [[cage]] retract into the [[bulb]]. | ||
{{Clear}} | {{Clear}} | ||
==Area 4== | ==Area 4== | ||
The platforms will begin to collapse, so | The platforms will begin to collapse, so the heroes need to hurry before the platforms sink all the way down. If the heroes are quick enough, they can reach the sixth [[Skull Coin]]. At the end, the heroes will have to destroy a [[Livingstone|Lividstone]] and a [[hunter]], in order to break open the [[Electoon]] [[cage]] to end the level. Then, the heroes will pose on the [[Photographer|photoboard]] as [[the Magician]] waits for the total amount of [[Lum (UbiArt games)|Lums]] that were collected throughout the level. | ||
<gallery widths="320px" heights="180px"> | <gallery widths="320px" heights="180px"> | ||
Revision as of 21:44, 22 August 2019
| Outta My Way | |||||||||||
|---|---|---|---|---|---|---|---|---|---|---|---|
 | |||||||||||
| ← Golly G. Golem | Up And Down → | ||||||||||
Outta My Way is the first level of the Ticklish Temples, a world in Rayman Origins. This marks the return of the Jibberish Jungle like environment, as Rayman and his friends begin their search for one of the Four Kings, Carnivora. This is the first level from this world and nineteenth overall that's not included in the Back to Origins mode in Rayman Legends.
Area 1
From the start of the level, the heroes will need to safely perform jumps on the short platforms, while destroying Lividstones. The first secret area can be found by crush attacking a flower bulb and bouncing to a vine where the door is close by. Continuing on, if the heroes drop down to a platform where there are foreground vines, the first Skull Coin can be collected. The second Skull Coin can be acquired if the heroes perform the wall run ability on a tall platform. As the heroes advance to the exit, they will encounter enemies from the Sea of Serendipity; the Blowfish and two spiky fish.
-
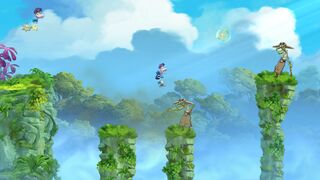 Rayman about to jump on a Lividstone.
 -


Secret area 1

The heroes can destroy the three Lividstones on the bottom in two ways; one is to manually defeat them, and the other is to hit the red flower bombs to make geysers appear to send two of the three Lividstones to where the bullets' path is. Either way, the geyser on the right will need to be used to get to a platform where two more Lividstones are at as well as the Electoon cage.
Area 2
A nearby hunter begins to shoot red bullets that follow the heroes until they come into contact with either water or something solid. A temporary power can be collected; if the heroes drop down to the left of the water, the Blue Punch can be found, which will shoot at long distances. The third Skull Coin can be collected through hovering to it while getting a running start. In order to reach the exit, the heroes need to safely jump on top of the incoming bullets.
-
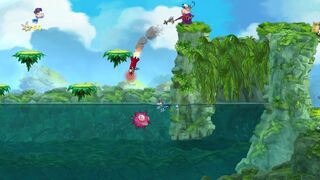 A hunter shooting a red missile.
 -


Area 3
Another hunter starts shooting homing red bullets at the heroes from above. The first one is next to the fourth Skull Coin of the level. Next to another hunter is a wooden barricade; smashing it will lead the heroes to the second secret area. After that, the heroes can gather the fifth Skull Coin if one crush attacks a flower bulb, bouncing past the spiky flowers. The exit can be found not too far from here.
-
 A platform with three heart bottles.
 -
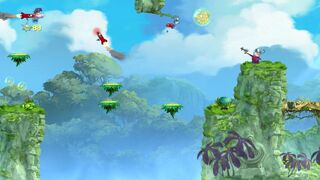 Another hunter shooting missiles.
 -
 Several spiky platforms.


Secret area 2

Rayman and his friends need to get to the large quantity of Lividstones without getting hit from the spiky flowers. Once the Lividstones are defeated, the heroes will need to hit the bulb on the left to make the spiky flowers that are around the cage retract into the bulb.
Area 4
The platforms will begin to collapse, so the heroes need to hurry before the platforms sink all the way down. If the heroes are quick enough, they can reach the sixth Skull Coin. At the end, the heroes will have to destroy a Lividstone and a hunter, in order to break open the Electoon cage to end the level. Then, the heroes will pose on the photoboard as the Magician waits for the total amount of Lums that were collected throughout the level.
-
 A Lum King.
 -
 A Lividstone.
 -
 The end of the level with the cage.


External links
- Outta My Way playthrough at YouTube (PC version) (Normal walkthrough + Lums Medal)
- Outta My Way playthrough at YouTube (PC version) (Speed Trophy)