Tricky Temple Too: Difference between revisions
Hunchman801 (talk | contribs) mNo edit summary |
Hunchman801 (talk | contribs) m Added Arabic translation from the PlayStation Vita version of Rayman Legends |
||
| (3 intermediate revisions by the same user not shown) | |||
| Line 1: | Line 1: | ||
'''Tricky Temple Too''' is the fourth level of the [[Moody Clouds]], a world in ''[[Rayman Origins]]''. It is the tenth and last [[Tricky Treasure]] level, where [[Rayman]] and his friends must chase a [[Tricky Treasure]] to obtain a [[Skull Tooth]]. Despite the level being found in the [[Moody Clouds]] world, most of its elements are from [[Mystical Pique]]. This is the fourth level from this world and the thirty-sixth overall to be included in the [[Back to Origins]] mode in ''[[Rayman Legends]]''. | |||
==Original version== | |||
{{ROLevel | {{ROLevel | ||
| name = Tricky Temple Too | | name = Tricky Temple Too | ||
| image = [[File:Tricky Temple Too 1.jpg|center|320px|Tricky Temple Too]] | | image = [[File:Tricky Temple Too 1.jpg|center|320px|Tricky Temple Too]] | ||
| preceded by = [[Mecha No Mistake!]] | |||
| followed by = [[The Reveal]] | |||
| world = [[Moody Clouds]] | | world = [[Moody Clouds]] | ||
| tricky treasure = yes | |||
| format numbers = true | |||
}} | }} | ||
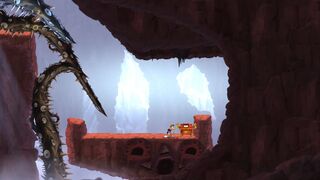
The heroes find the [[Tricky Treasure]] at the end of the first platform. The [[Tricky Treasure|chest]], believing [[Rayman]] is going to attack it, [[Running|runs]] away, and the chase begins. Getaway bluegrass music plays once it starts. This level takes place underground, in a cave not unlike those found in [[Mystical Pique]]. Light can be seen shining in the distance, behind the many stone pillars in the background. Glimpses of machinery or damaged structures, some topped with weather vanes, can be seen throughout the level, and there are objects hanging from the ceiling identical to those found in [[Mystical Pique]]. As the heroes chase the [[Tricky Treasure]] through this level, they must avoid [[Darkroot]]s and jagged, red spikes that come out of the ceiling, ground, and walls. Towards the end, the heroes are assisted on several occasions by [[Swingman|Swingmen]]. When there is no room left to go, the team can finally punch the [[Tricky Treasure|chest]] open and receive the [[Skull Tooth]] to give back to [[Mister Death]]. | |||
<gallery widths="320px" heights="180px"> | <gallery widths="320px" heights="180px"> | ||
Tricky Temple Too 2.jpg|[[Darkroot]]s are common in this level. | Tricky Temple Too 2.jpg|[[Darkroot]]s are common in this level. | ||
Tricky Temple Too 3.jpg|Red spikes appear | Tricky Temple Too 3.jpg|Red spikes appear frequently too. | ||
Tricky Temple Too 4.jpg|A [[Swingman]]. | Tricky Temple Too 4.jpg|A [[Swingman]]. | ||
Tricky Temple Too 5.jpg|The end of the chase. | Tricky Temple Too 5.jpg|The end of the chase. | ||
</gallery> | </gallery> | ||
==Back to Origins== | |||
{{RLLevel | {{RLLevel | ||
| name = Tricky Temple Too | | name = Tricky Temple Too | ||
| difficulty = | | difficulty = 3 | ||
| image = [[File:Tricky Temple Too - Back to Origins.png|center|320px|Tricky Temple Too]] | | image = [[File:Tricky Temple Too - Back to Origins.png|center|320px|Tricky Temple Too]] | ||
| preceded by = [[Riding the Storm#Back to Origins|Riding the Storm]] | | preceded by = [[Riding the Storm#Back to Origins|Riding the Storm]] | ||
| followed by = [[On Top of Old Smokey#Back to Origins|On Top of Old Smokey]] | | followed by = [[On Top of Old Smokey#Back to Origins|On Top of Old Smokey]] | ||
| world = [[Mystical Pique]] | | world = [[Mystical Pique]] | ||
| teensies = | | teensies = 3 | ||
| bronze cup = | | bronze cup = 25 | ||
| silver cup = | | silver cup = 50 | ||
| lucky ticket = | | lucky ticket = 75 | ||
| gold cup = | | gold cup = 100 | ||
| format numbers = true | |||
}} | }} | ||
This level is playable in the [[Back to Origins]] mode in ''[[Rayman Legends]]''. There are no notable differences between the versions apart from elements from ''[[Rayman Legends]]'' replacing some from the original game. | |||
<gallery widths="320px" heights="180px"> | <gallery widths="320px" heights="180px"> | ||
| Line 39: | Line 43: | ||
Tricky Temple Too - Back to Origins 2.jpg|The first [[Teensie]] [[cage]]. | Tricky Temple Too - Back to Origins 2.jpg|The first [[Teensie]] [[cage]]. | ||
Tricky Temple Too - Back to Origins 3.jpg|A purple [[Lum (UbiArt games)|Lum]] chain. | Tricky Temple Too - Back to Origins 3.jpg|A purple [[Lum (UbiArt games)|Lum]] chain. | ||
Tricky Temple Too - Back to Origins 4.jpg|The second [[Teensie]] [[cage]]. | Tricky Temple Too - Back to Origins 4.jpg|The second [[Teensie]] [[cage]]. | ||
Tricky Temple Too - Back to Origins 5.jpg|The end of the level. | Tricky Temple Too - Back to Origins 5.jpg|The end of the level. | ||
</gallery> | </gallery> | ||
== | ==Names in other languages== | ||
{{Names | |||
|en=Tricky Temple Too | |||
|ar=أثار مخادعة أيضا | |||
|zh_hans=诡秘神庙 | |||
|cs=Mazaný to chrám | |||
|da=Det listige tempel | |||
|nl=Warempel nog 'n Tempel | |||
|nl_S=''[[Rayman Origins]]'' | |||
|nl_2=Warempel nog 'n tempel | |||
|nl_2_S=''[[Rayman Legends]]'' | |||
|fi=Taas tukala temppeli | |||
|fr=Temple retors | |||
|de=Tückischer Tempel | |||
|hu=Ez is egy trükkös templom | |||
|it=Il tempio fugge | |||
|ja=トリッキートレジャーの おてら その2 | |||
|ja_S=''[[Rayman Origins]]'' | |||
|ja_2=「赤い洞くつで追え!」 | |||
|ja_2_S=''[[Rayman Legends]]'' | |||
|no=Vrient tempel | |||
|pl=Zbyt Cwana Świątynia | |||
|pl_S=''[[Rayman Origins]]'' | |||
|pl_2=Zbyt cwana świątynia | |||
|pl_2_S=''[[Rayman Legends]]'' | |||
|pt=Templo traiçoeiro | |||
|ru=Храм с секретом | |||
|es=Un cofre muy lejano | |||
|sv=Tempelloppet | |||
}} | |||
==External links== | ==External links== | ||
| Line 58: | Line 89: | ||
[[Category:Places from Rayman Origins]] | [[Category:Places from Rayman Origins]] | ||
[[Category:Places from Rayman Legends]] | |||
Latest revision as of 10:22, 11 July 2025
Tricky Temple Too is the fourth level of the Moody Clouds, a world in Rayman Origins. It is the tenth and last Tricky Treasure level, where Rayman and his friends must chase a Tricky Treasure to obtain a Skull Tooth. Despite the level being found in the Moody Clouds world, most of its elements are from Mystical Pique. This is the fourth level from this world and the thirty-sixth overall to be included in the Back to Origins mode in Rayman Legends.
Original version
| Tricky Temple Too | |||||||||||
|---|---|---|---|---|---|---|---|---|---|---|---|
 | |||||||||||
| ← Mecha No Mistake! | The Reveal → | ||||||||||
The heroes find the Tricky Treasure at the end of the first platform. The chest, believing Rayman is going to attack it, runs away, and the chase begins. Getaway bluegrass music plays once it starts. This level takes place underground, in a cave not unlike those found in Mystical Pique. Light can be seen shining in the distance, behind the many stone pillars in the background. Glimpses of machinery or damaged structures, some topped with weather vanes, can be seen throughout the level, and there are objects hanging from the ceiling identical to those found in Mystical Pique. As the heroes chase the Tricky Treasure through this level, they must avoid Darkroots and jagged, red spikes that come out of the ceiling, ground, and walls. Towards the end, the heroes are assisted on several occasions by Swingmen. When there is no room left to go, the team can finally punch the chest open and receive the Skull Tooth to give back to Mister Death.
-
 Darkroots are common in this level.
 -
 Red spikes appear frequently too.
 -
 A Swingman.
 -
 The end of the chase.


Back to Origins
| Tricky Temple Too | ||||||||
|---|---|---|---|---|---|---|---|---|
 | ||||||||
| ← Riding the Storm | On Top of Old Smokey → | |||||||
This level is playable in the Back to Origins mode in Rayman Legends. There are no notable differences between the versions apart from elements from Rayman Legends replacing some from the original game.
-
 The start of the level.
 -

-
 A purple Lum chain.
 -

-
 The end of the level.


Names in other languages
| Language | Name |
|---|---|
| English | Tricky Temple Too |
| Arabic | أثار مخادعة أيضا |
| Chinese (simplified) | 诡秘神庙 |
| Czech | Mazaný to chrám |
| Danish | Det listige tempel |
| Dutch | Warempel nog 'n Tempel (Rayman Origins)
Warempel nog 'n tempel (Rayman Legends) |
| Finnish | Taas tukala temppeli |
| French | Temple retors |
| German | Tückischer Tempel |
| Hungarian | Ez is egy trükkös templom |
| Italian | Il tempio fugge |
| Japanese | トリッキートレジャーの おてら その2 (Rayman Origins)
「赤い洞くつで追え!」 (Rayman Legends) |
| Norwegian | Vrient tempel |
| Polish | Zbyt Cwana Świątynia (Rayman Origins)
Zbyt cwana świątynia (Rayman Legends) |
| Portuguese | Templo traiçoeiro |
| Russian | Храм с секретом |
| Spanish | Un cofre muy lejano |
| Swedish | Tempelloppet |
External links
- Tricky Temple Too playthrough at YouTube (PC version)
- Tricky Temple Too's Rayman Legends playthrough at YouTube (PC version)