Tricky Winds: Difference between revisions
Hunchman801 (talk | contribs) mNo edit summary |
Hunchman801 (talk | contribs) m Auto-formatting numbers |
||
| Line 1: | Line 1: | ||
'''Tricky Winds''' is the second level of the [[Desert of Dijiridoos|Grumbling Grottos]], a world from ''[[Rayman Origins]]''. The heroes must use air currents and didgeridoos to progress through the level, similarly to [[Wind or Lose]]. The PlayStation Vita version of ''[[Rayman Origins]]'' features a [[Ghost Mode]] of this level. This level is the second one in this world, and the tenth overall that is included in the [[Back to Origins]] painting in ''[[Rayman Legends]]''. | |||
==Original version== | |||
{{ROLevel | {{ROLevel | ||
| name = Tricky Winds | | name = Tricky Winds | ||
| Line 5: | Line 8: | ||
| followed by = [[Don't Shoot the DJ]] | | followed by = [[Don't Shoot the DJ]] | ||
| world = [[Desert of Dijiridoos|Grumbling Grottos]] | | world = [[Desert of Dijiridoos|Grumbling Grottos]] | ||
| medallion slot 1 = | | medallion slot 1 = Cage | ||
| medallion slot 2 = | | medallion slot 2 = Cage | ||
| medallion slot 3 = | | medallion slot 3 = Cage | ||
| medallion slot 4 = | | medallion slot 4 = Lums | ||
| medallion slot 5 = | | medallion slot 4 number = 150 | ||
| medallion slot 6 = | | medallion slot 5 = Lums | ||
| medal = | | medallion slot 5 number = 300 | ||
| cup = | | medallion slot 6 = Time | ||
| skull | | medallion slot 6 number = 2:35 | ||
| | | medal = 350 | ||
| cup = 2:10 | |||
| skull coins = 6 | |||
| relics = 3 | |||
| format numbers = true | |||
}} | }} | ||
===Area 1=== | |||
= | |||
==Area 1== | |||
As the level begins, the heroes can use a nearby [[Swingman]] to swing left and reach the first [[Skull Coin]] of the level. This area is straightforward from here on; the heroes must use the air currents with green leaves to go through the didgeridoos that block their path. | As the level begins, the heroes can use a nearby [[Swingman]] to swing left and reach the first [[Skull Coin]] of the level. This area is straightforward from here on; the heroes must use the air currents with green leaves to go through the didgeridoos that block their path. | ||
| Line 28: | Line 32: | ||
</gallery> | </gallery> | ||
===Relic 1=== | ====Relic 1==== | ||
The first [[relic]] can be found in this area, beyond some didgeridoos. | The first [[relic]] can be found in this area, beyond some didgeridoos. | ||
<gallery widths="320px" heights="180px"> | |||
Tricky Winds first relic.png|The first [[relic]] is located behind the didgeridoo to the right of [[Rayman]]. | |||
</gallery> | |||
==Area 2== | ===Area 2=== | ||
[[File:Tricky Winds 4.jpg|320px|thumb|Hitting the [[switch]] will make the air current appear.]] | [[File:Tricky Winds 4.jpg|320px|thumb|Hitting the [[switch]] will make the air current appear.]] | ||
| Line 42: | Line 46: | ||
{{Clear}} | {{Clear}} | ||
===Secret area 1=== | ====Secret area 1==== | ||
The heroes must defeat three [[red bird]]s. Each one can be reached by using separate air currents. Once they have all been defeated, the [[Electoon]] [[cage]] can be broken. | The heroes must defeat three [[red bird]]s. Each one can be reached by using separate air currents. Once they have all been defeated, the [[Electoon]] [[cage]] can be broken. | ||
| Line 51: | Line 55: | ||
</gallery> | </gallery> | ||
==Area 3== | ===Area 3=== | ||
The heroes must ascend by [[Helicopter|gliding]], with the aid of an air current. The third [[Skull Coin]] can be collected by dropping down to a platform hidden behind feathers. While [[Helicopter|gliding]], the heroes must avoid many [[Antitoon|Darktoons]] attached to the didgeridoos, along with some [[spiky bird]]s. The fourth [[Skull Coin]] can be acquired by [[Helicopter|gliding]] near an electric wire and reaching a [[Darkroot]], where the [[Skull Coin|coin]] can be seen in its centre. After [[Helicopter|gliding]] to the top, the heroes can find the exit near a barricade. | The heroes must ascend by [[Helicopter|gliding]], with the aid of an air current. The third [[Skull Coin]] can be collected by dropping down to a platform hidden behind feathers. While [[Helicopter|gliding]], the heroes must avoid many [[Antitoon|Darktoons]] attached to the didgeridoos, along with some [[spiky bird]]s. The fourth [[Skull Coin]] can be acquired by [[Helicopter|gliding]] near an electric wire and reaching a [[Darkroot]], where the [[Skull Coin|coin]] can be seen in its centre. After [[Helicopter|gliding]] to the top, the heroes can find the exit near a barricade. | ||
| Line 59: | Line 63: | ||
</gallery> | </gallery> | ||
==Area 4== | ===Area 4=== | ||
Similarly to the third area, the heroes must [[Helicopter|glide]] in the air current to proceed, but this time they will be travelling horizontally. The heroes must avoid many more [[spiky bird]]s in this area. The fifth [[Skull Coin]] can be found by [[Helicopter|gliding]] under two stationary [[spiky bird]]s and one moving one. As they approach the exit, the heroes can [[Helicopter|glide]] up through a space between two platforms near a [[Antitoon|Darktoon]], where they will find the [[#Secret area 2|second secret area]] to their right. | Similarly to the third area, the heroes must [[Helicopter|glide]] in the air current to proceed, but this time they will be travelling horizontally. The heroes must avoid many more [[spiky bird]]s in this area. The fifth [[Skull Coin]] can be found by [[Helicopter|gliding]] under two stationary [[spiky bird]]s and one moving one. As they approach the exit, the heroes can [[Helicopter|glide]] up through a space between two platforms near a [[Antitoon|Darktoon]], where they will find the [[#Secret area 2|second secret area]] to their right. | ||
| Line 67: | Line 71: | ||
</gallery> | </gallery> | ||
===Secret area 2=== | ====Secret area 2==== | ||
The heroes must be careful when passing through the moving didgeridoos with [[Antitoon|Darktoons]] attached to them. They will then need to defeat three [[red bird]]s before the [[cage]] can be broken. | The heroes must be careful when passing through the moving didgeridoos with [[Antitoon|Darktoons]] attached to them. They will then need to defeat three [[red bird]]s before the [[cage]] can be broken. | ||
| Line 75: | Line 79: | ||
</gallery> | </gallery> | ||
==Area 5== | ===Area 5=== | ||
The heroes, aided by an air current, will travel horizontally through this area. Many more [[Darkroot]]s will appear, along with some [[spiky bird]]s and [[Antitoon|Darktoons]]. To reach the exit, the heroes must hit a [[switch]], which will disable the air currents. | The heroes, aided by an air current, will travel horizontally through this area. Many more [[Darkroot]]s will appear, along with some [[spiky bird]]s and [[Antitoon|Darktoons]]. To reach the exit, the heroes must hit a [[switch]], which will disable the air currents. | ||
| Line 83: | Line 87: | ||
</gallery> | </gallery> | ||
===Relic 2=== | ====Relic 2==== | ||
[[File:Tricky Winds second relic.png|thumb|320px|The second [[relic]] is located below [[Rayman]] in front of the didgeridoo.]] | [[File:Tricky Winds second relic.png|thumb|320px|The second [[relic]] is located below [[Rayman]] in front of the didgeridoo.]] | ||
| Line 90: | Line 94: | ||
{{clear}} | {{clear}} | ||
==Area 6== | ===Area 6=== | ||
[[File:Tricky Winds 16.jpg|320px|thumb|A passage filled with [[Darkroot]]s.]] | [[File:Tricky Winds 16.jpg|320px|thumb|A passage filled with [[Darkroot]]s.]] | ||
| Line 97: | Line 101: | ||
{{clear}} | {{clear}} | ||
===Relic 3=== | ====Relic 3==== | ||
[[File:Tricky Winds third relic.png|thumb|320px|The third [[relic]] is located beneath the didgeridoo, directly below [[Rayman]].]] | [[File:Tricky Winds third relic.png|thumb|320px|The third [[relic]] is located beneath the didgeridoo, directly below [[Rayman]].]] | ||
| Line 104: | Line 108: | ||
{{Clear}} | {{Clear}} | ||
==Area 7== | ===Area 7=== | ||
[[File:Tricky Winds 17.jpg|320px|thumb|The final area.]] | [[File:Tricky Winds 17.jpg|320px|thumb|The final area.]] | ||
| Line 114: | Line 118: | ||
{{RLLevel | {{RLLevel | ||
| name = Tricky Winds | | name = Tricky Winds | ||
| difficulty = | | difficulty = 1 | ||
| image = [[File:Tricky Winds - Back to Origins.png|center|320px|Tricky Winds]] | | image = [[File:Tricky Winds - Back to Origins.png|center|320px|Tricky Winds]] | ||
| preceded by = [[Best Original Score#Back to Origins|Best Original Score]] | | preceded by = [[Best Original Score#Back to Origins|Best Original Score]] | ||
| followed by = [[Skyward Sonata#Back to Origins|Skyward Sonata]] | | followed by = [[Skyward Sonata#Back to Origins|Skyward Sonata]] | ||
| world = [[Desert of Dijiridoos]] | | world = [[Desert of Dijiridoos]] | ||
| teensies = | | teensies = 10 | ||
| bronze cup = | | bronze cup = 150 | ||
| silver cup = | | silver cup = 300 | ||
| lucky ticket = | | lucky ticket = 450 | ||
| gold cup = | | gold cup = 600 | ||
| format numbers = true | |||
}} | }} | ||
Revision as of 22:09, 6 September 2024
Tricky Winds is the second level of the Grumbling Grottos, a world from Rayman Origins. The heroes must use air currents and didgeridoos to progress through the level, similarly to Wind or Lose. The PlayStation Vita version of Rayman Origins features a Ghost Mode of this level. This level is the second one in this world, and the tenth overall that is included in the Back to Origins painting in Rayman Legends.
Original version
| Tricky Winds | |||||
|---|---|---|---|---|---|
 | |||||
| ← Savage Swarms | Don't Shoot the DJ → | ||||
Area 1
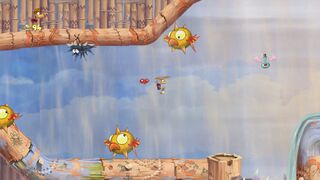
As the level begins, the heroes can use a nearby Swingman to swing left and reach the first Skull Coin of the level. This area is straightforward from here on; the heroes must use the air currents with green leaves to go through the didgeridoos that block their path.
-
 A spiky bird.
 -
 A Lum King.


Relic 1
The first relic can be found in this area, beyond some didgeridoos.

Area 2

The heroes must use more air currents to travel through this area. The second Skull Coin is located near a Darkroot, which is wrapped around the coin. The first secret area can be found not far from here; it can be reached by using the Swingman to swing left near the exit.
Secret area 1
The heroes must defeat three red birds. Each one can be reached by using separate air currents. Once they have all been defeated, the Electoon cage can be broken.
-
 The first secret area has the heroes going through several air vents to find all red birds.
 -
 All red birds must be defeated.
 -
 The cage in the first secret area.


Area 3
The heroes must ascend by gliding, with the aid of an air current. The third Skull Coin can be collected by dropping down to a platform hidden behind feathers. While gliding, the heroes must avoid many Darktoons attached to the didgeridoos, along with some spiky birds. The fourth Skull Coin can be acquired by gliding near an electric wire and reaching a Darkroot, where the coin can be seen in its centre. After gliding to the top, the heroes can find the exit near a barricade.
-
 The heroes must fly up a tight passage.
 -
 A Skull Coin.


Area 4
Similarly to the third area, the heroes must glide in the air current to proceed, but this time they will be travelling horizontally. The heroes must avoid many more spiky birds in this area. The fifth Skull Coin can be found by gliding under two stationary spiky birds and one moving one. As they approach the exit, the heroes can glide up through a space between two platforms near a Darktoon, where they will find the second secret area to their right.
-
 Several small spiky birds.
 -
 A big spiky bird.


Secret area 2
The heroes must be careful when passing through the moving didgeridoos with Darktoons attached to them. They will then need to defeat three red birds before the cage can be broken.
-
 The second secret area.
 -


Area 5
The heroes, aided by an air current, will travel horizontally through this area. Many more Darkroots will appear, along with some spiky birds and Darktoons. To reach the exit, the heroes must hit a switch, which will disable the air currents.


Relic 2

The second relic can be found in this area, just in front of a didgeridoo.
Area 6

With the aid of an air current, the heroes must glide and ascend to get through this area. The sixth Skull Coin can be retrieved by descending while avoiding a spiky bird and two Darktoons. The heroes must then continue to ascend by gliding, while avoiding many Darkroots on their way to the exit.
Relic 3

The third relic can be found in this area, camouflaged behind a dusty air current.
Area 7

The heroes must defeat four red birds, which hover above the Electoon cage. Once they are all defeated, the cage can be broken, ending the level. The heroes will then pose on the photoboard as the Magician counts the total number of Lums collected throughout the level.
Back to Origins
| Tricky Winds | ||||||||
|---|---|---|---|---|---|---|---|---|
 | ||||||||
| ← Best Original Score | Skyward Sonata → | |||||||
This level is playable in the Back to Origins painting from Rayman Legends as the first one from Desert of Dijiridoos. There are not many notable differences between the versions, except for the notable differences that appear in every other Back to Origins level.
-
 The first area of the level.
 -
 The second Skull Coin.
 -
 The first secret area.
 -
 The third area of the level.
 -
 The fourth area.
 -
 The second secret area.
 -
 The sixth area.
 -
 The seventh and final area of the level.


Names in other languages
| Language | Name |
|---|---|
| English | Tricky Winds |
| Chinese (simplified) | 和风细雨 |
| Czech | Mazané větry |
| Danish | Snedige vinde |
| Dutch | Lastige windjes |
| Finnish | Tukalat tuulet |
| French | À bout de souffle |
| German | Tückische Winde |
| Hungarian | Trükkös szelek |
| Italian | Venti insidiosi |
| Japanese | いや~な かぜ (Rayman Origins)
「かぜ風がう生みだすね音いろ色」 (Rayman Legends) |
| Norwegian | Vriene vinder |
| Polish | Podstępne wiatry |
| Portuguese | Ventos eólicos (Rayman Origins)
Ventos traiçoeiros (Rayman Legends) |
| Russian | Коварные ветры |
| Spanish | Ventosidades |
| Swedish | Lömska vindar |
External links
- Tricky Winds playthrough at YouTube (PC version) (Normal walkthrough + Lums Medal)
- Tricky Winds playthrough at YouTube (PC version) (Speed Trophy)
- Tricky Winds' Rayman Legends playthrough at YouTube (PC version)