Swimming with Stars: Difference between revisions
Hunchman801 (talk | contribs) m Manual of style, replaced: aren't → are not |
I might need to look over this again later |
||
| Line 18: | Line 18: | ||
}} | }} | ||
'''Swimming with Stars''' is the second level of the [[Sea of Serendipity]], the fourth world in ''[[Rayman Origins]]''. | '''Swimming with Stars''' is the second level of the [[Sea of Serendipity]], and the fourth world in ''[[Rayman Origins]]''. In this level, the heroes will [[Swimming|swim]] in both brightly lit and darkened areas; the latter requiring stars providing light to avoid the [[tentacle claw]]s. Despite the level being the first from this world and twenty-sixth overall that is included in the [[Back to Origins]] painting in ''[[Rayman Legends]]'', the first playable level in the painting is [[Freaking Flipper]]. | ||
==Original version== | ==Original version== | ||
==Area 1== | ==Area 1== | ||
As | As the heroes dive into the water, the tune with the friendly [[fish]] singing plays again, despite the fact that the [[fish]] are not present. A new enemy appears in this area, the [[sea anemone]]. Most of them throughout the world can be temporarily withdrawn if the heroes hit their [[bulb]]. The heroes will need to reach the exit while avoiding these [[Sea anemone|anemones]]. | ||
<gallery widths="320px" heights="180px"> | <gallery widths="320px" heights="180px"> | ||
| Line 29: | Line 29: | ||
==Area 2== | ==Area 2== | ||
The [[fish]] singing tune ends, and a more sinister tune plays. The | The [[fish]] singing tune ends, and a more sinister tune plays. The heroes need to advance by [[swimming]] deeper, while avoiding more groups of [[sea anemone]] and spikes sticking out from the walls. The first [[Skull Coin]] can be found by swimming through a tight space between two platforms to the far right of the area. As the heroes proceed to swim deeper, the second [[Skull Coin]] can be collected by waiting for the [[jellyfish]] to spread out away from the [[Skull Coin|coin]]. The heroes can now proceed to the exit. | ||
<gallery widths="320px" heights="180px"> | <gallery widths="320px" heights="180px"> | ||
| Line 35: | Line 35: | ||
Swimming with Stars 3.jpg|A [[Skull Coin]] guarded by another group of [[jellyfish]]. | Swimming with Stars 3.jpg|A [[Skull Coin]] guarded by another group of [[jellyfish]]. | ||
</gallery> | </gallery> | ||
===Relic 1=== | |||
[[File:Swimming with Stars first relic.png|thumb|right|320px|The first [[relic]] can be found just below [[Rayman]], inside the [[bulb]].]] | |||
The first [[relic]] can be found in this area; it is located inside a [[bulb]] of a [[sea anemone]]. | |||
{{clear}} | |||
==Area 3== | ==Area 3== | ||
As the place gets darker, the | As the place gets darker, the heroes must continue to [[Swimming|swim]] even deeper, while avoiding the [[giant jellyfish]] that appear throughout the area. The third [[Skull Coin]] can be collected by waiting for a lone [[jellyfish]] to move out of the way of a tight space, then [[swimming]] through the space to reach it. The heroes can now proceed to the exit, while avoiding the spikes sticking out along the way. | ||
<gallery widths="320px" heights="180px"> | <gallery widths="320px" heights="180px"> | ||
| Line 45: | Line 51: | ||
==Area 4== | ==Area 4== | ||
It is completely dark in this area, but fortunately a group of creatures | It is completely dark in this area, but fortunately a group of creatures surrounded by light will follow the heroes. These are useful for proceeding through the dark cavern, as the light will scare away the [[tentacle claw]]s. The heroes will need to move quickly, as the lighted creatures won't last long. The first secret area can be found by swimming upwards around a long [[sea anemone]]. Afterwards, the heroes can find their way to the exit. | ||
<gallery widths="320px" heights="180px"> | <gallery widths="320px" heights="180px"> | ||
| Line 51: | Line 57: | ||
Swimming with Stars 7.jpg|[[Tentacle claw]]s are scared of light. | Swimming with Stars 7.jpg|[[Tentacle claw]]s are scared of light. | ||
</gallery> | </gallery> | ||
===Relic 2=== | |||
[[File:Swimming with Stars second relic.png|thumb|right|320px|The second [[relic]] can be found just above [[Rayman]].]] | |||
The second [[relic]] can be found near the top of the area, next to a [[sea anemone]]. | |||
{{clear}} | |||
===Secret area 1=== | ===Secret area 1=== | ||
[[File:Swimming with Stars 8.jpg|320px|thumb| | [[File:Swimming with Stars 8.jpg|320px|thumb|left|The first secret area.]] | ||
In front of the | In front of the heroes are a bunch of blocks. The green ones can be destroyed, while the brown crates cannot, and they will have to be avoided if they start to fall. The heroes will need to quickly flee from the TNT crates if they attack one. There are also [[Blowfish]] which need to be defeated in order to break the [[Electoon]] [[cage]]. | ||
{{Clear}} | {{Clear}} | ||
==Area 5== | ==Area 5== | ||
This time, there are no creatures with light | This time, there are no creatures with light surrounding around them, though there are lone [[luminous fish]] with a limited amount of light around them. This makes it tougher to avoid the nearby [[tentacle claw]]s. The heroes will also aid the light of an [[Anglerfish]]. The fourth [[Skull Coin]] can be found by swimming down to a dimly lit area with a group of horizontal moving [[jellyfish]]. Afterwards, the heroes reach a bright area filled with [[Lum (UbiArt games)|Lums]], [[jellyfish]], and a [[Lum King]]. If the heroes swim straight up, they will encounter the fifth [[Skull Coin]] of the level. The heroes will now be aided by the help of another [[Anglerfish]] to reach to the exit. | ||
<gallery widths="320px" heights="180px"> | <gallery widths="320px" heights="180px"> | ||
| Line 66: | Line 78: | ||
Swimming with Stars 11.jpg|A [[Lum King]] with a bunch of [[Lum (UbiArt games)|Lums]]. | Swimming with Stars 11.jpg|A [[Lum King]] with a bunch of [[Lum (UbiArt games)|Lums]]. | ||
</gallery> | </gallery> | ||
===Relic 3=== | |||
[[File:Swimming with Stars third relic.png|thumb|right|320px|The third [[relic]] can be found just in front of [[Rayman]].]] | |||
The third [[relic]] can be found below the [[jellyfish]] and the [[Lum King]] in this area. | |||
{{clear}} | |||
==Area 6== | ==Area 6== | ||
[[File:Swimming with Stars 12.jpg|320px|thumb|left|[[Rayman]] swimming by a bunch of [[sea anemone]]s.]] | [[File:Swimming with Stars 12.jpg|320px|thumb|left|[[Rayman]] swimming by a bunch of [[sea anemone]]s.]] | ||
Again, the heroes will need to use the little creatures for light, as the heroes are now in an tighter area filled with [[sea anemone]]s, [[tentacle claw]]s, and [[jellyfish]]. The sixth [[Skull Coin]] can be retrieved by avoiding some [[sea anemone]]s close to a another spot filled with lighted creatures. Afterwards, the heroes can proceed to the exit. | |||
{{Clear}} | {{Clear}} | ||
==Area 7== | ==Area 7== | ||
Similar to the fifth area, the heroes | Similar to the fifth area, the heroes will need to be careful, as they use the light from the [[luminous fish]], along with an [[Anglerfish]] to advance. As the heroes proceed, they can find the second secret area, by using a couple of [[luminous fish]] to reach an area where then can swim down through a tight space. The exit is not too far away, and can be found close to more green [[luminous fish]]. | ||
<gallery widths="320px" heights="180px"> | <gallery widths="320px" heights="180px"> | ||
| Line 83: | Line 101: | ||
===Secret area 2=== | ===Secret area 2=== | ||
[[File:Swimming with Stars 15.jpg|320px|thumb|right|The second secret area.]] | [[File:Swimming with Stars 15.jpg|320px|thumb|right|The second secret area.]] | ||
There are a lot of [[Blowfish]] in this area, but there | There are a lot of [[Blowfish]] in this area, but there is also a [[giant jellyfish]] that will follow the heroes in order to hurt them. Once all of the orange [[fish]] are destroyed, the [[cage]] can be broken. | ||
{{Clear}} | {{Clear}} | ||
| Line 89: | Line 107: | ||
==Area 8== | ==Area 8== | ||
[[File:Swimming with Stars 16.jpg|320px|thumb|left|The final area has four [[Redfish]] protecting the [[cage]].]] | [[File:Swimming with Stars 16.jpg|320px|thumb|left|The final area has four [[Redfish]] protecting the [[cage]].]] | ||
In this | In this bright area, all the heroes will need to do is defeat the four [[Redfish]] in order to break the [[Electoon]] [[cage]], ending the level; the heroes pose on the [[The Photographer|photoboard]] as [[the Magician]] waits for the total amount of [[Lum (UbiArt games)|Lums]] that were collected throughout the level. | ||
{{Clear}} | {{Clear}} | ||
Revision as of 05:09, 3 September 2019
| Swimming with Stars | |||||||||||
|---|---|---|---|---|---|---|---|---|---|---|---|
 | |||||||||||
| ← Port 'O Panic | Freaking Flipper → | ||||||||||
 Sea of Serendipity Sea of Serendipity
| |||||||||||
   
|

|

| |||||||||
   
|
|
  
| |||||||||

|

| ||||||||||

Swimming with Stars is the second level of the Sea of Serendipity, and the fourth world in Rayman Origins. In this level, the heroes will swim in both brightly lit and darkened areas; the latter requiring stars providing light to avoid the tentacle claws. Despite the level being the first from this world and twenty-sixth overall that is included in the Back to Origins painting in Rayman Legends, the first playable level in the painting is Freaking Flipper.
Original version
Area 1
As the heroes dive into the water, the tune with the friendly fish singing plays again, despite the fact that the fish are not present. A new enemy appears in this area, the sea anemone. Most of them throughout the world can be temporarily withdrawn if the heroes hit their bulb. The heroes will need to reach the exit while avoiding these anemones.
-
 Rayman swimming by the new sea anemone enemies.

Area 2
The fish singing tune ends, and a more sinister tune plays. The heroes need to advance by swimming deeper, while avoiding more groups of sea anemone and spikes sticking out from the walls. The first Skull Coin can be found by swimming through a tight space between two platforms to the far right of the area. As the heroes proceed to swim deeper, the second Skull Coin can be collected by waiting for the jellyfish to spread out away from the coin. The heroes can now proceed to the exit.
-

-
 A Skull Coin guarded by another group of jellyfish.


Relic 1

The first relic can be found in this area; it is located inside a bulb of a sea anemone.
Area 3
As the place gets darker, the heroes must continue to swim even deeper, while avoiding the giant jellyfish that appear throughout the area. The third Skull Coin can be collected by waiting for a lone jellyfish to move out of the way of a tight space, then swimming through the space to reach it. The heroes can now proceed to the exit, while avoiding the spikes sticking out along the way.
-

-
 A few spikes stick out in this tight passage.


Area 4
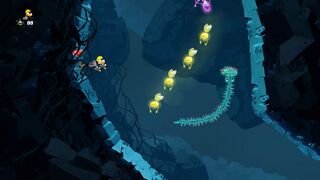
It is completely dark in this area, but fortunately a group of creatures surrounded by light will follow the heroes. These are useful for proceeding through the dark cavern, as the light will scare away the tentacle claws. The heroes will need to move quickly, as the lighted creatures won't last long. The first secret area can be found by swimming upwards around a long sea anemone. Afterwards, the heroes can find their way to the exit.
-
 The glowing fish will follow the player.
 -
 Tentacle claws are scared of light.


Relic 2

The second relic can be found near the top of the area, next to a sea anemone.
Secret area 1

In front of the heroes are a bunch of blocks. The green ones can be destroyed, while the brown crates cannot, and they will have to be avoided if they start to fall. The heroes will need to quickly flee from the TNT crates if they attack one. There are also Blowfish which need to be defeated in order to break the Electoon cage.
Area 5
This time, there are no creatures with light surrounding around them, though there are lone luminous fish with a limited amount of light around them. This makes it tougher to avoid the nearby tentacle claws. The heroes will also aid the light of an Anglerfish. The fourth Skull Coin can be found by swimming down to a dimly lit area with a group of horizontal moving jellyfish. Afterwards, the heroes reach a bright area filled with Lums, jellyfish, and a Lum King. If the heroes swim straight up, they will encounter the fifth Skull Coin of the level. The heroes will now be aided by the help of another Anglerfish to reach to the exit.
-
 Anglerfish provide light, although they won't directly follow the player.
 -
 A bunch of jellyfish above a secret leading to a Skull Coin.
 -


Relic 3

The third relic can be found below the jellyfish and the Lum King in this area.
Area 6

Again, the heroes will need to use the little creatures for light, as the heroes are now in an tighter area filled with sea anemones, tentacle claws, and jellyfish. The sixth Skull Coin can be retrieved by avoiding some sea anemones close to a another spot filled with lighted creatures. Afterwards, the heroes can proceed to the exit.
Area 7
Similar to the fifth area, the heroes will need to be careful, as they use the light from the luminous fish, along with an Anglerfish to advance. As the heroes proceed, they can find the second secret area, by using a couple of luminous fish to reach an area where then can swim down through a tight space. The exit is not too far away, and can be found close to more green luminous fish.
-
 The green luminous fish will provide light.
 -
 Another Anglerfish with light.


Secret area 2

There are a lot of Blowfish in this area, but there is also a giant jellyfish that will follow the heroes in order to hurt them. Once all of the orange fish are destroyed, the cage can be broken.
Area 8

In this bright area, all the heroes will need to do is defeat the four Redfish in order to break the Electoon cage, ending the level; the heroes pose on the photoboard as the Magician waits for the total amount of Lums that were collected throughout the level.
| Swimming with the Stars | ||||||||
|---|---|---|---|---|---|---|---|---|
 | ||||||||

| ||||||||
| ← Freaking Flipper | Why So Crabby? → | |||||||
| Sea of Serendipity
| ||||||||

|
||||||||

|

| |||||||

|

| |||||||
Back to Origins
This level is playable in the Back to Origins mode in Rayman Legends as the second one from Sea of Serendipity, the first being Freaking Flipper. There are not many notable differences between the versions; except the notable differences that appear in every other Back to Origins level. It is renamed Swimming with the Stars.
-
 The starting point of the level, as seen in Rayman Legends.
 -
 A small group of jellyfish.
 -
 Sea anemones attached to bulbs.
 -
 Lum chains appear throughout.
 -
 Spikes will be seen if the players get close to it.
 -
 The lighted creatures will help the players get through.
 -
 The first secret area.
 -
 An Anglerfish will light the way for the team.
 -
 Green luminous fish have a dim light around them.
 -

-
 Tentacle claws will attempt to grab the players if they don't have any light surrounding them.
 -
 The second secret area.
 -
 The final area of the level.


External links
- Swimming with Stars playthrough at YouTube (PC version) (Normal walkthrough + Lums Medal)
- Swimming with Stars playthrough at YouTube (PC version) (Speed Trophy)
- Swimming with the Stars' Rayman Legends playthrough at YouTube (PC version)