Fickle Fruit: Difference between revisions
No edit summary |
Improvements and added links |
||
| Line 18: | Line 18: | ||
}} | }} | ||
'''Fickle Fruit''' is the third level of the [[Luscious Lakes]], a world in ''[[Rayman Origins]]''. In this level, [[Rayman]] and his team must cross | '''Fickle Fruit''' is the third level of the [[Luscious Lakes]], a world in ''[[Rayman Origins]]''. In this level, [[Rayman]] and his team must cross the [[Frosty Delights]] area at night, filled with [[spiky orange]]s, [[Baby Piranhas|Baby Piranha]] infested water and slippery ice platforms. This level is the third one from this world and twenty-second overall that's included in the [[Back to Origins]] mode in ''[[Rayman Legends]]''. | ||
==Original version== | ==Original version== | ||
==Area 1== | |||
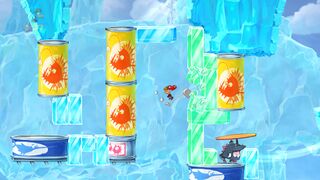
The heroes begin by sliding on the slippery ice platforms, jumping to not fall into the [[Baby Piranhas|Baby Piranha]] infested water. After that, they cross the blocks of ice to a platform that will make them shrink. The first secret area can be found by performing a [[wall run]] on a high located ice platform. Once done, the team can continue on. As they do, they encounter bouncing and wall attached [[spiky orange]]s. The exit is nearby the [[Spiky orange|oranges]]. | |||
== | <gallery widths="320px" heights="180px"> | ||
Fickle Fruit 2.jpg|A [[Baby Dragon Waiter]]. | |||
Fickle Fruit 3.jpg|A [[spiky orange]]. | |||
Fickle Fruit 8.jpg|The end of the first area. | |||
</gallery> | |||
===Secret area 1=== | |||
Here, the team needs to be extra careful not to fall down while reaching the [[Baby Dragon Waiter]]s. When they are defeated, the [[Electoon]] [[cage]] can be broken open. | |||
== | <gallery widths="320px" heights="180px"> | ||
Fickle Fruit 4.jpg|The first [[Baby Dragon Waiter]]. | |||
Fickle Fruit 5.jpg|The second [[Baby Dragon Waiter]]. | |||
Fickle Fruit 6.jpg|The third [[Baby Dragon Waiter]]. | |||
Fickle Fruit 7.jpg|The [[cage]] in the first secret area. | |||
</gallery> | |||
==Area 2== | ==Area 2== | ||
[[File:Fickle Fruit 9.jpg|320px|thumb|right|A bunch of blocks of ice.]] | [[File:Fickle Fruit 9.jpg|320px|thumb|right|A bunch of blocks of ice.]] | ||
If the team bounces on a green orange, they will find the first [[Skull Coin]] of the level. Next, there will be several bouncing [[ | If the team bounces on a green orange, they will find the first [[Skull Coin]] of the level. Next, there will be several bouncing [[spiky orange]]s on ice blocks. It is possible to lure them to a gap close by. The second [[Skull Coin]] is to the right of the bottom green block of ice. Shortly, if the players use two slippery green oranges to go up, they come in contact with a grassy scenery piece that will make the third [[Skull Coin]] appear in a [[bubble]]. Then the team grows back to normal size and find the exit. | ||
{{Clear}} | {{Clear}} | ||
==Area 3== | ==Area 3== | ||
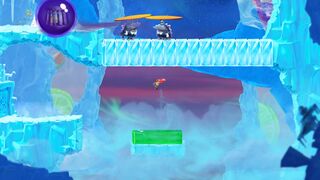
The heroes | The heroes now cross a body of [[Baby Piranhas|Baby Piranha]] to a [[funnel]] that will shrink the players again. If the players use a straw to get to a platform where they can perform walljumps, the second secret area can be found. After that, the team needs to get past the [[spiky orange]]s to a [[funnel]] that will grow them back to normal size. The fourth [[Skull Coin]] is found by touching the first of four green oranges near the exit. | ||
<gallery widths="320px" heights="180px"> | |||
Fickle Fruit 10.jpg|A watermelon floating in the water. | |||
Fickle Fruit 12.jpg|A [[Skull Coin]]. | |||
</gallery> | |||
===Secret | ===Secret area 2=== | ||
[[File:Fickle Fruit 11.jpg|320px|thumb| | [[File:Fickle Fruit 11.jpg|320px|thumb|left|The second secret area.]] | ||
The | The team needs to bounce on a [[Bumper Jelly]] to reach and defeat the [[Baby Dragon Waiter]]s. When done, the [[cage]] can be broken open. | ||
{{Clear}} | {{Clear}} | ||
==Area 4== | ==Area 4== | ||
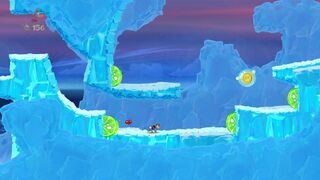
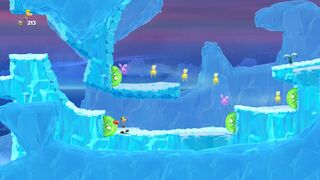
The heroes | The heroes start here by body slamming on blocks of ice to advance. Then, back to being shrunken, have to avoid being crushed by ice blocks and bouncing [[spiky orange]]s. The fifth [[Skull Coin]] can be retrieved by going up to a icy platform then performing a [[wall run]]. The sixth [[Skull Coin]] can be found by taking advantage of square-shaped ice blocks that lead up to the [[Skull Coin|coin]]. The exit is to the right. | ||
<gallery widths="320px" heights="180px"> | |||
Fickle Fruit 13.jpg||A [[Lum King]]. | |||
Fickle Fruit 14.jpg|[[Rayman]] hanging on a straw. | |||
</gallery> | |||
==Area 5== | ==Area 5== | ||
[[File:Fickle Fruit 15.jpg|320px|thumb|right|The | [[File:Fickle Fruit 15.jpg|320px|thumb|right|The fifth and final area.]] | ||
The only thing the team needs to do is destroy enough ice blocks to cause the [[ | The only thing the team needs to do is destroy enough ice blocks to cause the [[spiky orange]] to fall into the abyss. When done, the [[Electoon]] [[cage]] can be broken to end the level. The players then will pose on the [[The Photographer|photoboard]] as [[the Magician]] waits for the total amount of [[Lum (UbiArt games)|Lums]] that were collected in the level. | ||
{{Clear}} | {{Clear}} | ||
| Line 89: | Line 89: | ||
}} | }} | ||
==Back to Origins== | ==[[Back to Origins]]== | ||
This level is playable in the [[Back to Origins]] mode in ''[[Rayman Legends]]'' as the sixth one from [[Gourmand Land]]. There aren't many notable differences between the versions; except the notable differences that appear in every other Back to Origins level. | This level is playable in the [[Back to Origins]] mode in ''[[Rayman Legends]]'' as the sixth one from [[Gourmand Land]]. There aren't many notable differences between the versions; except the notable differences that appear in every other [[Back to Origins]] level. | ||
<gallery widths="320px" heights="180px"> | |||
Fickle Fruit - Back to Origins 1.jpg|The first area of the level. | |||
Fickle Fruit - Back to Origins 2.jpg|A trapped [[Teensie]]. | |||
Fickle Fruit - Back to Origins 3.jpg|The first secret area. | |||
Fickle Fruit - Back to Origins 4.jpg|The first [[Skull Coin]] in the level. | |||
Fickle Fruit - Back to Origins 5.jpg|The [[spiky orange]]s look different in the level. | |||
Fickle Fruit - Back to Origins 6.jpg|[[Baby Piranhas|Baby Piranha]] infested water. | |||
Fickle Fruit - Back to Origins 7.jpg|The second secret area. | |||
Fickle Fruit - Back to Origins 8.jpg|The third area of the level. | |||
Fickle Fruit - Back to Origins 9.jpg|The fourth area. | |||
Fickle Fruit - Back to Origins 10.jpg|The sixth [[Skull Coin]] in the level. | |||
Fickle Fruit - Back to Origins 11.jpg|The fifth and final area. | |||
</gallery> | |||
==External links== | ==External links== | ||
* [http://www.youtube.com/watch?v=Ma-EWji42mM Fickle Fruit playthrough at YouTube (PC version) (Normal walkthrough + Lums Medal)] | * [http://www.youtube.com/watch?v=Ma-EWji42mM Fickle Fruit playthrough at YouTube (PC version) (Normal walkthrough + Lums Medal)] | ||
* [http://www.youtube.com/watch?v=o_u-5VDRj4Q Fickle Fruit playthrough at YouTube (PC version) (Speed Trophy)] | * [http://www.youtube.com/watch?v=o_u-5VDRj4Q Fickle Fruit playthrough at YouTube (PC version) (Speed Trophy)] | ||
* [https://www.youtube.com/watch?v=--Pu5t3dZVo Fickle Fruit's ''Rayman Legends'' playthrough at YouTube (PC version)] | |||
* [https://www.youtube.com/watch?v=--Pu5t3dZVo Fickle Fruit's Rayman Legends playthrough at YouTube (PC version)] | |||
{{RaymanOriginslocations}} | {{RaymanOriginslocations}} | ||
Revision as of 18:00, 2 April 2018
| Fickle Fruit | |||||||||||
|---|---|---|---|---|---|---|---|---|---|---|---|
 | |||||||||||
| ← You're on Fire! | My Heartburn's for You → | ||||||||||
Fickle Fruit is the third level of the Luscious Lakes, a world in Rayman Origins. In this level, Rayman and his team must cross the Frosty Delights area at night, filled with spiky oranges, Baby Piranha infested water and slippery ice platforms. This level is the third one from this world and twenty-second overall that's included in the Back to Origins mode in Rayman Legends.
Original version
Area 1
The heroes begin by sliding on the slippery ice platforms, jumping to not fall into the Baby Piranha infested water. After that, they cross the blocks of ice to a platform that will make them shrink. The first secret area can be found by performing a wall run on a high located ice platform. Once done, the team can continue on. As they do, they encounter bouncing and wall attached spiky oranges. The exit is nearby the oranges.
-

-
 A spiky orange.
 -
 The end of the first area.


Secret area 1
Here, the team needs to be extra careful not to fall down while reaching the Baby Dragon Waiters. When they are defeated, the Electoon cage can be broken open.
-
 The first Baby Dragon Waiter.
 -
 The second Baby Dragon Waiter.
 -
 The third Baby Dragon Waiter.
 -
 The cage in the first secret area.


Area 2

If the team bounces on a green orange, they will find the first Skull Coin of the level. Next, there will be several bouncing spiky oranges on ice blocks. It is possible to lure them to a gap close by. The second Skull Coin is to the right of the bottom green block of ice. Shortly, if the players use two slippery green oranges to go up, they come in contact with a grassy scenery piece that will make the third Skull Coin appear in a bubble. Then the team grows back to normal size and find the exit.
Area 3
The heroes now cross a body of Baby Piranha to a funnel that will shrink the players again. If the players use a straw to get to a platform where they can perform walljumps, the second secret area can be found. After that, the team needs to get past the spiky oranges to a funnel that will grow them back to normal size. The fourth Skull Coin is found by touching the first of four green oranges near the exit.
-
 A watermelon floating in the water.
 -
 A Skull Coin.


Secret area 2

The team needs to bounce on a Bumper Jelly to reach and defeat the Baby Dragon Waiters. When done, the cage can be broken open.
Area 4
The heroes start here by body slamming on blocks of ice to advance. Then, back to being shrunken, have to avoid being crushed by ice blocks and bouncing spiky oranges. The fifth Skull Coin can be retrieved by going up to a icy platform then performing a wall run. The sixth Skull Coin can be found by taking advantage of square-shaped ice blocks that lead up to the coin. The exit is to the right.


Area 5

The only thing the team needs to do is destroy enough ice blocks to cause the spiky orange to fall into the abyss. When done, the Electoon cage can be broken to end the level. The players then will pose on the photoboard as the Magician waits for the total amount of Lums that were collected in the level.
| Fickle Fruit | ||||||||
|---|---|---|---|---|---|---|---|---|
 | ||||||||
| ← Dragon Soup | You're on Fire! → | |||||||
Back to Origins
This level is playable in the Back to Origins mode in Rayman Legends as the sixth one from Gourmand Land. There aren't many notable differences between the versions; except the notable differences that appear in every other Back to Origins level.
-
 The first area of the level.
 -
 A trapped Teensie.
 -
 The first secret area.
 -
 The first Skull Coin in the level.
 -
 The spiky oranges look different in the level.
 -
 Baby Piranha infested water.
 -
 The second secret area.
 -
 The third area of the level.
 -
 The fourth area.
 -
 The sixth Skull Coin in the level.
 -
 The fifth and final area.


External links
- Fickle Fruit playthrough at YouTube (PC version) (Normal walkthrough + Lums Medal)
- Fickle Fruit playthrough at YouTube (PC version) (Speed Trophy)
- Fickle Fruit's Rayman Legends playthrough at YouTube (PC version)