Best Original Score: Difference between revisions
I may revise this one again when I'm not tired. |
|||
| Line 22: | Line 22: | ||
==Original version== | ==Original version== | ||
==Area 1== | ==Area 1== | ||
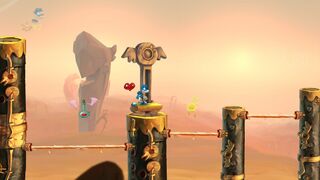
As the heroes enter the level, [[the Magician]] can be seen to their left; he gives them some information about saving [[Electoon]] [[cage]]s, and popping bubblized enemies to earn more [[Lum (UbiArt games)|Lums]]. Now the heroes can move on, jumping on friendly green [[bird#In Rayman Origins|birds]] that remain stationary on music sheets. The first [[Skull Coin]] can be found by passing a water current, under a bad [[Red Bird]]. Afterwards, they will encounter another [[Red Bird]] bouncing a platform which makes the friendly green [bird#In Rayman Origins|birds]] appear or disappear. The heroes can defeat the [[Red Bird|bad bird]] and use the friendly ones to advance. The rounded [[bird]] can be crush attacked in order to reach the second [[Skull Coin]] of the level. A little while later, after destroying some [[Antitoon|Darktoons]], an [[Electoon]] cries for help. To reach the secret area, the heroes must perform walljumps and climb to the top, nearby are some some [[helmet bird]]s. Once the [[Electoon]]s are saved, the heroes can proceed to the exit. | |||
<gallery widths="320px" heights="180px"> | <gallery widths="320px" heights="180px"> | ||
| Line 30: | Line 30: | ||
===Secret area 1=== | ===Secret area 1=== | ||
[[File:Best Original Score 10.jpg|320px|thumb|right|The first secret area.]] | [[File:Best Original Score 10.jpg|320px|thumb|right|The first secret area.]] | ||
The [[cage]] | The [[cage]] can be found at the bottom of the area. The heroes will need to [[Helicopter|glide]] in order to safely destroy the [[Red Bird]]s as they descend. Once they are destroyed, the [[cage]] can then be broken. | ||
{{clear}} | |||
===Relic 1=== | |||
[[File:Best Original Score first relic.png|thumb|left|320px|The first [[relic]] can be found just to the right of [[Rayman]].]] | |||
The first [[relic]] can be found above the exit in this area. | |||
{{clear}} | {{clear}} | ||
==Area 2== | ==Area 2== | ||
The heroes will need to advance, while avoiding some electrical currents. Afterwards, the heroes have to use a small green [[bird]] in order to pass more electrical currents; the [[bird]] will release a [[Skull Coin]] in a [[bubble]], the third [[Skull Coin|coin]] of the level. As the heroes approach the exit, there is a [[bumper notebird]] that nears it; the heroes can obtain the fourth [[Skull Coin]] if they crush attack the bird, then the exit can be found beneath the [[Skull Coin|coin]]. | |||
<gallery widths="320px" heights="180px"> | <gallery widths="320px" heights="180px"> | ||
Best Original Score 5.jpg|[[Rayman]] standing under a [[Lum King]]. | Best Original Score 5.jpg|[[Rayman]] standing under a [[Lum King]]. | ||
Best Original Score 6.jpg| | Best Original Score 6.jpg|The fourth [[Skull Coin]]. | ||
</gallery> | </gallery> | ||
==Area 3== | ==Area 3== | ||
The | The heroes will need to use more friendly [[bird]]s and advance to where they will encounter several electrical currents. All of the currents can be temporarily deactivated by jumping on a small platform. There is a [[switch]] that can make three green [[bird]]s appear if activated; performing a crush attack on the last one will help the heroes reach the fifth [[Skull Coin]] of the level, located next to a [[spiky bird]]. The exit can be found ahead, next to a sleeping [[Red Bird]]. | ||
<gallery widths="320px" heights="180px"> | <gallery widths="320px" heights="180px"> | ||
| Line 51: | Line 57: | ||
==Area 4== | ==Area 4== | ||
As the heroes destroy a few [[Red Bird]]s along the way, more electrical currents will block their path. Using a small platform to deactivate them and taking the higher path will result in them reaching the sixth [[Skull Coin]]. The second secret area is not too far away; the heroes need to perform walljumps to ascend in order to reach it. Once the [[Electoon]]s are saved, the heroes must activate two groups of friendly [[bird]]s, the others will appear by themselves, as if they were linked to a [[gendoor]]. The heroes can reach the exit by using the [[Swingman]]. | |||
===Secret area 2=== | |||
[[File:Best Original Score 9.jpg|320px|thumb|left|The second secret area.]] | [[File:Best Original Score 9.jpg|320px|thumb|left|The second secret area.]] | ||
In this very dark area, the heroes must destroy some [[Helmet Bird]]s and a [[Blowing Bird]]. Once all are defeated, the [[cage]] can be broken. | |||
{{clear}} | |||
=== | ===Relic 2=== | ||
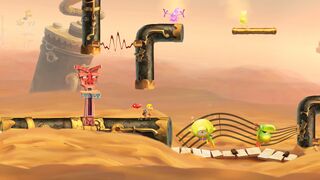
[[File:2019-08-27-030509.png|thumb|right|320px|The second [[relic]] can be found on the bottom left of this image.]] | |||
The second [[relic]] can be found in this area just after the heroes pass some piano keys. | |||
{{clear}} | {{clear}} | ||
==Area 5== | ==Area 5== | ||
[[File:Best Original Score 11.jpg|320px|thumb| | [[File:Best Original Score 11.jpg|320px|thumb|left|The final area.]] | ||
The | The heroes must destroy the sleeping [[Red Bird]]s in order for it to be possible to break the [[Electoon]] [[cage]]. Breaking the cage ends the level, then the heroes will pose on a [[The Photographer|photoboard]] as [[the Magician]] waits to accumulate the total amount of [[Lum (UbiArt games)|Lums]] that were collected throughout the level. | ||
{{clear}} | {{clear}} | ||
Revision as of 03:09, 27 August 2019
| Best Original Score | |||||||||||
|---|---|---|---|---|---|---|---|---|---|---|---|
 | |||||||||||
| ← Crazy Bouncing | Wind or Lose → | ||||||||||
Best Original Score is the second level of the Desert of Dijiridoos, the second world in Rayman Origins. The heroes will use friendly green birds throughout the level to advance, and use small platforms to deactivate blocking electrical shocks. This level is the first one from this world and ninth overall that's included in the Back to Origins mode in Rayman Legends.
Original version
Area 1
As the heroes enter the level, the Magician can be seen to their left; he gives them some information about saving Electoon cages, and popping bubblized enemies to earn more Lums. Now the heroes can move on, jumping on friendly green birds that remain stationary on music sheets. The first Skull Coin can be found by passing a water current, under a bad Red Bird. Afterwards, they will encounter another Red Bird bouncing a platform which makes the friendly green [bird#In Rayman Origins|birds]] appear or disappear. The heroes can defeat the bad bird and use the friendly ones to advance. The rounded bird can be crush attacked in order to reach the second Skull Coin of the level. A little while later, after destroying some Darktoons, an Electoon cries for help. To reach the secret area, the heroes must perform walljumps and climb to the top, nearby are some some helmet birds. Once the Electoons are saved, the heroes can proceed to the exit.

Secret area 1

The cage can be found at the bottom of the area. The heroes will need to glide in order to safely destroy the Red Birds as they descend. Once they are destroyed, the cage can then be broken.
Relic 1

The first relic can be found above the exit in this area.
Area 2
The heroes will need to advance, while avoiding some electrical currents. Afterwards, the heroes have to use a small green bird in order to pass more electrical currents; the bird will release a Skull Coin in a bubble, the third coin of the level. As the heroes approach the exit, there is a bumper notebird that nears it; the heroes can obtain the fourth Skull Coin if they crush attack the bird, then the exit can be found beneath the coin.
-

-
 The fourth Skull Coin.


Area 3
The heroes will need to use more friendly birds and advance to where they will encounter several electrical currents. All of the currents can be temporarily deactivated by jumping on a small platform. There is a switch that can make three green birds appear if activated; performing a crush attack on the last one will help the heroes reach the fifth Skull Coin of the level, located next to a spiky bird. The exit can be found ahead, next to a sleeping Red Bird.
-
 Electrical shocks that can be deactivated from using the stationary platform.
 -
 The fifth Skull Coin of the level.


Area 4
As the heroes destroy a few Red Birds along the way, more electrical currents will block their path. Using a small platform to deactivate them and taking the higher path will result in them reaching the sixth Skull Coin. The second secret area is not too far away; the heroes need to perform walljumps to ascend in order to reach it. Once the Electoons are saved, the heroes must activate two groups of friendly birds, the others will appear by themselves, as if they were linked to a gendoor. The heroes can reach the exit by using the Swingman.
Secret area 2

In this very dark area, the heroes must destroy some Helmet Birds and a Blowing Bird. Once all are defeated, the cage can be broken.
Relic 2
The second relic can be found in this area just after the heroes pass some piano keys.
Area 5

The heroes must destroy the sleeping Red Birds in order for it to be possible to break the Electoon cage. Breaking the cage ends the level, then the heroes will pose on a photoboard as the Magician waits to accumulate the total amount of Lums that were collected throughout the level.
| Best Original Score | ||||||||
|---|---|---|---|---|---|---|---|---|
 | ||||||||
| ← Poor Little Daisy | Tricky Winds → | |||||||
Back to Origins
This level is playable in the Back to Origins mode in Rayman Legends as the first one from Desert of Dijiridoos. There aren't many notable differences between the versions; except the notable differences that appear in every other Back to Origins level.
-
 The beginning of the level, with already some notable differences.
 -
 The first secret area.
 -
 Another look of the same area.
 -
-
 Turnips appear in the Back to Origins levels.
 -
 Teensies replace many of the Skull Coins.
 -
 The second secret area, this time in Rayman Legends.
 -
 The final area of the level.


Trivia
- If the player collected all of the Electoons in this level and the previous levels, the count will be at 45. This is enough to unlock the second Tricky Treasure level, Cacophonic Chase.
External links
- Best Original Score playthrough at YouTube (PC version) (Normal walkthrough + Lums Medal)
- Best Original Score playthrough at YouTube (PC version) (Speed Trophy)